Vol.45 - Protel
Vol.45 - Protel
Vol.45 - Protel

Create successful ePaper yourself
Turn your PDF publications into a flip-book with our unique Google optimized e-Paper software.
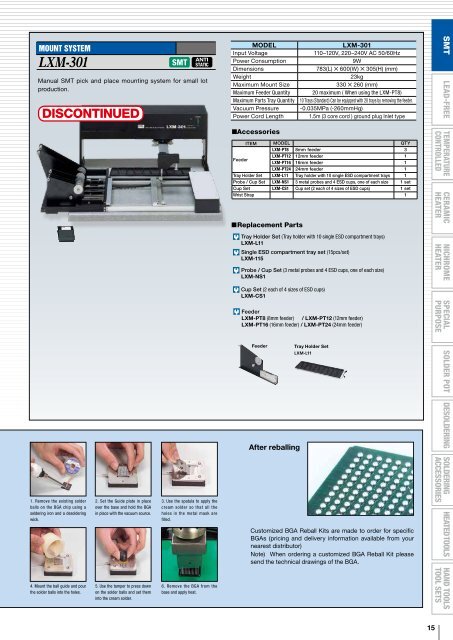
Mount System<br />
LXM-301<br />
Manual SMT pick and place mounting system for small lot<br />
production.<br />
discontinued<br />
SMT<br />
ANTI<br />
STATIC<br />
MODEL<br />
Input Voltage<br />
Power Consumption<br />
Dimensions<br />
Weight<br />
Maximum Mount Size<br />
Maximum Feeder Quantity<br />
Maximum Parts Tray Quantity<br />
Vacuum Pressure<br />
Power Cord Length<br />
■Accessories<br />
LXM-301<br />
110–120V, 220–240V AC 50/60Hz<br />
9W<br />
783(L) 5 600(W) 5 305(H) (mm)<br />
23kg<br />
330 5 260 (mm)<br />
20 maximum ( When using the LXM-PT8)<br />
10 Trays (Standard) Can be equipped with 20 trays by removing the feeder.<br />
-0.035MPa (-260mmHg)<br />
1.5m (3 core cord ) ground plug Inlet type<br />
ITEM MODEL QTY<br />
LXM-PT8 8mm feeder 3<br />
Feeder<br />
LXM-PT12 12mm feeder 1<br />
LXM-PT16 16mm feeder 1<br />
LXM-PT24 24mm feeder 1<br />
Tray Holder Set LXM-L11 Tray holder with 10 single ESD compartment trays 1<br />
Probe / Cup Set LXM-NS1 3 metal probes and 4 ESD cups, one of each size 1 set<br />
Cup Set LXM-CS1 Cup set (2 each of 4 sizes of ESD cups) 1 set<br />
Wrist Strap 1<br />
■Replacement Parts<br />
Tray Holder Set (Tray holder with 10 single ESD compartment trays)<br />
LXM-L11<br />
Single ESD compartment tray set (15pcs/set)<br />
LXM-115<br />
Probe / Cup Set (3 metal probes and 4 ESD cups, one of each size)<br />
LXM-NS1<br />
Cup Set (2 each of 4 sizes of ESD cups)<br />
LXM-CS1<br />
Feeder<br />
LXM-PT8 (8mm feeder) / LXM-PT12 (12mm feeder)<br />
LXM-PT16 (16mm feeder) / LXM-PT24 (24mm feeder)<br />
SMT LEAD-FREE TEMPERATURE<br />
CONTROLLED<br />
CERAMIC<br />
HEATER<br />
NICHROME<br />
HEATER<br />
SPECIAL<br />
PURPOSE<br />
1. Remove the existing solder<br />
balls on the BGA chip using a<br />
soldering iron and a desoldering<br />
wick.<br />
4. Mount the ball guide and pour<br />
the solder balls into the holes.<br />
2. Set the Guide plate in place<br />
over the base and hold the BGA<br />
in place with the vacuum source.<br />
5. Use the tamper to press down<br />
on the solder balls and set them<br />
into the cream solder.<br />
3. Use the spatula to apply the<br />
cream solder so that all the<br />
holes in the metal mask are<br />
filled.<br />
6. Remove the BGA from the<br />
base and apply heat.<br />
Feeder<br />
After reballing<br />
Tray Holder Set<br />
LXM-L11<br />
Customized BGA Reball Kits are made to order for specific<br />
BGAs (pricing and delivery information available from your<br />
nearest distributor)<br />
Note) When ordering a customized BGA Reball Kit please<br />
send the technical drawings of the BGA.<br />
SOLDER POT DESOLDERING SOLDERING<br />
ACCESSORIES<br />
HEATED TOOLS HAND TOOLS<br />
TOOL SETS<br />
15