Flash Padlock® 2 User Manual - Corsair
Flash Padlock® 2 User Manual - Corsair
Flash Padlock® 2 User Manual - Corsair

You also want an ePaper? Increase the reach of your titles
YUMPU automatically turns print PDFs into web optimized ePapers that Google loves.
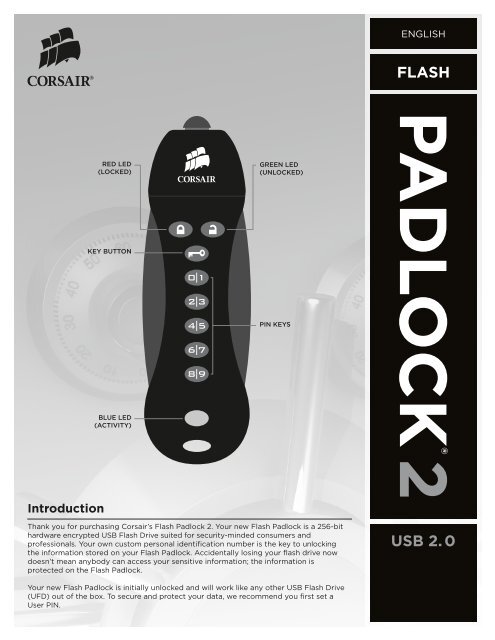
Introduction<br />
reD LeD<br />
(LockeD)<br />
key BUtton<br />
BLUe LeD<br />
(ActIvIty)<br />
Green LeD<br />
(UnLockeD)<br />
PIn keys<br />
Thank you for purchasing <strong>Corsair</strong>’s <strong>Flash</strong> Padlock 2. Your new <strong>Flash</strong> Padlock is a 256-bit<br />
hardware encrypted USB <strong>Flash</strong> Drive suited for security-minded consumers and<br />
professionals. Your own custom personal identification number is the key to unlocking<br />
the information stored on your <strong>Flash</strong> Padlock. Accidentally losing your flash drive now<br />
doesn’t mean anybody can access your sensitive information; the information is<br />
protected on the <strong>Flash</strong> Padlock.<br />
Your new <strong>Flash</strong> Padlock is initially unlocked and will work like any other USB <strong>Flash</strong> Drive<br />
(UFD) out of the box. To secure and protect your data, we recommend you first set a<br />
<strong>User</strong> PIN.<br />
ENGLISH<br />
FLASH<br />
USB 2. 0
2<br />
LED Indicators<br />
Your <strong>Flash</strong> Padlock comes with three different LED indicators on the top side of the unit. Each LED indicator,<br />
whether it’s solid or flashing or appears with another LED indicator all provide feedback to you on the current state<br />
of the <strong>Flash</strong> Padlock. Review chart below to view the definition of each LED display option.<br />
LED InDIcAtIon ExpLAnAtIon<br />
All indicators off Drive is in sleep mode<br />
Green LED blink Drive is unlocked and ready for use<br />
Red LED blink Drive is locked<br />
Red and green LEDs blink in unison Ready for user PIN input<br />
Red and green LEDs double blink Ready for master PIN input<br />
Red and green LEDs lit Change of PIN initiated<br />
Green LED lit Drive is connected to USB port and unlocked<br />
Blue LED blinking Drive is active<br />
Blue LED lit Drive is connected to USB port and unlocked<br />
Alternating red and green LEDs blinking Error<br />
<strong>User</strong> operation<br />
Steps below show how users can Set or Change <strong>User</strong> PIN, and Lock or Unlock your <strong>Flash</strong> Padlock.<br />
Setting <strong>User</strong> pIn<br />
Your <strong>Flash</strong> Padlock comes out of the box without any set <strong>User</strong> PIN. Until the <strong>User</strong> PIN is set, your <strong>Flash</strong> Padlock is<br />
unsecure allowing any user access to view your files on the <strong>Flash</strong> Drive. We recommend you set a custom <strong>User</strong> PIN<br />
immediately upon receipt of your <strong>Flash</strong> Padlock.<br />
DIrEctIonS ExpLAnAtIon<br />
1. Press and hold the KEY button for 3 seconds. Both red and green LEDs will illuminate.<br />
2. Enter desired PIN using the PIN keys. A user PIN may be 4 to 10 digits long. Both red and green LEDs will blink once and<br />
then remain lit.<br />
3. Press and hold KEY button. Both red and green LEDs will blink in unison.<br />
4. Re-enter your PIN to confirm.<br />
5. Press and release KEY button. Green LED will flash.<br />
Unlocking your <strong>Flash</strong> padlock using a <strong>User</strong> pIn<br />
Once a <strong>User</strong> PIN is set, all files stored on the <strong>Flash</strong> Padlock are secure and not viewable. In order to read, or write to<br />
your <strong>Flash</strong> Padlock, you must first unlock the drive with your <strong>User</strong> PIN.<br />
DIrEctIonS ExpLAnAtIon<br />
1. Press and release the KEY button. Both red and green LEDS will blink in unison.<br />
2. Enter your user PIN using the PIN keys.<br />
3. Press and release the KEY button. Green LED will blink for 20 seconds.<br />
4. Insert drive into USB port. Green LED will remain lit while unit is connected<br />
to USB port.<br />
Note your Padlock will automatically lock if the device hasn’t been inserted into a computer within 20 seconds.
Locking your <strong>Flash</strong> padlock<br />
After you use your <strong>Flash</strong> Padlock, we recommend locking your <strong>Flash</strong> Padlock to protect your stored files on the<br />
<strong>Flash</strong> drive.<br />
DIrEctIonS ExpLAnAtIon<br />
1. Remove your <strong>Flash</strong> Padlock from the USB port. LEDs will turn off.<br />
Keeping your <strong>Flash</strong> padlock Unlocked<br />
Your <strong>Flash</strong> Padlock is designed to automatically lock after removal from USB port. You may want to keep your <strong>Flash</strong><br />
Padlock from automatically locking if you intend to use your <strong>Flash</strong> Padlock repeatedly between multiple systems.<br />
DIrEctIonS ExpLAnAtIon<br />
1. Unlock your <strong>Flash</strong> Padlock using directions earlier in Unlock your <strong>Flash</strong><br />
Padlock.<br />
2. Press and hold the KEY button for 3 seconds. Both red and green LEDs will illuminate<br />
3. Release KEY button.<br />
4. Press and release KEY button. Both red and green LEDs will blink in unison.<br />
5. Press and release KEY button. Green LED will blink.<br />
change <strong>User</strong> pIn<br />
<strong>Corsair</strong> recommends regularly changing your <strong>User</strong> PIN in order to prevent unauthorized access to your <strong>Flash</strong> Padlock.<br />
DIrEctIonS ExpLAnAtIon<br />
1. Press and release the KEY button.<br />
2. Enter your current user PIN using the PIN keys.<br />
Both red and green LEDS will blink in unison.<br />
3. Press and release the KEY button. Green LED will blink for 20 seconds.<br />
4. Press and hold the KEY button for 3 seconds while green LED is blinking. Both red and green LEDs will illuminate.<br />
5. Enter new PIN using the PIN keys. A user PIN may be 4 to 10 digits long. Both red and green LEDs will blink once and<br />
then remain lit.<br />
6. Re-enter your new PIN to confirm. Both red and green LEDs will blink in unison.<br />
7. Press and release KEY button. Green LED will flash.<br />
Master pIn Functions<br />
A second PIN can be created to unlock your <strong>Flash</strong> Padlock 2, in case you forget the primary user PIN.<br />
change <strong>User</strong> pIn<br />
DIrEctIonS ExpLAnAtIon<br />
1. Drive must be unlocked and in master mode. Go to unlocking with master<br />
PIN below to unlock drive.<br />
2. Double press KEY button. On 2nd press of KEY button, press and hold<br />
down KEY button for 3 seconds.<br />
3. Enter desired master PIN. Master PIN can be 4-10 digits long.<br />
Green and red LEDs will illuminate. After 2nd<br />
KEY button release, green and red LEDs will<br />
blink twice.<br />
4. Press and release KEY button. Green and red LEDs will blink.<br />
5. Re-enter master PIN.<br />
6. Press and release KEY button. Green LED will double blink if successful.<br />
3
4<br />
Unlock with Master pIn<br />
Unlocking your <strong>Flash</strong> Padlock with a master PIN will erase the user PIN setting. The content on the drive will not be<br />
deleted and the drive will not be secure.<br />
DIrEctIonS ExpLAnAtIon<br />
1. Double press KEY button. Green and red LEDs will double blink.<br />
2. Enter master PIN using PIN keys.<br />
3. Press and release KEY button. Green LED will double blink.<br />
4. Drive is now unlocked and unsecure and user PIN has been reset.<br />
troubleshooting<br />
Dead Battery<br />
Your <strong>Flash</strong> Padlock comes with an internal battery. If the internal battery is fully discharged, you may still continue<br />
using your <strong>Flash</strong> Padlock.<br />
1. Connect your <strong>Flash</strong> Padlock to a USB port on any computer.<br />
2. Enter a user or master PIN on your <strong>Flash</strong> Padlock to unlock the drive, while your drive is connected to the<br />
computer.<br />
The internal battery will automatically charge when connected to a USB port on your computer. We recommend<br />
keeping your <strong>Flash</strong> Padlock connected to your computer for 1 hour to fully charge the internal battery.<br />
Lost your <strong>User</strong> pIn? (no Master pIn Set)<br />
If you lose your user PIN, you’ll need to reset the <strong>Flash</strong> Padlock, but all the data on the drive will be completely<br />
erased. If you have a Master PIN set, then please proceed to section below to recover use of your drive without<br />
erasing your stored data.<br />
1. Press and hold KEY and 0/1 buttons simultaneously for 3 seconds.<br />
2. notE ALL DAtA WILL BE LoSt Upon coMpLEtIon oF tHIS StEp. Enter 9-1-1 using the PIN keys and then<br />
press the KEY button. The <strong>Flash</strong> Padlock will now be unlocked and all data will be lost.<br />
3. Connect <strong>Flash</strong> Padlock to a USB port and format the drive<br />
4. Your user PIN has been erased and your <strong>Flash</strong> Padlock is unlocked. Please set a new PIN to secure your data.<br />
Lost your <strong>User</strong> pIn (Master pIn Set)<br />
If your <strong>Flash</strong> Padlock has a master PIN, you may recover the use of your drive and gain access to your data.<br />
1. Double press the KEY button.<br />
2. Enter master PIN using key PIN keys.<br />
3. notE USEr pIn WILL BE DELEtED Upon coMpLEtIon oF tHIS StEp, BUt tHE DAtA WILL StILL BE<br />
AVAILABLE. Press KEY button.<br />
4. Your drive will be unlocked and ready for use.<br />
We recommend resetting your user PIN to secure the data on your drive. The drive will stay unlocked and your data<br />
will not be protected until a user PIN is created.<br />
Hacking Detection<br />
After 5 unsuccessful user PIN entry attempts, your <strong>Flash</strong> Padlock will be disabled for 2 minutes. The red LED will<br />
blink to indicate the unit has been locked. After 2 minutes, you can attempt to unlock your <strong>Flash</strong> Padlock.<br />
For More Information<br />
You can find a frequently updated list of questions and answers at www.corsair.com/faq. Or, you can visit the<br />
support section of our web site at www.corsair.com.<br />
© 2010, <strong>Corsair</strong> Memory, Inc. All rights reserved. <strong>Corsair</strong>, the <strong>Corsair</strong> logo, and other <strong>Corsair</strong> marks are owned by <strong>Corsair</strong> and may be registered. All other trademarks are the<br />
property of their respective owners. <strong>Corsair</strong> assumes no responsibility for any errors that may appear in this manual. Information contained herein is subject to change without notice.