
Create successful ePaper yourself
Turn your PDF publications into a flip-book with our unique Google optimized e-Paper software.
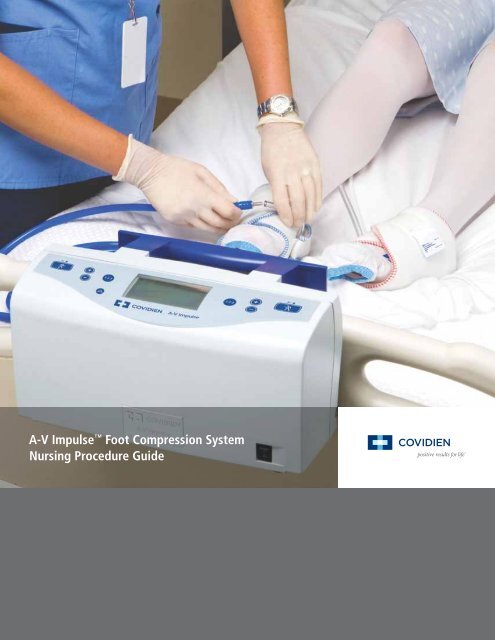
A-V Impulse Foot Compression System<br />
Nursing Procedure Guide
A-V Impulse Foot Compression System<br />
The A-V Impulse foot compression system has been developed to mimic the natural<br />
hemodynamic effects of walking and weight bearing. Upon every step, the plantar<br />
arch is flattened, causing an immediate evacuation of blood from the plexus of<br />
veins in the bottom of the foot. This action sends a column of blood up the leg<br />
and back to the heart. The ImPad rigid sole foot covers are designed with a hard<br />
sole, which contains and directs the impulse to the bottom of the foot. This action<br />
mimics the natural hemodynamic effect of ambulation and has been clinically<br />
proven to reduce this incidence of VTE as well as post operative swelling and pain.
Getting Started<br />
You will need:<br />
• ImPad rigid sole foot cover<br />
• A-V Impulse foot<br />
compression system<br />
• Tubing set<br />
• T.E.D. anti-embolism<br />
stockings or stockinette<br />
(optional)<br />
<strong>Sizing</strong><br />
ImPad rigid sole foot covers are available according to patient’s shoe size and foot circumference.<br />
Consult the sizing chart below before selecting an ImPad rigid sole foot cover for your patient.<br />
ImPad Rigid Sole Foot Cover Latex Free<br />
Women’s<br />
Shoe Size<br />
Men’s<br />
Shoe Size Size Item Code<br />
Foot<br />
Circumference<br />
5½ - 9 4½ - 8 Medium 5065 up to 12"<br />
9½ - 11½ 8½ - 12½ Large 5075 up to 13"<br />
9½ - 12½ 8½ - 13½ Extra Large 5107 13-18"<br />
Sterile ImPad Rigid Sole Foot Cover<br />
Style Size Item Code<br />
Sterile Right Foot One Size Fits All 6066<br />
Sterile Left Foot One Size Fits All 6067
Application<br />
1. Apply T.E.D. anti-embolism stocking<br />
or stockinette over foot and ankle.<br />
Avoid wrinkles. (optional)<br />
2. Select appropriate ImPad foot cover.<br />
Note: ImPad foot covers are available in color<br />
distinction. Red: Left Foot, Blue: Right Foot.<br />
3. Place foot centrally on the ImPad foot cover so that<br />
the plantar arch is directly above the hard rigid<br />
sole as shown by the graphics on the inflation pad.<br />
4. Wrap the medial side over the top of the<br />
foot and then overlap the lateral side of<br />
the ImPad foot cover. Pull to fit “sneaker<br />
tight” and secure in place with the tab.<br />
5. Next, loosely position the rear strap around<br />
the back of the heel and secure medially.
System Operation<br />
1. Connect tubing to the controller by pushing<br />
the black connector firmly into the output<br />
socket on the rear panel of the controller. To<br />
disconnect, pull the connector from the socket.<br />
2. Power on the controller by pressing the black<br />
power switch located on the front lower right<br />
of the controller.<br />
Note: The controller will initiate a brief<br />
self-test followed by a 5 second countdown<br />
shown on the LCD display.<br />
3. Press the run/stop buttons on the<br />
top panel to activate each channel<br />
being used. (left, right, or both)<br />
4. Check that the impulse is felt directly<br />
under the arch of the foot. If not, adjust<br />
the ImPad foot cover accordingly.<br />
5. Check regularly for patient comfort, tenderness<br />
and skin integrity per hospital protocol.<br />
6. For optimum results, make sure patient is seated<br />
head up, feet down (reverse trendelenberg position).
Sterile ImPad Rigid Sole Foot Cover<br />
1. Apply non-sterile foot cover to<br />
non-operative limb as described previously<br />
in application instructions on page 4.<br />
2. After sterilizing field, apply the sterile foot cover<br />
to the foot of the operative limb. When applying<br />
the ImPad foot cover, be careful to ensure<br />
that the tubing remains in the sterile field.<br />
3. Place foot centrally on top of the ImPad foot<br />
cover as shown by the graphic on inflation<br />
bladder. The bladder must be located<br />
directly under the arch of the foot.<br />
4. Wrap the medial side over the top of the<br />
foot and then overlap the lateral side of<br />
the ImPad foot cover. Pull to fit “sneaker<br />
tight” and secure in place with the tab.<br />
5. Next, loosely position the rear strap around<br />
the back of the heel and secure medially.<br />
6. Check to ensure the ImPad foot cover<br />
fits securely on patient foot.<br />
7. Lift patient’s leg to estimate the<br />
tubing length required to perform the<br />
intraoperative limb manipulation.<br />
8. Secure the tubing by twisting the sterile drape<br />
around the tubing and clip. This will prevent the<br />
portion of tubing required for the limb manipulation<br />
from dropping below the operating table.<br />
9. Connect tubing to the controller by pushing the<br />
black connector firmly into the output socket on the<br />
rear panel of the controller.<br />
NOTE: Unlike the non-sterile ImPad foot cover,<br />
the sterile ImPad foot cover’s clear tubing is<br />
ATTACHED - please do not attempt to use blue<br />
tubing set with sterile ImPad foot cover.
Alarm Codes<br />
Ault Code 1:<br />
tubing disconnect<br />
Check the tubing connection at the back of the<br />
controller and at the ImPad rigid sole foot cover.<br />
Ensure no leaks are present in the tubing set.<br />
FAult Code 2:<br />
tubing Kink<br />
Check the tubing set for a kink or blockage.<br />
FAult Code 3:<br />
low Pressure Alarm<br />
Check the fit of ImPad foot covers to<br />
ensure they are not too loose.<br />
FAult Code 4:<br />
High Pressure Alarm*<br />
Check the fit of ImPad foot covers to<br />
ensure they are not too tight.<br />
* For patient safety, excess pressure is immediately<br />
vented and controller operation is suspended.
Tips and Tricks<br />
Swelling Reduction<br />
The A-V Impulse foot compression<br />
system is indicated to reduce swelling<br />
in the lower limb. Over time, swelling<br />
reduction could affect the fit of the ImPad<br />
foot cover, causing an alarm. This alarm<br />
can easily be addressed by readjusting<br />
the ImPad foot cover for a proper fit.<br />
duplicate Alarms<br />
To avoid duplicate alarms when adjusting<br />
one ImPad foot cover (e.g., left) to correct<br />
an alarm, it is often a good idea to adjust<br />
the other (e.g., right) at the same time.<br />
Patient Comfort<br />
Should a patient have difficulty adapting<br />
to the foot compression therapy, consider<br />
using one of the Preset Operating<br />
Parameters by pressing the button*.<br />
(Preset 3 is designed to allow the patient<br />
to become accustomed to the therapy)<br />
* Always consult the physician prior to<br />
adjusting the default pressure parameters.<br />
See the Operators Manual for more<br />
detailed information on Presets.<br />
For additional information, log on to<br />
www.covidien.com/dvtcompression<br />
15 Hampshire Street<br />
Mansfield, MA<br />
02048<br />
Patient education<br />
Empower your patient to take an active<br />
role in their recovery. Your local <strong>Covidien</strong><br />
Representative can supply you with A-V<br />
Impulse foot compression system Patient<br />
Education Pads and DVT Awareness Literature<br />
to help educate your patients on the risks of<br />
VTE and the importance of prophylaxis.<br />
Continuing education<br />
Contact your local <strong>Covidien</strong> Representative<br />
to schedule CEU programs on VTE<br />
Prophylaxis for your nursing staff.<br />
COVIDIEN, COVIDIEN with logo, <strong>Covidien</strong> logo and positive results for life are U.S. and internationally<br />
registered trademarks of <strong>Covidien</strong> AG. Other brands are trademarks of a <strong>Covidien</strong> company © 2011 <strong>Covidien</strong>.<br />
QB2015 VTH0331 07/11<br />
1-800-962-9888<br />
508-261-8000<br />
www.covidien.com