three phase lcd multifunction meters
three phase lcd multifunction meters
three phase lcd multifunction meters
Create successful ePaper yourself
Turn your PDF publications into a flip-book with our unique Google optimized e-Paper software.
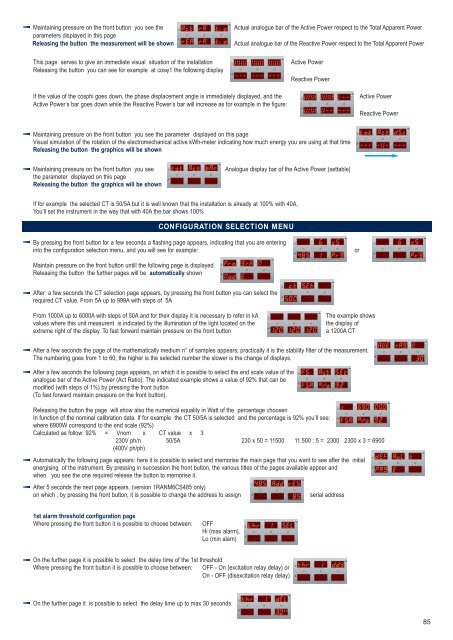
Maintaining pressure on the front button you see the<br />
para<strong>meters</strong> displayed in this page<br />
Releasing the button the measurement will be shown<br />
This page serves to give an immediate visual situation of the installation<br />
Releasing the button you can see for example at cosϕ1 the following display<br />
Actual analogue bar of the Active Power respect to the Total Apparent Power<br />
Actual analogue bar of the Reactive Power respect to the Total Apparent Power<br />
Active Power<br />
Reactive Power<br />
If the value of the cosphi goes down, the <strong>phase</strong> displacement angle is immediately displayed, and the<br />
Active Power’s bar goes down while the Reactive Power’s bar will increase as for example in the figure:<br />
Active Power<br />
Reactive Power<br />
Maintaining pressure on the front button you see the parameter displayed on this page<br />
Visual simulation of the rotation of the electromechanical active kWh-meter indicating how much energy you are using at that time<br />
Releasing the button the graphics will be shown<br />
Maintaining pressure on the front button you see<br />
the parameter displayed on this page<br />
Releasing the button the graphics will be shown<br />
Analogue display bar of the Active Power (settable)<br />
If for example the selected CT is 50/5A but it is well known that the installation is already at 100% with 40A,<br />
You’ll set the instrument in the way that with 40A the bar shows 100%<br />
CONFIGURATION SELECTION MENU<br />
By pressing the front button for a few seconds a flashing page appears, indicating that you are entering<br />
into the configuration selection menu, and you will see for example:<br />
or<br />
Maintain pressure on the front button untill the following page is displayed.<br />
Releasing the button the further pages will be automatically shown<br />
After a few seconds the CT selection page appears, by pressing the front button you can select the<br />
required CT value. From 5A up to 999A with steps of 5A<br />
From 1000A up to 6000A with steps of 50A and for their display it is necessary to refer in kA<br />
values where this unit measurent is indicated by the illumination of the light located on the<br />
extreme right of the display. To fast forward maintain pressure on the front button<br />
The example shows<br />
the display of<br />
a 1200A CT<br />
After a few seconds the page of the mathematically medium n° of samples appears; practically it is the stability filter of the measurement.<br />
The numbering goes from 1 to 60; the higher is the selected number the slower is the change of displays.<br />
After a few seconds the following page appears, on which it is possible to select the end scale value of the<br />
analogue bar of the Active Power (Act Ratio). The indicated example shows a value of 92% that can be<br />
modified (with steps of 1%) by pressing the front button<br />
(To fast forward maintain pressure on the front button).<br />
Releasing the button the page will show also the numerical equality in Watt of the percentage choosen<br />
In function of the nominal calibration data. If for example the CT 50/5A is selected and the percentage is 92% you’ll see:<br />
where 6900W correspond to the end scale (92%)<br />
Calculated as follow: 92% = Vnom x CT value x 3<br />
230V ph/n 50/5A 230 x 50 = 11500 11.500 : 5 = 2300 2300 x 3 = 6900<br />
(400V ph/ph)<br />
Automatically the following page appears: here it is possible to select and memorise the main page that you want to see after the initial<br />
energising of the instrument. By pressing in succession the front button, the various titles of the pages available appear and<br />
when you see the one required release the button to memorise it.<br />
After 5 seconds the next page appears. (version 1RANM6CS485 only)<br />
on which , by pressing the front button, it is possible to change the address to assign<br />
serial address<br />
1st alarm threshold configuration page<br />
Where pressing the front button it is possible to choose between: OFF OFF,<br />
Hi (max alarm),<br />
Lo (min alarn)<br />
On the further page it is possible to select the delay time of the 1st threshold<br />
Where pressing the front button it is possible to choose between: OFF - On (excitation relay delay) or<br />
On - OFF (disexcitation relay delay)<br />
On the further page it is possible to select the delay time up to max 30 seconds<br />
85


