ŠkodaOctavia CAR RADIO AUDIENCE - Media Portal - škoda auto
ŠkodaOctavia CAR RADIO AUDIENCE - Media Portal - škoda auto
ŠkodaOctavia CAR RADIO AUDIENCE - Media Portal - škoda auto

Create successful ePaper yourself
Turn your PDF publications into a flip-book with our unique Google optimized e-Paper software.
<strong>ŠkodaOctavia</strong><br />
<strong>CAR</strong> <strong>RADIO</strong> <strong>AUDIENCE</strong><br />
SIMPLY CLEVER
Contents<br />
Radio . . . . . . . . . . . . . . . . . . . . . . . . . . . . . . . . . . . . . . .<br />
Radio Audience: Overview . . . . . . . . . . . . . . . . . . . .<br />
Important information . . . . . . . . . . . . . . . . . . . . . . . .<br />
Anti-theft protection . . . . . . . . . . . . . . . . . . . . . . . . . .<br />
Basic setting . . . . . . . . . . . . . . . . . . . . . . . . . . . . . . . . . . .<br />
Special functions . . . . . . . . . . . . . . . . . . . . . . . . . . . . . .<br />
Radio mode . . . . . . . . . . . . . . . . . . . . . . . . . . . . . . . . . . .<br />
The CD changer . . . . . . . . . . . . . . . . . . . . . . . .<br />
Using the system . . . . . . . . . . . . . . . . . . . . . . . . . . . . . .<br />
External sources . . . . . . . . . . . . . . . . . . . . . . . . . . . . . . .<br />
Technical short description . . . . . . . . . . . . . . . . . . .<br />
2<br />
2<br />
2<br />
3<br />
3<br />
5<br />
6<br />
10<br />
10<br />
12<br />
13<br />
Contents 1
2<br />
Radio<br />
Radio<br />
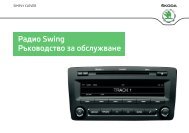
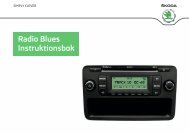
Radio Audience: Overview<br />
A1 Rotary/push knob<br />
− switching on and off (pressing)<br />
− Volume control (rotate)<br />
− other function settings in various menus<br />
A2 Button CD<br />
− Activation of CD mode (CD-DA/CD-R/CD-RW/MP3, multisession)<br />
− Direct selection of the CD via station keys A12<br />
− Activation of the mode for external audio source<br />
A3 Button FM to activate the FM radio mode<br />
A4 Button AS to store the six stations with the strongest reception in the respective<br />
waveband<br />
A5 Button SCAN<br />
− fast search in the respective waveband<br />
− Scroll through the contents of the CD<br />
A6 Buttons � �<br />
− manual station finding in radio mode<br />
− Selecting title in CD mode<br />
A7 Buttons � �<br />
A8<br />
− fast station finding in radio mode<br />
− Pre-winding the title in the CD mode<br />
Button � for adjusting the sound and volume distribution<br />
A9 Button AM to activate the AM radio mode<br />
A10 Button INFO<br />
− Display of radio text information<br />
− Display of additional information of MP3-CDs<br />
A11 Button MENU to call up the menu settings of the parameter for radio or CD<br />
player<br />
A12 Station keys<br />
A13<br />
− store and select the RDS station<br />
− CD selection<br />
− Selecting the parameter for user settings<br />
CD - eject button<br />
A14 CD-case<br />
A15 Display - screen<br />
A16 Button TP for activating the traffic information mode<br />
A17 Button for activating the mode for inserting CD<br />
A18 Button AIM<br />
for setting and playing the function of the traffic reports<br />
Important information<br />
Warranty<br />
The same warranty terms apply for the equipment as for new vehicles.<br />
After the expiration of the warranty, a unit in need of repair will be replaced inexpensively<br />
with a reconditioned, original unit with spare part warranty. However it is<br />
required that there is no housing damage and no unauthorised repair attempts<br />
have been made.<br />
Note<br />
A damage in the sense of the warranty must not be the result from improper<br />
handling of the system or from unprofessional repair attempts. In addition, no<br />
external damage must be present.<br />
Radio mode<br />
The radio should only be used, if the traffic situation permits it.
The volume settings must be selected in such a way that acoustic signals from the<br />
outside, such as e.g. a Martins horn from utility vehicles (police cars, ambulances<br />
and fire brigade), can be heard at any time.<br />
WARNING<br />
Please always pay full attention to the traffic situation around you! As the<br />
driver you are fully responsible for the traffic safety. Only use the functions<br />
in such a way that you always maintain the control over your vehicle in all<br />
traffic situations!<br />
Using the display<br />
Carefully handle the display because dents and scratches can occur through pressure<br />
of the finger or contact with sharp objects.<br />
The display can be cleaned with a soft cloth and finger marks can be wiped away<br />
with pure alcohol.<br />
Note<br />
Do not use solvent such as turpentine or petrol as they will corrode the display<br />
surface.<br />
Anti-theft protection<br />
Anti-theft coding<br />
Your radio is equipped with a convenience coding. If the radio is being operated for<br />
the first time, the safety code is not only stored in the radio but also in the vehicle.<br />
After disconnecting and reconnecting the battery, first of all switch on the ignition<br />
and then the radio.<br />
If you wish to install the radio in another vehicle, the safety code must be entered.<br />
In this case, please do not hesitate to contact a Škoda Service Partner or a Škoda<br />
importer.<br />
Radio 3<br />
As the unit only functions after entering the safety code, this practically excludes its<br />
use after a theft - a contribution to increased anti-theft safety.<br />
Note<br />
The code is stored in the instrument cluster. Through this it is <strong>auto</strong>matically<br />
decoded (convenience coding). A manual entry of the code is normally not<br />
necessary.<br />
Code entry<br />
– Switch on the radio if the ignition is on. SAFE is displayed and then<br />
0000.<br />
– Enter the safety code using the station keys A12 .<br />
– Confirm the safety code by pressing the button � .<br />
If you have confirmed a wrongly entered code, you can repeat once again the entire<br />
process.<br />
If the code number is entered incorrectly for the second time, the unit will be<br />
blocked for approx. one hour. It is only possible to repeat the entry of the safety<br />
code after an hour has expired and while the unit is switched on and the ignition<br />
key remains in the ignition lock.<br />
The cycle - two attempts, blocked for an hour - furthermore applies.<br />
Basic setting<br />
Switching the unit on and off<br />
– The system is switched on or off by pressing the rotary/push knob A1<br />
.<br />
If the key is pulled out of the ignition lock when the system is switched on, the<br />
system switches off <strong>auto</strong>matically. You can switch on again the unit by pressing the
4<br />
Radio<br />
rotary/push knob A1 . If the engine is switched off, the unit (protection of the vehicle<br />
battery before discharging) switches off <strong>auto</strong>matically after approx. one hour.<br />
If you have switched off the radio by withdrawing the ignition key, the radio<br />
switches on again once the ignition is on.<br />
Audio settings<br />
– Select the desired parameter after pressing the button � and then<br />
the station key A12 .<br />
– Set the desired value by turning the rotary/push knob A1 .<br />
You can select the following parameters:<br />
• TREBLE - treble setting;<br />
• MIDTONE - midtone setting;<br />
• BASS - bass setting;<br />
• LOUD - in case of low volume level, this function reinforces the range of bass<br />
and treble frequencies;<br />
• MONO.<br />
The selection OFF of the stereo coder is <strong>auto</strong>matically regulated. If the signal is<br />
strong, a stereo reception is made.<br />
The selection ON - under certain circumstances the reception of the stereo signals<br />
can be distorted, even if the signal is strong. e.g. while driving through urbanization.<br />
The stereo coder is deactivated and the reception quality is clearly improved by<br />
activating the force Mono reception.<br />
Note<br />
The text on the display goes out 10 seconds after the last press. After pressing any<br />
button, except the station keys A12 , the setting is finished and the selected values<br />
are stored.<br />
Second level of the audio settings<br />
– You can call up the second level of the audio settings by pressing the<br />
button � and by subsequently pressing the station key A12 �.<br />
You can select between the following parameters:<br />
• BALANCE - setting of the volume ratio between the right and left side;<br />
• FADER - setting of the volume ratio between the front and the rear.<br />
Third level of the audio settings<br />
– You can call up the third level of the audio settings by pressing the<br />
station key A12<br />
� again.<br />
You can select between the following parameters:<br />
GALA<br />
Your radio increases <strong>auto</strong>matically its volume with the increasing vehicle speed. A<br />
higher setting value results in a stronger volume increase.<br />
PDC VOL<br />
If your vehicle is equipped with “parking aid”, the volume is <strong>auto</strong>matically<br />
decreased to a pre-defined value, when the “parking aid” is active.<br />
PH VOL<br />
If your vehicle is equipped with a handsfree system, you can set the desired volume<br />
of the mobile phone calls.<br />
TA VOL<br />
The setting of the minimum volume for receivable traffic reports.<br />
The volume is increased by the value set by this parameter, if its current value is<br />
lower. Otherwise the volume is not changed.
ON VOL<br />
Your radio stores the last volume set before switching off. If the volume is higher<br />
than the value set in the ON VOL, the volume is reduced to this value after switching<br />
on the radio again.<br />
BACK<br />
You can return to the second level of the audio settings by pressing this button.<br />
Special functions<br />
Setting the special functions<br />
More and more broadcasting companies, mainly USW stations transmit<br />
RDS information in addition to the program. E.g the station name and the<br />
traffic status of the set station belong to this information.<br />
Setting the radio functions<br />
– If you press the button MENU , the menu for setting the special functions<br />
is shown on the display.<br />
LEARN<br />
This function enables an interference-free and clear reception as well as a fast<br />
station finding. The radio has its own list of receivable frequencies, which are<br />
arranged according to program identification (PI) and signal strength. This makes it<br />
possible to change to another frequency of the station which can be taken from a<br />
list containing the alternative frequencies of the stations covering the area.<br />
• LEARN ON - the radio constantly updates and classifies all available frequencies<br />
depending on the area in which you are located. This leads to short signal failures;<br />
• LEARN OFF - under certain circumstances the updating of the Learn list can<br />
cause disturbances. Then the radio tests each frequency for switch-over.<br />
Radio 5<br />
REGIONAL<br />
Certain programs of the broadcasting companies are divided into regional<br />
programs at specific times. That is why in individual regions the regional programs<br />
of a station can broadcast different contents.<br />
First of all the unit attempts to set only alternative frequencies of the selected<br />
station.<br />
If the quality is however so low, that there is a risk of a “program loss”, the unit also<br />
accepts “related” frequencies.<br />
• REGIONAL ON - the receiver switches to a regional “related” station, if the<br />
reception of the current station could be interrupted;<br />
• REGIONAL OFF - the receiver can access the regional “related” station unlimited.<br />
SEEK<br />
• SEEK LOCAL - stops the station finding on the local stations with the strongest<br />
signal;<br />
• SEEK DX - stops the station finding on all available stations.<br />
AF<br />
The function alternative frequency (AF) ensures that the best receivable frequency<br />
of the selected station is <strong>auto</strong>matically and precisely set. The replay of the broadcast<br />
can be muted briefly during the search process according to the best receivable<br />
frequency. If no alternative frequency of the set station can be found and the<br />
station no longer offers a satisfactory quality, then please select another station.<br />
Second level for setting the special functions<br />
– You can call up the second level of the setting for special functions by<br />
pressing the button MENU and by subsequently pressing the station<br />
key A12<br />
�.<br />
PDC<br />
If your vehicle is equipped with “parking aid” and after it is activated, the distance<br />
to the obstacle is shown on the display. The distance is shown by a column.
6<br />
Radio<br />
BEEP<br />
Switching on or off the tone signal when storing the radio stations.<br />
PHONE<br />
If your vehicle is equipped with a handsfree system, the volume of the radio is <strong>auto</strong>matically<br />
reduced during a phone call.<br />
TIME<br />
Switching on or off the time display on the display.<br />
TEMP<br />
Switching on or off the outside temperature display on the display.<br />
Third level for setting the special functions<br />
– You can call up the third level of the setting for special functions by<br />
pressing the station key A12 � again.<br />
ILLUM<br />
Switch on (value 1) or switch off (value 2) illumination of the controls for the radio.<br />
AC<br />
If your vehicle is equipped with CLIMATRONIC, a manual change of the setting is<br />
shown on the display. If you wish to see the change, then change the value to ON.<br />
AUX<br />
Your radio is equipped with a connection which enables the play function of<br />
external sources.<br />
BACK<br />
You can return to the previous level of the setting by pressing this button.<br />
External amplifier<br />
If you have connected an external amplifier, you can choose between six<br />
audio effects.<br />
– Press the button � and select with the station keys A12 between the<br />
offered audio effects:<br />
• LINEAR - Standard play function without special weighting, adapted to all<br />
music types and voice play function;<br />
• SPEECH - suppresses surrounding noises so that the voice can be clearly heard;<br />
• ROCK - suitable for play function of rock music;<br />
• CLASSIC - suitable for play function of classic music;<br />
• POP - suitable for play function of pop music;<br />
• LIVE - suitable for play function of Live concerts or recording.<br />
Radio mode<br />
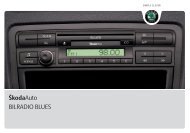
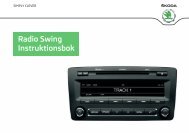
Display contents<br />
The display shows the following content:<br />
A<br />
the selected radio station (its frequency or designation);<br />
Fig. 1 Radio mode
AB the frequencies or the designations of the radio stations in the memory of the<br />
radio;<br />
AC the symbol points to the already selected radio station;<br />
AD Activation for the reception of traffic reports;<br />
AE current time;<br />
AF outside temperature;<br />
AG selected waveband.<br />
Waveband switch-over<br />
Your radio is equipped with FM and AM wavebands. They are divided in 6 memory<br />
levels, i.e. 3 levels for the FM waveband and 3 levels for the AM waveband. There<br />
are each 6 memory spaces available on these levels.<br />
Activation of the FM waveband<br />
The FM waveband is activated when pressing the button FM . By pressing the<br />
button several times, you can move between the memory levels FM1, FM2 and FM-<br />
AS.<br />
Activation of the AM waveband<br />
The AM waveband is activated when pressing the button AM . By pressing the<br />
button several times, you can move between the memory levels AM1, AM2 and<br />
AM-AS.<br />
The process of searching for and storing the radio stations<br />
Manual search<br />
– Set the frequency of the desired radio station by pressing the button<br />
� or � .<br />
Radio 7<br />
Automatic station finding SEEK<br />
– The radio searches for the next radio station in the selected waveband<br />
by pressing the button � or � .<br />
Store station<br />
– After selecting the radio station, hold the station key A12 , on which it<br />
should be stored until it briefly switches to mute and a brief signal<br />
sounds.<br />
Automatic station finding with storing the radio stations<br />
– Press the button AS . An <strong>auto</strong>matic station finding is started during<br />
which the 6 stations with the strongest signal are stored. The display<br />
STORING appears on the display and the volume is reduced.<br />
When storing the radio stations on the station keys A12 is finished, you can call up<br />
the desired radio station by pressing a station key A12 .<br />
Note<br />
The stored radio stations are updated and stored once again by repetitively<br />
pressing the button AS .<br />
Radio text<br />
Certain radio stations transmit additional text information - called radio<br />
text.<br />
– The information of the radio text is displayed by pressing the button<br />
INFO<br />
.<br />
Note<br />
• The text information must not be available to all radio stations.<br />
• Depending upon the quality of the received signal, the radio needs a specific<br />
time, in order to correctly read all the illustrated characters.
8<br />
Radio<br />
• If the selected radio station does not transmit any radio text, the message TEXT<br />
UNAVAILABLE appears.<br />
Traffic reports<br />
Activating and deactivating the traffic information<br />
Press the button TP , TP appears in the display. If a set radio station does not<br />
transmit a traffic report, the radio searches for a station which transmits the traffic<br />
report. TP SEEK is displayed on the display.<br />
If no radio station which transmits the traffic reports is found, NO INFO is shown on<br />
the display.<br />
An incoming traffic report <strong>auto</strong>matically interrupts the CD play function or listening<br />
to a radio station, which at that moment is not transmitting a traffic report. TRAFFIC<br />
is displayed on the display. At the end of the traffic report, the radio <strong>auto</strong>matically<br />
returns to the original play function.<br />
If you wish to deactivate the traffic information, press once again the button TP , TP<br />
goes out on the display.<br />
Play function of traffic reports<br />
Press the button AIM .<br />
After pressing the station key A12 PLAY the last stored traffic report is replayed. After<br />
its play function, the previously stored traffic reports are <strong>auto</strong>matically replayed.<br />
The recording time, the relevant station name and the number of stored traffic<br />
reports are shown on the display.<br />
You can select between the individual traffic reports using the station keys A12 � or<br />
�.<br />
Deleting traffic reports<br />
The memory for the recording of the traffic reports can take up to 9 reports or up to<br />
4 minutes. Old traffic reports are <strong>auto</strong>matically replaced by new ones.<br />
In order to delete individual traffic reports, press the button AIM and then the<br />
station key A12 DEL.<br />
In order to delete all the traffic reports, press the station key A12 DEL ALL.<br />
Recording traffic reports<br />
Your radio enables you to set 2 time segments, during which the traffic reports can<br />
be stored.<br />
Press the button AIM , AIM RECORDING is displayed in the display.<br />
Press the station key A12 SETUP. There are 2 time segments displayed in the display.<br />
Set the desired time segments by turning the rotary/push knob A1 .<br />
Note<br />
• The information emitted by a radio station can be received while listening to<br />
another radio station. If no reception of traffic reports is possible, NO INFO appears<br />
on the display.<br />
• If you wish to receive no traffic reports, press the station key A12 AIM OFF.<br />
Function SCAN<br />
Stations of a waveband can be played briefly one after the other (for ten<br />
seconds).<br />
– Press the button SCAN , the radio searches <strong>auto</strong>matically all available<br />
stations of the current waveband.<br />
– If you wish to select other radio stations, press the button A12 � or �.<br />
– End the <strong>auto</strong>matic finding by pressing the button A12 OK. The current<br />
radio station remains selected.<br />
– In order to call up the original radio station, press the station key A12<br />
CANCEL.<br />
Program types (PTY)<br />
This function enables a finding of radio stations with the desired program<br />
type.
Selecting program types (PTY)<br />
– Press the button SCAN and then the station key A12 PTY. Rotate the<br />
rotary/push knob A1 and select the desired program type, which is<br />
shown on the display.<br />
– Confirm the selection of the program type by pressing the station key<br />
A12 OK, the radio is switched to mute and starts to search for radio<br />
stations with the desired program type.<br />
– To end the finding and to listen to the found radio station, press the<br />
station key A12<br />
OK or CANCEL, in order to return to the previous<br />
program.<br />
You can select between the following program types:<br />
NONE - not specified WEATHER - weather<br />
NEWS - news FINANCE - finance<br />
AFFAIRS - affairs CHILDREN - children<br />
INFO - information SOCIAL - social<br />
SPORT - sport RELIGION - religious program<br />
EDUCATE - education PHONE IN - phone in live<br />
DRAMA - drama TRAVEL - travel programs<br />
CULTURE - culture LEISURE - leisure<br />
VARIED - various music COUNTRY - country music<br />
POP - pop music JAZZ - jazz music<br />
ROCK - rock music NATION - nation music<br />
EASY - easy music OLDIES - oldies<br />
LIGHT - light music FOLK - folk music<br />
CLASSICS - classic music DOCUMENT - documentaries<br />
OTHER - other program types SCIENCE - science<br />
Radio 9<br />
Note<br />
• If you have selected NONE as program type, the station finding stops on each<br />
radio station.<br />
• If no radio station with the desired program type was found, the radio returns to<br />
the original station.<br />
• The selection of the program type is only possible in the FM waveband.<br />
• The program type ALARM is emitted in case of a national or local threat.
10<br />
The CD changer<br />
The CD changer<br />
Using the system<br />
Inserting the CD<br />
Your radio is equipped with an integrated 6-compartment CD changer,<br />
which can read the formats CD-DA, CD-R/RW/MP3 and multisession.<br />
– Press the button CD . If no CD is inserted, NO CD appears in the<br />
display. If a CD has already been inserted, the play function begins at<br />
the point where the last play function was interrupted.<br />
– Press button A17 . SELECT CD TO INSERT is displayed.<br />
– Press the station key A12 next to the not assigned position NO CD. The<br />
unit is prepared for inserting a CD, PLEASE WAIT is displayed in the<br />
display.<br />
– Wait until INSERT CD is displayed in the display.<br />
– Insert the CD into the CD case A14 .<br />
– After reading the CD, the play function starts <strong>auto</strong>matically.<br />
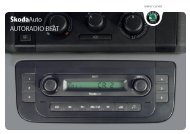
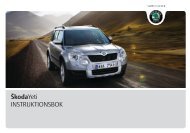
The display shows the following content:<br />
Fig. 2 CD mode<br />
A current title number;<br />
AB Information for playing time;<br />
AC Assignment of the station keys A12 to the CDs, select the relevant CD by pressing;<br />
AD Display of the currently replayed CD;<br />
AE Display of the active REPEAT mode;<br />
AF Display of the active MIX mode.<br />
Caution<br />
The unit differs in the operation control in contrast to other CD players. Do not<br />
attempt to insert a CD, before the display INSERT CD appears in the display.<br />
Note<br />
The complete CD changer can be filled by pressing the button A17 . After the display<br />
LOAD ALL appears, release the button A17 and you will be requested to insert the<br />
CDs one after the other.<br />
Mode of the integrated CD changer<br />
CD selection<br />
– Select a CD by pressing the corresponding station key A12 with the<br />
designation CD1 - CD6. NO CD is displayed for not assigned positions.<br />
Select track<br />
– Press the button � or � during the play function of the CD, in order<br />
to select the previous and/or the next title.<br />
– Press the button � or �<br />
for the fast finding, the reverse or forward<br />
search starts after releasing the button.
Button SCAN<br />
– Press the button SCAN , in order to scroll through the CD. The first 10<br />
seconds of each title are played. At the same time the title number is<br />
displayed in the display.<br />
– In order to call up the <strong>auto</strong>matic station finding, press the station key<br />
A12 OK. The found title is replayed.<br />
End the play function of the CD<br />
– Press the button FM or AM in order to end the play function of the<br />
CD.<br />
Note<br />
If the ejected CD is not removed, it is drawn in again for safety reasons.<br />
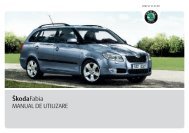
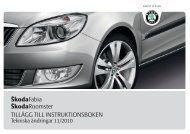
Play function of MP3 data<br />
Fig. 3 Play function of MP3<br />
data<br />
Function SCAN<br />
– Press the button SCAN , in order to scroll through the CD. The first 10<br />
seconds of each title are played. At the same time the title number is<br />
displayed in the display.<br />
The CD changer 11<br />
– In order to select a folder and to scroll through its content, press the<br />
relevant station key A12 .<br />
– In order to call up the <strong>auto</strong>matic station finding, press the station key<br />
A12 OK. The found title is replayed.<br />
Button INFO<br />
– Press the button INFO , the information for the current folder and title<br />
is displayed under MP3 INFO on the display.<br />
Display of additional information<br />
– Press the station key A12 ID3 INFO, the additional information for the<br />
current title is displayed on the display.<br />
The display shows the following content:<br />
A the number of the replayed CD;<br />
AB the number of the folder, from which the current title is replayed;<br />
AC Assignment of the station keys A12 , selection of the previous � or next � folder,<br />
selection of the information display for current title FILE;<br />
AD Display of the currently played title;<br />
AE Expiration of play function time;<br />
AF Information for title. If no information was stored on the CD, UNAVAILABLE<br />
appears in the display.<br />
Selective functions in CD mode<br />
– Press the button MENU<br />
during the CD play function.<br />
The display shows the following functions:<br />
MIX<br />
Play function of titles in random order.<br />
• OFF - Play function in continuous order;
12<br />
The CD changer<br />
• TRACK - Play function of titles in random order in a certain folder;<br />
• FOLDER - is a CD inserted with MP3 data, the titles in random order are played<br />
from randomly selected folders.<br />
PLAY<br />
• CD - play function of standard audio data in the format CD-DA;<br />
• MP3 - play function of data in the MP3 format.<br />
REPEAT<br />
Selection of the mode for repeating the title.<br />
• OFF - Play function in continuous order;<br />
• TRACK - repeated play function of the selected title;<br />
• FOLDER - is a CD inserted with MP3 data, the titles are repeated from the folder,<br />
which was active when starting the repeat mode.<br />
NEXT CD<br />
• AUTO - <strong>auto</strong>matic selection of the next CD;<br />
• MAN - the selected CD is repeatedly played.<br />
Information on how to use a CD<br />
CD to jump<br />
Uneven road surfaces and strong vibrations may cause the CD to jump.<br />
Formation of condensation<br />
When it is cold and after rain showers, moisture can deposit in the CD drive<br />
(condensation). This can effect the CD jump or impair the play function. In such<br />
cases wait until the moisture has dissipated.<br />
Notes for the care of the CDs<br />
If a CD is soiled, please never clean the CD in the direction of a circle but rather with<br />
a soft fluffly cloth from inside to outside. In case of severe layers of dirt we recommend<br />
to clean the CD with a commercially available CD cleaner. Also in this case do<br />
not clean the CD in the direction of a circle but rather from inside to outside and<br />
then let it dry off.<br />
Caution<br />
• Never use liquids such as gasoline, paint thinner or disk cleaner, otherwise the<br />
surface of the CD could get damaged.<br />
• Never expose CDs to direct sun rays!<br />
• Please never write or affix the CD!<br />
Note<br />
Dirt or damage of a CD can lead to difficulties when “reading” the information. The<br />
difficulty in reading the error depends on the dirt or on the severity of the mechanical<br />
damage. Severe scratches cause reading errors which can make the CD jump or<br />
“get stuck”. All CDs must be treated carefully and always be stored in a protective<br />
case.<br />
External sources<br />
Your radio enables the connection of audio units from a wide range, e.g.<br />
portable player.<br />
Activating an external audio source<br />
– By repetitively pressing the button CD activate the external input,<br />
AUX IN... is displayed. The play function starts <strong>auto</strong>matically after<br />
connecting the external source.<br />
– If you wish to set the input sensitivity depending on the signal output<br />
level of the external source, press the station key A12 �.<br />
End play function of the external source<br />
– Press button FM or AM . It starts the play function of the last selected<br />
radio station.<br />
– Press the button CD<br />
, in order to start the play function of the CD.
Setting of the input sensitivity<br />
• AUX LEV 1 - high level, used in particular for notebooks;<br />
• AUX LEV 2 - middle level, used for cassettes or CD player;<br />
• AUX LEV 3 - low level, used for MP3 player;<br />
Note<br />
• Your radio has no control over the level setting of the external source. Make sure<br />
that the highest quality is achieved by a suitable combination of input sensitivity<br />
and output sensitivity of the external source (volume control). You will find detailed<br />
information for this setting in the operating instructions of the units.<br />
Technical short description<br />
Power output<br />
4x20 W at 14,4 V; 25 °C; 10% THD (Total Harmonic Distation)<br />
4x35 W peak power<br />
Digital audio processor with Equalizer according to vehicle model.<br />
Display<br />
Positive FSTN (Film Super Twisted Nematic)<br />
Graphic 200x47 active points<br />
The CD changer 13
Škoda Auto pursues a policy of constant product and model development. We trust that you will understand that changes to models in<br />
terms of shape, equipment and engineering, may be introduced at any time. It is therefore not possible for legal claims to be made<br />
based on the data, illustrations and descriptions contained in this Owner’s Manual.<br />
Reprint, reproduction or translation, either in whole or in part, is not permitted without the written consent from Škoda Auto.<br />
Škoda Auto expressly reserves all rights relating to copyright laws.<br />
We reserve the right to make changes to this document.<br />
Published by ŠKODA AUTO a. s.<br />
© ŠKODA AUTO a.s. 2007
www.skoda-<strong>auto</strong>.com Autorádio Audience<br />
Škoda Auto anglicky 11.07<br />
S00.5610.47.20<br />
1Z0 012 095 AD<br />
*1Z0012095AD*