Download the catalogue - legrand
Download the catalogue - legrand
Download the catalogue - legrand

You also want an ePaper? Increase the reach of your titles
YUMPU automatically turns print PDFs into web optimized ePapers that Google loves.
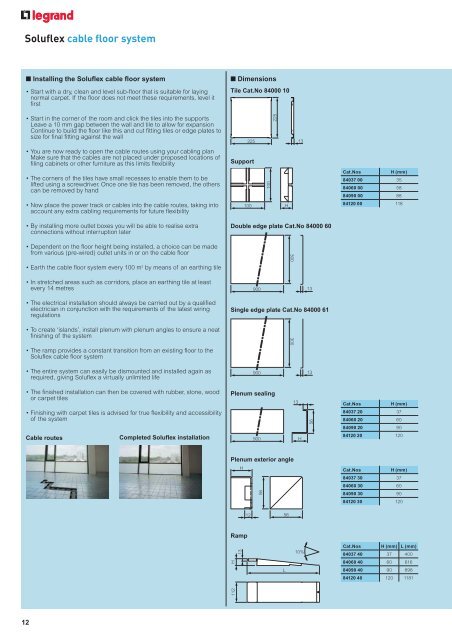
Soluflex cable floor system<br />
Installing <strong>the</strong> Soluflex cable floor system<br />
Start with a dry, clean and level sub-floor that is suitable for laying<br />
normal carpet. If <strong>the</strong> floor does not meet <strong>the</strong>se requirements, level it<br />
first<br />
Start in <strong>the</strong> corner of <strong>the</strong> room and click <strong>the</strong> tiles into <strong>the</strong> supports<br />
Leave a 10 mm gap between <strong>the</strong> wall and tile to allow for expansion<br />
Continue to build <strong>the</strong> floor like this and cut fitting tiles or edge plates to<br />
size for final fitting against <strong>the</strong> wall<br />
You are now ready to open <strong>the</strong> cable routes using your cabling plan<br />
<br />
filing cabinets or o<strong>the</strong>r furniture as this limits flexibility<br />
The corners of <strong>the</strong> tiles have small recesses to enable <strong>the</strong>m to be<br />
lifted using a screwdriver. Once one tile has been removed, <strong>the</strong> o<strong>the</strong>rs<br />
can be removed by hand<br />
Now place <strong>the</strong> power track or cables into <strong>the</strong> cable routes, taking into<br />
account any extra cabling requirements for future flexibility<br />
By installing more outlet boxes you will be able to realise extra<br />
connections without interruption later<br />
Dependent on <strong>the</strong> floor height being installed, a choice can be made<br />
from various (pre-wired) outlet units in or on <strong>the</strong> cable floor<br />
Earth <strong>the</strong> cable floor system every 100 m 2 by means of an earthing tile<br />
In stretched areas such as corridors, place an earthing tile at least<br />
every 14 metres<br />
The electrical installation should always be carried out by a qualified<br />
electrician in conjunction with <strong>the</strong> requirements of <strong>the</strong> latest wiring<br />
regulations<br />
To create ‘islands’, install plenum with plenum angles to ensure a neat<br />
finishing of <strong>the</strong> system<br />
The ramp provides a constant transition from an existing floor to <strong>the</strong><br />
Soluflex cable floor system<br />
The entire system can easily be dismounted and installed again as<br />
required, giving Soluflex a virtually unlimited life<br />
Dimensions<br />
Tile Cat.No 84000 10<br />
225 13<br />
Support<br />
100<br />
225<br />
100 H<br />
Double edge plate Cat.No 84000 60<br />
300<br />
900 13<br />
Single edge plate Cat.No 84000 61<br />
300<br />
900 13<br />
Cat.Nos<br />
H (mm)<br />
84037 00 35<br />
84060 00 58<br />
84090 00 88<br />
84120 00 118<br />
The finished installation can <strong>the</strong>n be covered with rubber, stone, wood<br />
or carpet tiles<br />
Finishing with carpet tiles is advised for true flexibility and accessibility<br />
of <strong>the</strong> system<br />
Plenum sealing<br />
13<br />
56<br />
Cat.Nos<br />
H (mm)<br />
84037 20 37<br />
84060 20 60<br />
84090 20 90<br />
Cable routes<br />
Completed Soluflex installation<br />
900 H<br />
84120 20 120<br />
Plenum exterior angle<br />
H<br />
Cat.Nos<br />
H (mm)<br />
84037 30 37<br />
84060 30 60<br />
56<br />
84090 30 90<br />
84120 30 120<br />
12<br />
56<br />
Ramp<br />
13<br />
10%<br />
Cat.Nos H (mm) L (mm)<br />
84037 40 37 400<br />
112 H<br />
L<br />
84060 40 60 616<br />
84090 40 90 898<br />
84120 40 120 1181<br />
12