2013 Factory Catalog Vol. 7 - Classic Auto Air
2013 Factory Catalog Vol. 7 - Classic Auto Air
2013 Factory Catalog Vol. 7 - Classic Auto Air
You also want an ePaper? Increase the reach of your titles
YUMPU automatically turns print PDFs into web optimized ePapers that Google loves.
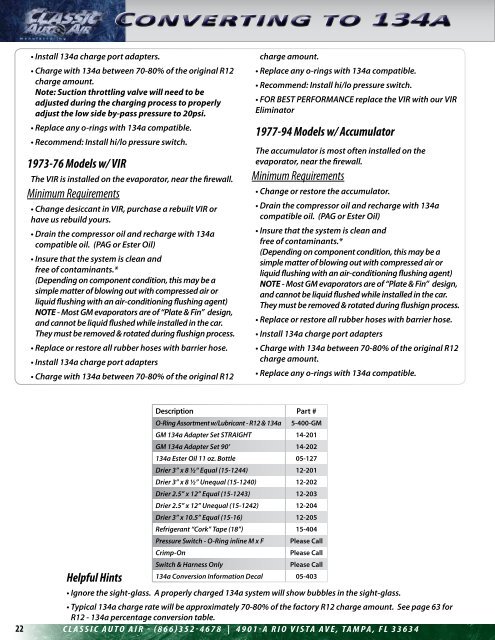
Converting to 134a<br />
• Install 134a charge port adapters.<br />
• Charge with 134a between 70-80% of the original R12<br />
charge amount.<br />
Note: Suction throttling valve will need to be<br />
adjusted during the charging process to properly<br />
adjust the low side by-pass pressure to 20psi.<br />
• Replace any o-rings with 134a compatible.<br />
• Recommend: Install hi/lo pressure switch.<br />
1973-76 Models w/ VIR<br />
The VIR is installed on the evaporator, near the firewall.<br />
Minimum Requirements<br />
• Change desiccant in VIR, purchase a rebuilt VIR or<br />
have us rebuild yours.<br />
• Drain the compressor oil and recharge with 134a<br />
compatible oil. (PAG or Ester Oil)<br />
• Insure that the system is clean and<br />
free of contaminants.*<br />
(Depending on component condition, this may be a<br />
simple matter of blowing out with compressed air or<br />
liquid flushing with an air-conditioning flushing agent)<br />
NOTE - Most GM evaporators are of “Plate & Fin” design,<br />
and cannot be liquid flushed while installed in the car.<br />
They must be removed & rotated during flushign process.<br />
• Replace or restore all rubber hoses with barrier hose.<br />
• Install 134a charge port adapters<br />
• Charge with 134a between 70-80% of the original R12<br />
charge amount.<br />
• Replace any o-rings with 134a compatible.<br />
• Recommend: Install hi/lo pressure switch.<br />
• FOR BEST PERFORMANCE replace the VIR with our VIR<br />
Eliminator<br />
1977-94 Models w/ Accumulator<br />
The accumulator is most often installed on the<br />
evaporator, near the firewall.<br />
Minimum Requirements<br />
• Change or restore the accumulator.<br />
• Drain the compressor oil and recharge with 134a<br />
compatible oil. (PAG or Ester Oil)<br />
• Insure that the system is clean and<br />
free of contaminants.*<br />
(Depending on component condition, this may be a<br />
simple matter of blowing out with compressed air or<br />
liquid flushing with an air-conditioning flushing agent)<br />
NOTE - Most GM evaporators are of “Plate & Fin” design,<br />
and cannot be liquid flushed while installed in the car.<br />
They must be removed & rotated during flushign process.<br />
• Replace or restore all rubber hoses with barrier hose.<br />
• Install 134a charge port adapters<br />
• Charge with 134a between 70-80% of the original R12<br />
charge amount.<br />
• Replace any o-rings with 134a compatible.<br />
Helpful Hints<br />
Description Part #<br />
O-Ring Assortment w/Lubricant - R12 & 134a 5-400-GM<br />
GM 134a Adapter Set STRAIGHT 14-201<br />
GM 134a Adapter Set 90’ 14-202<br />
134a Ester Oil 11 oz. Bottle 05-127<br />
Drier 3” x 8 ½“ Equal (15-1244) 12-201<br />
Drier 3” x 8 ½” Unequal (15-1240) 12-202<br />
Drier 2.5” x 12” Equal (15-1243) 12-203<br />
Drier 2.5” x 12” Unequal (15-1242) 12-204<br />
Drier 3” x 10.5” Equal (15-16) 12-205<br />
Refrigerant “Cork” Tape (18”) 15-404<br />
Pressure Switch - O-Ring inline M x F Please Call<br />
Crimp-On<br />
Please Call<br />
Switch & Harness Only<br />
Please Call<br />
134a Conversion Information Decal 05-403<br />
• Ignore the sight-glass. A properly charged 134a system will show bubbles in the sight-glass.<br />
• Typical 134a charge rate will be approximately 70-80% of the factory R12 charge amount. See page 63 for<br />
R12 - 134a percentage conversion table.<br />
22 <strong>Classic</strong> auto air - (866)352-4678 | 4901-A Rio Vista Ave, Tampa, FL 33634


