Weinig Tools - OERTLI Werkzeuge AG
Weinig Tools - OERTLI Werkzeuge AG
Weinig Tools - OERTLI Werkzeuge AG
Create successful ePaper yourself
Turn your PDF publications into a flip-book with our unique Google optimized e-Paper software.
Normal clamping<br />
Installation:<br />
1. Remove dirt and resin on clamping ledges and<br />
serrated back.<br />
2. Fit profiled cutters in serration.<br />
3. Slide clamping ledge in from the side.<br />
4. Axially align the clamping ledge and profiled cutters<br />
and tighten the middle clamping screw with half the<br />
specified torque.<br />
5. Check that the profiled cutters are correctly seated in<br />
the serration.<br />
6. Tighten the clamping screws from the centre<br />
outwards.<br />
7. Use an angled Allen key with shank to tighten the<br />
clamping screws uniformly (extensions and striking<br />
tools must not be used!)<br />
8. Tightening torque of the clamping screws:<br />
M 10: 25 – 26 Nm<br />
M 12: 30 – 33 Nm<br />
Never tension the complete cutter groove in<br />
one operation, otherwise the tool could<br />
become deformed.<br />
Do not use damaged Allen keys or keys on<br />
which the hexagon head has become round,<br />
as this may result in damage to the clamping<br />
screws.<br />
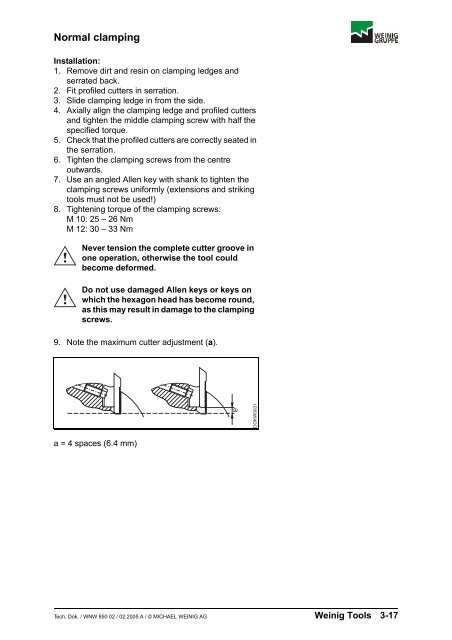
9. Note the maximum cutter adjustment (a).<br />
a<br />
DOKW0031<br />
a = 4 spaces (6.4 mm)<br />
Tech. Dok. / WNW 850 02 / 02.2005.A / © MICHAEL WEINIG <strong>AG</strong> <strong>Weinig</strong> <strong>Tools</strong> 3-17


