3-Heights⢠PDF Security Shell - PDF Tools AG
3-Heights⢠PDF Security Shell - PDF Tools AG
3-Heights⢠PDF Security Shell - PDF Tools AG

You also want an ePaper? Increase the reach of your titles
YUMPU automatically turns print PDFs into web optimized ePapers that Google loves.
3-Heights <strong>PDF</strong> <strong>Security</strong> <strong>Shell</strong>, Version 4.2 Page 28 of 35<br />
July 8, 2013<br />
-cr "I reviewed the document"<br />
Execute the conversion<br />
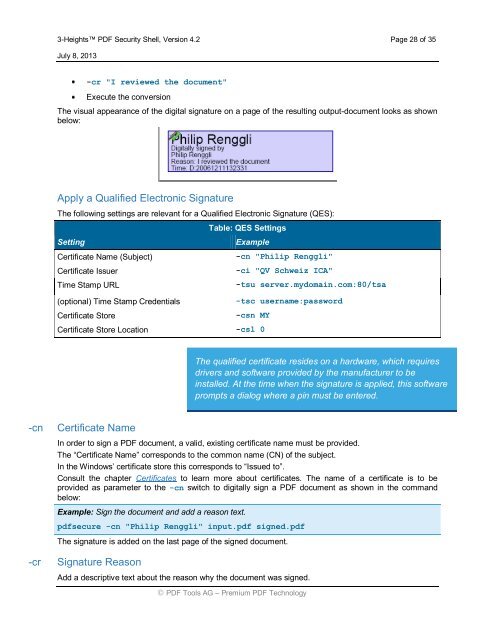
The visual appearance of the digital signature on a page of the resulting output-document looks as shown<br />
below:<br />
Apply a Qualified Electronic Signature<br />
The following settings are relevant for a Qualified Electronic Signature (QES):<br />
Table: QES Settings<br />
Setting<br />
Certificate Name (Subject)<br />
Certificate Issuer<br />
Time Stamp URL<br />
(optional) Time Stamp Credentials<br />
Certificate Store<br />
Example<br />
-cn "Philip Renggli"<br />
-ci "QV Schweiz ICA"<br />
-tsu server.mydomain.com:80/tsa<br />
-tsc username:password<br />
-csn MY<br />
Certificate Store Location -csl 0<br />
The qualified certificate resides on a hardware, which requires<br />
drivers and software provided by the manufacturer to be<br />
installed. At the time when the signature is applied, this software<br />
prompts a dialog where a pin must be entered.<br />
-cn<br />
Certificate Name<br />
In order to sign a <strong>PDF</strong> document, a valid, existing certificate name must be provided.<br />
The “Certificate Name” corresponds to the common name (CN) of the subject.<br />
In the Windows’ certificate store this corresponds to “Issued to”.<br />
Consult the chapter Certificates to learn more about certificates. The name of a certificate is to be<br />
provided as parameter to the -cn switch to digitally sign a <strong>PDF</strong> document as shown in the command<br />
below:<br />
Example: Sign the document and add a reason text.<br />
pdfsecure -cn "Philip Renggli" input.pdf signed.pdf<br />
The signature is added on the last page of the signed document.<br />
-cr<br />
Signature Reason<br />
Add a descriptive text about the reason why the document was signed.<br />
<strong>PDF</strong> <strong>Tools</strong> <strong>AG</strong> – Premium <strong>PDF</strong> Technology