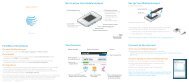
Wireless-N 150 ADSL2+ Modem Router DGN1000 Setup ... - netgear
Wireless-N 150 ADSL2+ Modem Router DGN1000 Setup ... - netgear
Wireless-N 150 ADSL2+ Modem Router DGN1000 Setup ... - netgear

Create successful ePaper yourself
Turn your PDF publications into a flip-book with our unique Google optimized e-Paper software.
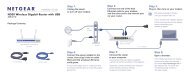
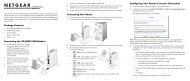
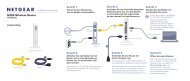
Connecting Your <strong>Wireless</strong> <strong>Modem</strong> <strong>Router</strong><br />
Before you install your wireless modem router, make sure that the Internet Protocol (TCP/IP)<br />
Property settings on your computer are set to “automatically obtain an IP address” using DHCP<br />
and “Obtain DNS server address automatically.” You can check these settings by looking at the<br />
TCP/IP Properties of your Internal Network Connections, which are accessible through the<br />
Control Panel of your computer. If you are unsure about this, refer to the documentation for your<br />
computer or see the link to TCP/IP Addressing in “Related Documents” on page 34.<br />
If you are replacing an existing router, disconnect it completely from your network<br />
and set it aside before starting to install your new router.<br />
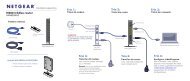
To connect the wireless modem router, the ADSL filter and the computer:<br />
1. Connect an ADSL filter as shown below.<br />
If you purchased the <strong>DGN1000</strong> in a country where an ADSL filter is not<br />
included, you must acquire one.<br />
• Install an ADSL filter for every telephone that uses the same phone line as your wireless<br />
modem router. Select the appropriate filter(s) for your wireless setup.<br />
1 2<br />
3<br />
1. One-Line Filter: Use with a phone or fax machine.<br />
2. Splitter: Use with a one-line filter to share an outlet with a phone and the wireless<br />
modem router.<br />
3. Two-Line Filter with Splitter: Use to share an outlet with a phone and the wireless<br />
modem router.<br />
Figure 6<br />
Installing Your <strong>Router</strong> Manually (Advanced, Mac, and Linux Users) 13