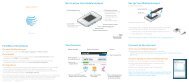
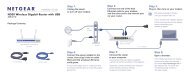
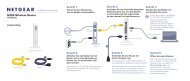
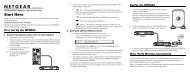
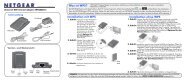
Wireless-N 150 ADSL2+ Modem Router DGN1000 Setup ... - netgear
Wireless-N 150 ADSL2+ Modem Router DGN1000 Setup ... - netgear
Wireless-N 150 ADSL2+ Modem Router DGN1000 Setup ... - netgear

Create successful ePaper yourself
Turn your PDF publications into a flip-book with our unique Google optimized e-Paper software.
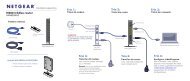
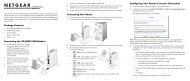
To set up your computers for wireless connectivity:<br />
1. Configure the wireless settings of each computer or wireless adapter to have the same SSID<br />
(wireless network name) as the router.<br />
2. Check that the wireless adapter on each computer can support the mode and security option<br />
that you selected. (If you have a question, see the online User Manual or review the settings<br />
you selected in “Setting Your SSID and <strong>Wireless</strong> Security” on page 20).<br />
3. Check that the security settings on each wireless device match the security settings of the<br />
router. For example, if you selected a security option requiring a passphrase, then the same<br />
passphrase must be used for each wireless computer.<br />
4. Check that each wireless computer has a wireless link and is able to obtain an IP address by<br />
DHCP from the router.<br />
For a Windows PC, go to the Control Panel and select Network Connections.<br />
Check the <strong>Wireless</strong> Connections Properties and ensure that TCP/IP Properties<br />
are set to Obtain an IP address automatically.<br />
To access the Internet from any computer connected to your wireless modem router, launch a<br />
browser such as Microsoft Internet Explorer or Mozilla Firefox. You should see the wireless<br />
modem router’s Internet LED blink, indicating communication to the ISP.<br />
Using Push 'N' Connect (WPS) to Add <strong>Wireless</strong><br />
Devices<br />
If your wireless clients support Wi-Fi Protected <strong>Setup</strong> (WPS), you can use this feature to connect<br />
the wireless client securely and easily to the router. Look for the symbol on your client<br />
device. 1<br />
NETGEAR’s Push 'N' Connect feature is based on the Wi-Fi Protected <strong>Setup</strong><br />
(WPS) standard. All other Wi-Fi-certified and WPS-capable products should be<br />
compatible with NETGEAR products that implement Push 'N' Connect.<br />
1. For a list of other Wi-Fi-certified products available from NETGEAR, go to http://www.wi-fi.org.<br />
Configuring Your <strong>Wireless</strong> Network 21