Create successful ePaper yourself
Turn your PDF publications into a flip-book with our unique Google optimized e-Paper software.
#PRP1776<br />
<strong>Star</strong> <strong>Trek</strong> TOS Klingon Disruptor<br />
Prop Kit Assembly Manual<br />
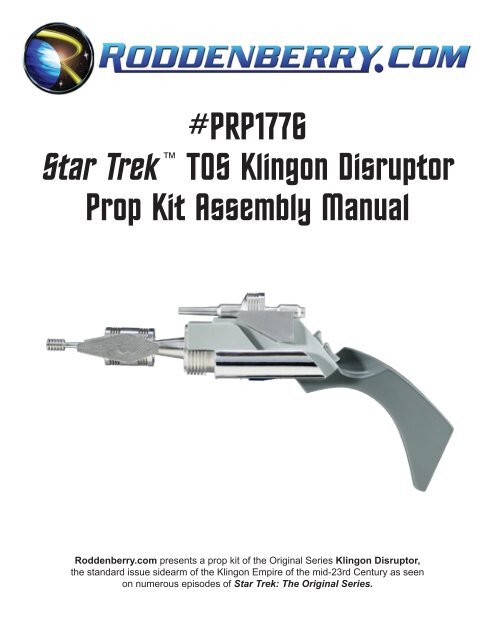
<strong>Roddenberry</strong>.<strong>com</strong> presents a prop kit of the Original Series Klingon Disruptor,<br />
the standard issue sidearm of the Klingon Empire of the mid-23rd Century as seen<br />
on numerous episodes of <strong>Star</strong> <strong>Trek</strong>: The Original Series.
2<br />
#PRP1776 - St a r Tr e k: TOS Kl i n go n Dis r u p t o r Pr o p Kit As s e m b l y Ma n u a l<br />
Parts Included:<br />
• Main body<br />
• Sight (sight and sight base pre-assembled)<br />
• Emitter assembly (emitter, side plates with grid tape, screws and<br />
standoffs for the plates, and mounting stud)<br />
• Emitter base collar<br />
• Mylar tape for the body sides, cut for left and right<br />
Tools and supplies needed:<br />
• Auto body spot putty, and/or Bondo filler<br />
• Sandpaper (220 rough grit, 320, 400, up to 600 finish grits)<br />
• Hand drill with a 1/4-inch drill bit – the emitter mounting hole is not pre-drilled<br />
• Hobby knife (X-Acto brand or similar)<br />
• 5-minute epoxy glue<br />
• Masking tape (blue low-tack painter’s tape re<strong>com</strong>mended)<br />
Spray paints (Krylon brand or similar]:<br />
• Sandable-type gray primer<br />
• Gray paint in a contrasting shade to the primer -- this can be another primer, or buy<br />
two cans of contrasting non-primer grays for the finish surfaces. One should be as<br />
light a gray as you can find (Oyster or Platinum Gray or similar for the light body<br />
gray), the hand grip is a medium gray. Krylon #1318 All-purpose Gray Primer or<br />
Machinery Gray is an excellent choice for the dark gray painted on the hand grip.<br />
Optional:<br />
Clear matte or semi-gloss paint – but only if you’re using primers as the final colors
#PRP1776 - St a r Tr e k: TOS Kl i n go n Dis r u p t o r Pr o p Kit As s e m b l y Ma n u a l 3<br />
Step 1: Wash your resin castings with a chlorine-based soap such as Ajax or Comet with water to remove<br />
any trace of mold release, which might interfere with the paint finish. Fill in any objectionable bubbles, mold<br />
lines, etc. with the spot putty or Bondo and sand smooth with 220 to 320 to start.<br />
Step 2: Drill the hole for the emitter mounting stud, sighting along the drill bit on the sides and top so you<br />
drill as straight a hole as possible, and check the fit with the emitter and emitter collar.<br />
Mask off any areas you’ll be gluing parts to, such as the sight area, as glue does not stick well to painted<br />
surfaces.<br />
Spray the first coat of primer, and after it’s dry, check the body for any holes or spots you missed earlier,<br />
and fill and sand and re-primer until you are satisfied with the result.<br />
Step 3: When you’re ready to paint the finish colors, you have the choice of using two contrasting gray<br />
primer colors with an overcoat of matte or semi-gloss clear, or two finish colors in light and medium gray.<br />
Regardless of which paints you use, after you spray the first color, mask off that color so you can spray<br />
the second color. And it’s re<strong>com</strong>mended that the darker handle color be sprayed first since it’s easier to<br />
mask around the trigger button. Allow to dry at least two or more hours between coats (the longer the<br />
better) before finish sanding (with 400 to 600 grit paper), applying masking tape for the contrast color, or<br />
continuing the assembly process.<br />
When the final coat of paint is cured, remove the masking tape.
4<br />
#PRP1776 - St a r Tr e k: TOS Kl i n go n Dis r u p t o r Pr o p Kit As s e m b l y Ma n u a l<br />
(The final assembly may be done in any order.)<br />
Step 4: Apply the mylar body detail tape panels carefully – check them on the body first before you peel<br />
the backing off, and apply starting at the top lining up the tape edge with the corner detail and working your<br />
way down. If any tape is sticking out beyond the body, you may very carefully use a hobby knife to cut off<br />
the excess, being careful you don’t damage the paint!
#PRP1776 - St a r Tr e k: TOS Kl i n go n Dis r u p t o r Pr o p Kit As s e m b l y Ma n u a l 5<br />
Step 5: Assemble the emitter as shown with the screws and standoffs provided, checking to be sure the<br />
two plates look even on the emitter [figures 1 and 2]. If you like, you can fill in the screws with Bondo and<br />
sand smooth so the tape will have a <strong>com</strong>pletely flat surface to sit on [figure 3]. Apply the detail grid tape<br />
and cut off the excess with your knife [figures 4 and 5].
6<br />
#PRP1776 - St a r Tr e k: TOS Kl i n go n Dis r u p t o r Pr o p Kit As s e m b l y Ma n u a l<br />
Step 6: Check the fit of the emitter and emitter collar on the body, then glue in place with 5-minute epoxy,<br />
being sure the two parts are seated properly and the emitter is pointing straight on the disruptor body. Make<br />
sure it all fits to your satisfaction first before you glue anything, and make sure it’s straight and even while<br />
the glue is curing!<br />
Step 7: The sight is glued on with epoxy, again making sure it fits on first before you glue it. Roughen the<br />
glue surface and scrape away paint if you didn’t mask this area while you were painting – remember glue<br />
will not stick well to painted surfaces!
#PRP1776 - St a r Tr e k: TOS Kl i n go n Dis r u p t o r Pr o p Kit As s e m b l y Ma n u a l 7<br />
That’s it...your <strong>Roddenberry</strong>.<strong>com</strong> <strong>Star</strong> <strong>Trek</strong> TOS Klingon Disruptor is <strong>com</strong>pleted! Qapla’!<br />
IMPORTANT NOTES:<br />
The reproduction of the <strong>Roddenberry</strong>.<strong>com</strong> <strong>Star</strong> <strong>Trek</strong> TOS Klingon Disruptor kit or any of its parts<br />
by any means known or yet to be invented (including molding and recasting, reverse-engineering,<br />
or 3D scanning/SLA printing) is expressly prohibited by United States and international copyright<br />
and product protection laws.<br />
Copyright © 2009 <strong>Roddenberry</strong> Productions.<br />
<strong>Star</strong> <strong>Trek</strong> and related marks and logos are Trademarks of CBS Studios Inc. All rights reserved.


