Create successful ePaper yourself
Turn your PDF publications into a flip-book with our unique Google optimized e-Paper software.
#PRP1750<br />
<strong>Star</strong> <strong>Trek</strong> "Boomerang" Phaser<br />
Prop Kit Assembly Manual<br />
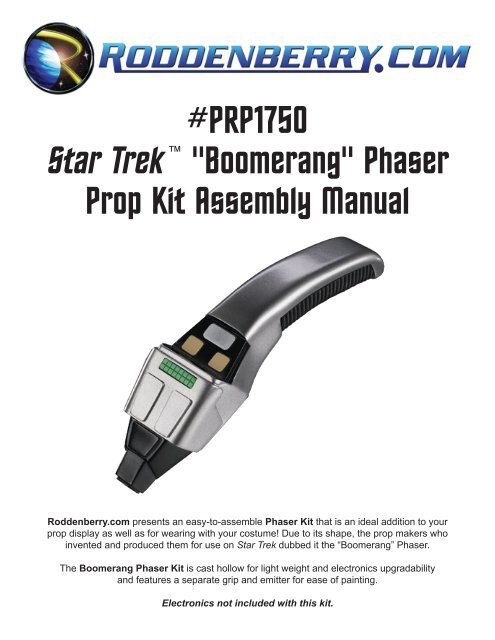
<strong>Roddenberry</strong>.<strong>com</strong> presents an easy-to-assemble Phaser Kit that is an ideal addition to your<br />
prop display as well as for wearing with your costume! Due to its shape, the prop makers who<br />
invented and produced them for use on <strong>Star</strong> <strong>Trek</strong> dubbed it the “Boomerang” Phaser.<br />
The Boomerang Phaser Kit is cast hollow for light weight and electronics upgradability<br />
and features a separate grip and emitter for ease of painting.<br />
Electronics not included with this kit.
2<br />
#PRP1750 - St a r Tr e k “Bo o m e r a n g” Ph a s e r Pr o p Kit As s e m b l y Ma n u a l<br />
BASIC LAYOUT AND INVENTORY<br />
Parts List:<br />
1 Main Body<br />
1 Grip<br />
1 Emitter<br />
1 Cast LED Display<br />
1 Bottom Plate<br />
4 2-56 x 1/4” Flathead<br />
Screws<br />
1 Each 2-56 x 1/2” and<br />
5/8” Flathead Screws<br />
1 Button Template<br />
1 1/8” Sheet Plastic<br />
for buttons<br />
Tools Needed:<br />
Hobby knife<br />
Sandpaper (150 to 220 grit rough paper,<br />
320 to 400-600 grit finishing)<br />
Hand drill with 3/32” drill bit<br />
5 Minute epoxy or cyanaoacrylate glue<br />
(gap-filling thick type re<strong>com</strong>mended)<br />
Auto body spot putty<br />
Masking tape (blue “low tack” type re<strong>com</strong>mended)<br />
Glue Stik<br />
Small hobby paintbrush<br />
Screwdriver<br />
Optional:<br />
Foam weather-stripping tape<br />
PAINTS Needed:<br />
(spray paints unless noted)<br />
Spray primer (sandable type)<br />
Plastikote brand Medium Charcoal Gray or<br />
GM7173 or similar (see instructions)<br />
Semi-flat or Gloss Black<br />
Light Green (regular or fluorescent)<br />
spray or bottle paint<br />
Metallic Blue spray or bottle paint<br />
Antique White or Beige/Tan spray or bottle paint<br />
Aluminum spray or bottle paint<br />
Optional paints for a movie phaser:<br />
Red (spray or brush-on)<br />
These instructions assume you are making a non-functioning “dummy” prop.<br />
Wash your parts with soap and water to remove traces of mold release before starting.
#PRP1750 - St a r Tr e k “Bo o m e r a n g” Ph a s e r Pr o p Kit As s e m b l y Ma n u a l 3<br />
Step 1: Sand all mold separation lines and sprues smooth, test fit your parts as you work. Clear the holes<br />
in the bottom plate as well as the LED display hole with your knife. Fill in any objectionable holes/bubbles<br />
and seam lines with the spot putty according to the putty manufacturer’s instructions, then sand smooth<br />
[Figs. 2 through 4].<br />
Step 2: Sand the rear block of the emitter and test fit in the phaser body to make sure it goes in all the way<br />
[Fig. 5].<br />
Step 3: With the 3/32” drill, drill out the two screw holes in the grip. Be sure you are drilling straight. You<br />
may drill part of the way into one side of the holes, then turn the piece over and drill from the other side –<br />
this will help in giving you a good hole. Test fit and screw on the grip to make sure it works [Fig. 6].
4<br />
#PRP1750 - St a r Tr e k “Bo o m e r a n g” Ph a s e r Pr o p Kit As s e m b l y Ma n u a l<br />
Step 4: Make the control buttons with the supplied plastic strip and template, securing the template with<br />
Glue Stik and scoring and snapping the plastic with your hobby knife, then sand the edges to size and sand<br />
the corners round [Figs. 7 through 9].<br />
Step 5: Clean the residual glue off, check the fit in the holes, then spray primer and spray (or brush) paint<br />
the two small buttons antique white/beige/tan. Primer, then paint the large button aluminum (or red if you<br />
are making a <strong>Star</strong> <strong>Trek</strong> movie version) [Figs. 10 and 11].<br />
Step 6: When you’re satisfied with the smoothness of your parts, make a hook with a wire hanger and<br />
hang the main body for painting using one of the control button holes and being sure the wire doesn’t<br />
interfere with your outer surfaces [Fig. 12].
#PRP1750 - St a r Tr e k “Bo o m e r a n g” Ph a s e r Pr o p Kit As s e m b l y Ma n u a l 5<br />
Step 6: You may cover with masking tape any areas that will have parts glued to them, otherwise they will<br />
need to be scraped clear of paint before gluing parts. The other parts may be placed on a flat surface, and<br />
then spray primer all parts including the heads of all the screws [Fig. 13].<br />
Step 7: When dry, check for imperfections and putty and sand smooth if needed. Spray primer again and<br />
repeat if necessary.<br />
Note: The Boomerang Phaser for the most part was painted using Plastikote GM7173. Other medium gray<br />
metallics in a light pewter color (such as Plastikote Medium Charcoal Gray) were also used in production<br />
on the Boomerang Phaser and will give just as attractive a phaser look.<br />
Step 8: When you have a final primer coat that’s to your satisfaction, spray paint with metallic gray the<br />
main body and the bottom plate, as well as the heads of the four 1/4” screws. You may wet-sand the parts<br />
with 600 grit or finer sandpaper for the ultimate smooth finish, then spray a second color coat. When you’ve<br />
sprayed your final color coat, set aside for several hours or overnight [Fig. 14].<br />
Taking your time with the paint will yield you a better finish without fingerprints from premature handling.
6<br />
#PRP1750 - St a r Tr e k “Bo o m e r a n g” Ph a s e r Pr o p Kit As s e m b l y Ma n u a l<br />
Step 9: Spray paint in black the grip and the emitter, and your two remaining screws. Again, you may wetsand<br />
and paint a second coat if desired [Fig. 15].<br />
Step 10: In the bottom of the emitter is a depressed slotted area. You may mask off this area and spray<br />
a metallic blue, or brush on the blue. For a <strong>Star</strong> <strong>Trek</strong> movie phaser, the raised detail surrounding the front<br />
emitter hole is painted aluminum [Fig. 16].<br />
Step 11: After the main body paint is cured, apply masking tape so the control button section is exposed as<br />
shown, and then paint this area black [Figs. 17 and 18].
#PRP1750 - St a r Tr e k “Bo o m e r a n g” Ph a s e r Pr o p Kit As s e m b l y Ma n u a l 7<br />
Step 12: When cured, remove the tape [Fig. 19].<br />
Step 13: Glue does not stick well on paint, so scrape away the paint where you will be gluing the large<br />
square emitter hole and the three buttons (this also roughens the surfaces so the glue will stick better)<br />
[Figs. 20 and 21].<br />
Step 14: Glue the emitter using either epoxy or cyanoacrylate glue, depending on how much of a gap you<br />
have inside your joints [Figs. 27 and 28]. Be sure you do not get glue on any outer surfaces. Allow curing<br />
before handling further.
8<br />
#PRP1750 - St a r Tr e k “Bo o m e r a n g” Ph a s e r Pr o p Kit As s e m b l y Ma n u a l<br />
Step 15: Secure the three control buttons in place. This may be more easily done by placing the buttons<br />
in first and applying a drop of glue in the holes from inside the phaser cavity (hold each button in place as<br />
you do this) [Figs. 22 and 23]. You have an option of purchasing some thin foam weather-stripping and<br />
securing the buttons with foam inside so you can push the buttons if you want to, instead of a solid glue<br />
joint.<br />
Step 16: Spray or brush paint the top surface of the LED display with green. When dry, glue in place at the<br />
two ends; again being sure you’ve scraped the paint off where you are gluing the joint [Figs. 24 through 26].<br />
Step 17: Screw on the bottom plate and the grip [Fig. 29], and you’re done!
#PRP1750 - St a r Tr e k “Bo o m e r a n g” Ph a s e r Pr o p Kit As s e m b l y Ma n u a l 9<br />
IMPORTANT NOTES:<br />
The physical reproduction by any means known or yet to be invented (including recasting<br />
and/or reverse-engineering or 3D scanning/printing) of the <strong>Roddenberry</strong>.<strong>com</strong> Boomerang<br />
Phaser Kit or any of its parts is expressly prohibited under U.S. and International copyright<br />
and product protection laws.<br />
Copyright © 2009 <strong>Roddenberry</strong> Productions.<br />
<strong>Star</strong> <strong>Trek</strong> and related marks and logos are Trademarks of CBS Studios Inc. All rights reserved.


