

Star Trek: The Motion Picture Tricorder - Roddenberry.com
Star Trek: The Motion Picture Tricorder - Roddenberry.com
Star Trek: The Motion Picture Tricorder - Roddenberry.com

You also want an ePaper? Increase the reach of your titles
YUMPU automatically turns print PDFs into web optimized ePapers that Google loves.
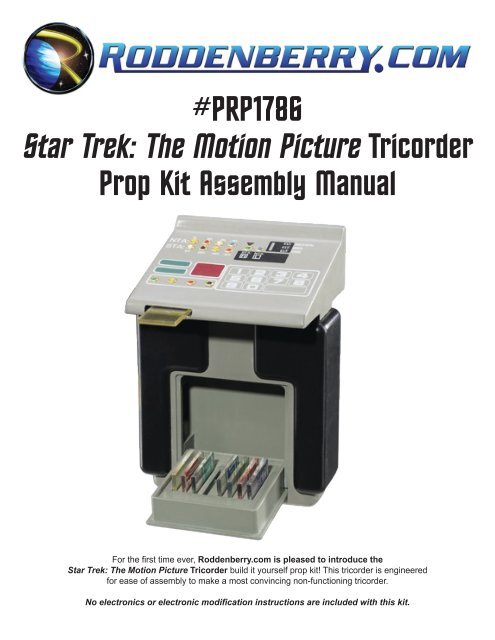
#PRP1786<br />
<strong>Star</strong> <strong>Trek</strong>: <strong>The</strong> <strong>Motion</strong> <strong>Picture</strong> <strong>Tricorder</strong><br />
Prop Kit Assembly Manual<br />
For the first time ever, <strong>Roddenberry</strong>.<strong>com</strong> is pleased to introduce the<br />
<strong>Star</strong> <strong>Trek</strong>: <strong>The</strong> <strong>Motion</strong> <strong>Picture</strong> <strong>Tricorder</strong> build it yourself prop kit! This tricorder is engineered<br />
for ease of assembly to make a most convincing non-functioning tricorder.<br />
No electronics or electronic modification instructions are included with this kit.
2<br />
#PRP1786 - St a r Tr e k: Th e Mo t i o n Pi c t ur e Tr i c or d e r Pr o p Kit As s e m b l y Ma n u a l<br />
Parts included in kit:<br />
1 Upper Body - Top Wedge<br />
(resin cast)<br />
1 Mid-Plate (resin cast)<br />
1 Lower Body (resin cast<br />
in 2 halves)<br />
1 each Left and Right Hand-grips<br />
(rubber castings)<br />
1 Fold Down Door (resin cast)<br />
with brass axle<br />
1 each Upper and Lower<br />
Chipholder Plates, and plate<br />
spacer (laser-cut acrylic)<br />
8 Data Chips (laser-cut acrylic)<br />
1 each Chip Slider, Slider Cross,<br />
and slider grip<br />
2 <strong>com</strong>plete Graphics Sheets<br />
(water-slide decals)<br />
Copper vinyl strips (2) and white<br />
vinyl detail strips (14)<br />
14 each Colored Pins and<br />
Brass Eyelets<br />
6 each long and short wood screws<br />
4 @ 2-56 screws<br />
Tools and supplies needed:<br />
Hobby knife (X-Acto or similar brand)<br />
Sandpaper (220-320 rough grit, 400-600 finishing grit)<br />
Hand drill, with 3/32” drill bit<br />
Flat file(s)<br />
Screwdriver<br />
Cyanoacrylate (CA) glue, and CA cure accelerator<br />
Acrylic solvent cement such as Weld-On 3 or similar<br />
Testors Clear Parts Cement<br />
Bondo plastic filler and/or automotive/hobby spot putty<br />
Masking tape (blue low-tack type re<strong>com</strong>mended)<br />
Tweezers<br />
Paints needed [spray paints unless noted]:<br />
Primer (sandable-type re<strong>com</strong>mended)<br />
Krylon Stone Gray #1605<br />
Testors Clear Coat to spray on your decals<br />
Semi-gloss or gloss black (spray or brush-on)<br />
White (brush-on)<br />
Plastikote or other brand Bumper Paint (charcoal gray)
#PRP1786 - St a r Tr e k: Th e Mo t i o n Pi c t ur e Tr i c or d e r Pr o p Kit As s e m b l y Ma n u a l 3<br />
Step 1: Wash all resin parts with chlorine based cleaner such as Comet or Ajax to remove all resin mold<br />
residue. Sand off imperfections and all mold lines and sprues from the castings including the mold bridges<br />
from all the body grooves, and fill pinholes with bondo or putty on your parts including the fold-down door.<br />
Step 2: Insert the brass axle through the holes in bottom of the fold-down door.<br />
Step 3: Test fit the fold-down door into the lower body with the square hole in it. Due to some shrinkage in<br />
some resin castings, you may have to sand some of the lip on the door frame so as not to scrape off the<br />
final paint finish.<br />
Note that you may put together the two lower body halves, the mid-plate, and the top body wedge with the<br />
supplied screws for later installation of electronics, or you may glue the parts together with CA if you’re<br />
making a dummy tricorder -- but if you use glue, it will be difficult to break the parts apart without damage if<br />
you change your mind later.
4<br />
#PRP1786 - St a r Tr e k: Th e Mo t i o n Pi c t ur e Tr i c or d e r Pr o p Kit As s e m b l y Ma n u a l<br />
Step 4: Assuming you’ll be screwing it together, hold the two lower body halves together and drill all six<br />
holes with your 3/32” drill bit 3/4” deep.<br />
Step 5: Test fit the 2 halves and use four long wood screws to temporarily hold them together<br />
Step 6: Now lay the top plate into the top groove and press into place. Make sure the data chip slot is on<br />
the same side as the large square door hole. With the 3/32” drill bit, drill down through the 6 counter sink<br />
holes to a depth of 5/8” to 3/4 of an inch.
#PRP1786 - St a r Tr e k: Th e Mo t i o n Pi c t ur e Tr i c or d e r Pr o p Kit As s e m b l y Ma n u a l 5<br />
Step 7: Remove the 4 screws that hold the two lower body halves together for now. Prep the fold-down<br />
door and the inside of both the lower body halves by sanding them with 400 grit sandpaper, as you will<br />
need to primer and paint the inside of the back wall of the frame and the inside of the door with Krylon<br />
Stone Gray before you paint the outside of the other parts -- they will be visible when you open up the door<br />
for access to the tricorder’s data chips.<br />
Step 8: After sanding the door inside and out, prep the 3 laser cut parts by sanding them with 220 to 400<br />
grit sandpaper. <strong>The</strong> laser cut parts with the 8 holes in it has a good side and a bad side, as one side of the<br />
slots is a little rough due to the parts that break out after the laser cut. Sand with 400 grit sandpaper and<br />
sand down into the slots to remove any roughness, or use a flat file in the slots, then glue the plate spacer<br />
on the opposite wall from the axle side with CA.<br />
Step 9: <strong>The</strong> smaller of the two 8-slot plastic parts will stick onto the double-stick carpet tape in the door<br />
bottom against the spacer you glued in place -- the wider space on this part goes up against the spacer<br />
strip you just glued in, and is also glued in place. <strong>The</strong> tape is put there in an effort to help the data chips<br />
stay put when the tricorder is carried around and the door is opened.
6<br />
#PRP1786 - St a r Tr e k: Th e Mo t i o n Pi c t ur e Tr i c or d e r Pr o p Kit As s e m b l y Ma n u a l<br />
Step 10: With masking tape, mask the lower slot plate covering all the slots, and the top surfaces of the<br />
two axle protrusions and the spacer plate .<br />
Prime and paint the inside door and the outside frame areas with Stone Gray. Also paint the inside of the<br />
back area of the handle, and the top surface of the upper chipholder plate. Let the paint dry <strong>com</strong>pletely, and<br />
remove your masking tape.<br />
Step 11: Glue the top 8 slot chip-holder plate, which is placed paint side out on top of the spacer piece and<br />
on the back two resin axle areas.<br />
Step 12: Put the brass axle through the holes in the fold-out door and slide it into place, and screw the<br />
2 halves of the base together with the long wood screws. You can use some CA glue to help hold them<br />
together if you wish, keeping in mind that if you’re going to install electronics later you might not be able to<br />
get glued parts apart without causing damage.
#PRP1786 - St a r Tr e k: Th e Mo t i o n Pi c t ur e Tr i c or d e r Pr o p Kit As s e m b l y Ma n u a l 7<br />
Step 13: <strong>The</strong> mid-plate screws down to the handle section with the 6 short screws, which should already<br />
be pre-drilled earlier in the process.<br />
Step 14: Sand and assemble the data chip slider by gluing with Weld-On 3 the cross shaped piece (the<br />
long side) to the oval thumb-slider through the hole on the mid-plate with the cross piece towards the<br />
inside, making sure it will still slide easily -- you should also sand smooth the areas on the mid-plate and<br />
the top wedge where the slider and data chip will be in contact for smooth operation.<br />
Step 15: Now you can decide if you want to add electronics or build a static prop. If you are planning to add<br />
electronics now or later, drill all the holes in the angle top for your lights, then screw the angle top onto the<br />
mid-plate using the four 2-56 screws provided.<br />
If you are building just a static prop, install the screws and fill the seams and the 4 screw holes with bondo,<br />
sand and paint.<br />
Step 16: Bondo or putty the seams down the visible sides of the lower body that the rubber grips won’t be<br />
covering, and the bottom, as well as the seam at the middle sides of the top wedge/mid-plate, and sand<br />
with 400-grit paper until smooth.
8<br />
#PRP1786 - St a r Tr e k: Th e Mo t i o n Pi c t ur e Tr i c or d e r Pr o p Kit As s e m b l y Ma n u a l<br />
Step 17: File or sand the chip slot lip until it is even with the tricorder’s edge if needed.<br />
<strong>The</strong>se instructions assume you will be putting all electronics in the top wedge space, so you may omit this<br />
step for the lower body at this time if you think you will be putting any circuitry down there and you have to<br />
get the halves apart, otherwise filling in the lower body seam will make for a much nicer looking tricorder.<br />
Step 18: Make sure to close the chip door to ensure no additional paint gets inside, and spray primer all of<br />
your tricorder. Check the surface for imperfections, putty and sand any such areas, and primer again until<br />
you are satisfied with your finish. Paint with Krylon Stone Gray, wet sand if desired with 600 grit, then paint<br />
a final coat of gray and set aside to cure several hours or overnight. A gloss finish is best for application of<br />
water-slide decals.
#PRP1786 - St a r Tr e k: Th e Mo t i o n Pi c t ur e Tr i c or d e r Pr o p Kit As s e m b l y Ma n u a l 9<br />
Step 19: Mask and spray paint, or hand paint the front detail plates with semi gloss or gloss black. Paint<br />
the two round domes white.<br />
Add the white detail tape provided into the recessed areas; there are 14 places for tape to be placed.<br />
Place the 2 copper foil strips into their recessed areas.<br />
Hand paint the inside of the data chip slot with semi gloss or gloss black paint -- if you didn’t glue the upper<br />
parts together or bondo the seams, you can unscrew and remove the top wedge to make this step a little<br />
easier.<br />
Step 20: Trim the water slide decal (2 provided in case of accident), and test place where they need to<br />
be; try to get the lower left rectangle centered around the four holes, and the “1L, 2L.../1R, 2R... lined up<br />
with those corresponding holes. Decals are best applied on gloss surfaces, so make sure your finish is<br />
good before starting. Using tweezers, dip the decal in a cup of water (do not soak the decal!), and lay the<br />
decal on your work surface for 60 seconds, then slide the decal off the backing paper into position on the<br />
tricorder. Gently blot out excess water and allow to dry a couple of hours.<br />
You may use a decal setting solution such as Microscale brand MicroSet if you have it, and put on the part<br />
as per directions. Set them into place as per photo for placement, and let dry <strong>com</strong>pletely for a couple of<br />
hours. Mist on clear spray that is only made for decals -- Testors Clear Coat is widely available in hobby<br />
stores -- other brands of clear sprays may irreparably harm your decals.
10<br />
#PRP1786 - St a r Tr e k: Th e Mo t i o n Pi c t ur e Tr i c or d e r Pr o p Kit As s e m b l y Ma n u a l<br />
Step 21: Place the arrowhead decal on the center of the chip door and repeat decal set process.<br />
Step 22: Place the brass eyelets into the holes with a drop of Testors Clear Parts Cement, and after they<br />
dry, glue all the colored pins in the eyelets with Clear Parts Cement; these effectively simulate the different<br />
lights on the tricorder. As there is no available reference on what colors they actually were, the colors you<br />
get with this kit are <strong>com</strong>pletely random and they may be placed at any location; or if desired, you may<br />
brush paint the pin heads any colors you want. You might need to trim the pins for them to fit, or drill small<br />
holes in the middle of each eyelet hole.
#PRP1786 - St a r Tr e k: Th e Mo t i o n Pi c t ur e Tr i c or d e r Pr o p Kit As s e m b l y Ma n u a l 11<br />
Step 23: <strong>The</strong> rubber hand-grips may need to have some flash cut off around the edges -- cut it off with<br />
scissors or a good sharp hobby knife blade. Test fit how the handles fit into place -- note that they may stay<br />
in place without glue. Insert the handles into place, and if they need it, secure with a couple drops of CA;<br />
you won’t need much -- and you will need to scrape some of the paint from the grooves so that the CA will<br />
bond with the handles. Be careful with the amount of glue used because you do not want to mar the finish<br />
with glue squishing out of the sides.<br />
If desired, you could paint the hand grips with charcoal gray flexible bumper paint available at auto parts<br />
stores before installing the grips.<br />
Step 24: Cut the clear color decals to fit on the eight data chips and trim around them after placing on the<br />
clear chips, then place all 8 chips into the chip slots of the open door.
12<br />
#PRP1786 - St a r Tr e k: Th e Mo t i o n Pi c t ur e Tr i c or d e r Pr o p Kit As s e m b l y Ma n u a l<br />
Congratulations, you’ve successfully assembled a <strong>Roddenberry</strong>.<strong>com</strong> <strong>Star</strong> <strong>Trek</strong> <strong>The</strong>: <strong>Motion</strong> <strong>Picture</strong> <strong>Tricorder</strong>!<br />
IMPORTANT NOTES:<br />
<strong>The</strong> physical reproduction by any means known or yet to be invented (including molding and recasting,<br />
reverse-engineering, and stereo lithography scanning and printing) of the <strong>Roddenberry</strong>.<strong>com</strong><br />
<strong>Star</strong> <strong>Trek</strong>: <strong>The</strong> <strong>Motion</strong> <strong>Picture</strong> <strong>Tricorder</strong> Kit #1786 or its parts and graphics; or reproducing/replicating<br />
any pre-existing products, parts, or graphics is expressly prohibited under U.S. and International<br />
copyright and product protection laws.<br />
Copyright © 2009 <strong>Roddenberry</strong> Productions.<br />
<strong>Star</strong> <strong>Trek</strong> and related marks and logos are Trademarks of CBS Studios Inc. All rights reserved.


