#PRP1787 Star Trek TOS Wall Communicator ... - Roddenberry.com
#PRP1787 Star Trek TOS Wall Communicator ... - Roddenberry.com
#PRP1787 Star Trek TOS Wall Communicator ... - Roddenberry.com

Create successful ePaper yourself
Turn your PDF publications into a flip-book with our unique Google optimized e-Paper software.
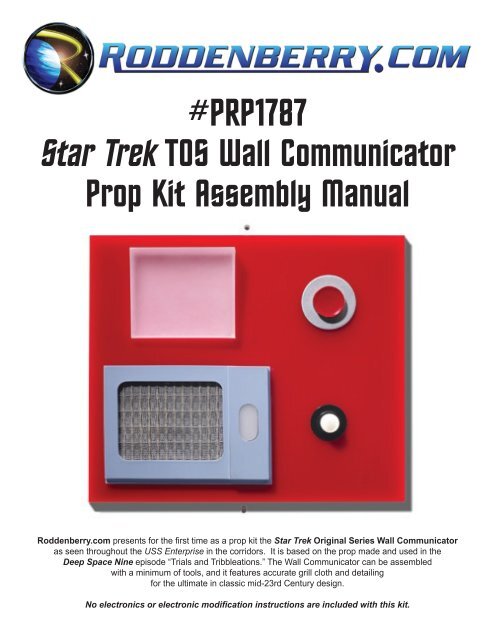
<strong>#PRP1787</strong><br />
<strong>Star</strong> <strong>Trek</strong> <strong>TOS</strong> <strong>Wall</strong> <strong>Communicator</strong><br />
Prop Kit Assembly Manual<br />
<strong>Roddenberry</strong>.<strong>com</strong> presents for the first time as a prop kit the <strong>Star</strong> <strong>Trek</strong> Original Series <strong>Wall</strong> <strong>Communicator</strong><br />
as seen throughout the USS Enterprise in the corridors. It is based on the prop made and used in the<br />
Deep Space Nine episode “Trials and Tribbleations.” The <strong>Wall</strong> <strong>Communicator</strong> can be assembled<br />
with a minimum of tools, and it features accurate grill cloth and detailing<br />
for the ultimate in classic mid-23rd Century design.<br />
No electronics or electronic modification instructions are included with this kit.
2<br />
<strong>#PRP1787</strong> - St a r Tr e k <strong>TOS</strong> Wa l l Co m m u n ic a t o r Pr o p Kit As s e m b l y Ma n u a l<br />
Parts included in kit:<br />
• 1 <strong>Wall</strong> Plate (laser-cut red acrylic)<br />
• 1 Inter<strong>com</strong> Speaker Frame (resin-cast), with grill cloth<br />
• 1 Grill Cloth Retainer<br />
• 1 Inter<strong>com</strong> Light and backing plate (laser-cut)<br />
• 1 Inter<strong>com</strong> Button and small button sleeve (resin-cast)<br />
• 1 Alert Light (clear resin casting)<br />
• 1 Alert Button, and large button ring (resin-cast)<br />
Tools and supplies needed:<br />
• Sandpaper (220-320 grit rough sanding,<br />
400-600 grit finish sanding)<br />
• Bondo plastic filler and automotive or hobby spot putty<br />
• 5-minute epoxy<br />
• Testors Clear Parts Cement<br />
Paints needed<br />
[spray paints unless noted]:<br />
• Primer (sandable-type re<strong>com</strong>mended) -- you will want<br />
to get a darker primer like Krylon #1318 and a lighter<br />
one like Krylon #1314 Platinum Gray<br />
• Rustoleum Slate Blue, or Krylon Colonial Blue (may be<br />
discontinued), or other “sky” or “baby” blue shaded<br />
paint with a hint of gray<br />
• Chrome Silver, or Bright Silver<br />
• Gloss Black<br />
• Gloss Red (use Krylon Banner Red if you’re spraying<br />
the wall plate, it may also be used for the alert button)<br />
Optional materials and paints:<br />
• Masking tape<br />
• Cyanoacrylate (CA) glue<br />
• Small hobby paint brush<br />
• Transparent Red (brush-on or spray can) or red stage lighting gel or mylar sheet<br />
• White (brush-on or spray can)<br />
• Clear matte finish spray paint<br />
• Aluminum tape or aluminum foil<br />
• Hot glue<br />
• Foam double-stick tape, or double-stick weather-stripping tape, available in hardware stores
<strong>#PRP1787</strong> - St a r Tr e k <strong>TOS</strong> Wa l l Co m m u n ic a t o r Pr o p Kit As s e m b l y Ma n u a l 3<br />
Step 1: Wash all the resin parts (not the clear or acrylic parts, or the cast gloss white inter<strong>com</strong> button!) with<br />
chlorine based cleaner like Comet or Ajax to clean off any traces of mold release. Sand the mold lines off<br />
all the resin parts (speaker frame, inter<strong>com</strong> and alert buttons and rings) with 400 grit sand paper. Fill any<br />
imperfections/pinholes with Bondo plastic filler or spot putty where needed and sand until smooth.<br />
Step 2: With masking tape, mask any parts you shouldn’t have paint on; these mostly consist of the insides<br />
of the large and small button rings -- if you are adding light effects to your wall-<strong>com</strong>m, it is important you<br />
have freedom of movement for the buttons to push in on your switch without scraping the eventual paint<br />
finish off the sides of the buttons.<br />
Step 3: Paint the resin parts with primer. The small domed inter<strong>com</strong> button is cast in white so painting it is<br />
not necessary, but you do primer and paint the alert button. Fill any imperfections that show up with spot<br />
putty, sand until smooth, and primer again until you have parts you are happy with.<br />
Paint with Chrome Silver the large alert button ring and Gloss Red/Banner Red for the alert button itself.<br />
Paint the small button ring Gloss Black.
4<br />
<strong>#PRP1787</strong> - St a r Tr e k <strong>TOS</strong> Wa l l Co m m u n ic a t o r Pr o p Kit As s e m b l y Ma n u a l<br />
Step 4: Paint one side of the plastic screen retainer dark gray, using Krylon Gray Primer #1318 or some<br />
other dark gray.<br />
Paint the speaker frame with a medium to light pale blue such as Rustoleum Slate Blue. Krylon Colonial<br />
Blue may be used, but as of the time these instructions were written, it may have been discontinued.<br />
The red wall plate can be used as is, or you can fine sand it with 400 grit sandpaper and primer and paint<br />
it with Krylon Banner Red spray paint. If desired, you may also use a clear matte finish spray on either the<br />
raw red acrylic or the red painted surface if you want to tone down the glossiness.<br />
Step 5: Cut or sand the sprue off the casting and sand the back (400-grit) to even the surface.<br />
Step 6: The Alert Light wedge may be left as is in clear, or it can be masked to expose the back surface<br />
(photo on the left) and lightly misted with Transparent Red paint (photo on the right), or you may use a<br />
piece of red stage lighting gel like an original set piece would use. These had a light bulb flashing behind it,<br />
and the gel was placed a little distance behind the wall so the alert light when seen from the front is whiteclear,<br />
yet it lights up red -- if you put too heavy a coat of red paint on or place your gel against the surface,<br />
it may make the whole wedge appear red. If desired, you may add a piece of aluminum tape or ordinary<br />
aluminum foil to the back (with or without the red) to make it appear to “light up.”
<strong>#PRP1787</strong> - St a r Tr e k <strong>TOS</strong> Wa l l Co m m u n ic a t o r Pr o p Kit As s e m b l y Ma n u a l 5<br />
Assembly of the <strong>Wall</strong> <strong>Communicator</strong> may be done in any order.<br />
Step 7: Use 5-minute epoxy to attach the two button rings, and the clear alert wedge light (large side to<br />
top) -- just add glue to the edges that fit into the holes without getting any on your visible surfaces (figs. 8<br />
and 9). If you have some glue pushed out, you can wait until the glue is starting to harden up (yet soft) and<br />
pull it off with a toothpick or your fingernail.<br />
Optional: If you are making a static wall display without working push buttons, glue the buttons in place<br />
in their respective sleeves with epoxy or CA -- note that you probably won’t be able to get them back out if<br />
you change your mind and want to put in working lights later.<br />
Step 8: The speaker cloth material can be used as is or you can mist a very light coat of light gray paint<br />
on it to tone down the bright gold (or silver) color. The original speaker cloth used on set looked grayish<br />
in color, though some of the speakers looked brown and some were silverfish in color, so you may make<br />
your cloth look any way desired. If you’re painting, be sure you only spray enough so you still have<br />
some metallic sparkle in the cloth. After the paint has dried, trim the cloth with scissors to fit into the back<br />
rectangle hole of the speaker.<br />
Most of these instruction pictures show assembly with the cloth as it <strong>com</strong>es in the kit not painted, but the<br />
finished prop pictured has the cloth painted.
6<br />
<strong>#PRP1787</strong> - St a r Tr e k <strong>TOS</strong> Wa l l Co m m u n ic a t o r Pr o p Kit As s e m b l y Ma n u a l<br />
Step 9: Use hot glue or 5-minute epoxy to attach the cloth to the frame. Insert the backing plate to the<br />
frame to hold the cloth into place, making sure you put the painted part of the backing plate towards the<br />
cloth.<br />
Step 10: Glue with 5-minute epoxy or CA the clear plastic backing plate into the back rectangle hole on<br />
the backside of the speaker grill (left photo). Make sure you don’t have dried glue inside the oval hole, then<br />
glue the milk plex oval part into the oval hole onto the clear backing plate you just glued in the previous<br />
step using Testors Clear Parts Cement or epoxy.<br />
Step 11: There is a fine line shaped like an “L” etched into the wall plate; this is a guide for you to line up<br />
the speaker grill into place (left photo). Scuff up the plastic wall plate where the speaker grill will sit on<br />
with sandpaper, and take care you don’t sand where it will show around the grill -- if you put your speaker<br />
where you want it and put some masking tape around your speaker, it will help greatly in not damaging the<br />
finished surface when scuffing.<br />
Attach the speaker grill to the plate with 5-minute epoxy, using the “L” guidelines to place the speaker<br />
(right photo). Be careful not to squish out the glue around the edge that shows -- if this happens, wait until<br />
the glue is almost dry and pick it away with a toothpick. If you have painted the wall plate, you will need to<br />
scrape away or sand the area to be glued, as glue does not stick too well to a painted surface.
<strong>#PRP1787</strong> - St a r Tr e k <strong>TOS</strong> Wa l l Co m m u n ic a t o r Pr o p Kit As s e m b l y Ma n u a l 7<br />
Congratulations, your <strong>Roddenberry</strong>.<strong>com</strong> <strong>Star</strong> <strong>Trek</strong> <strong>TOS</strong> <strong>Wall</strong> <strong>Communicator</strong> is finished!<br />
If you want to hang your finished wall-<strong>com</strong>m on a wall, you can use some double-sticky foam tape (thin<br />
weather-stripping tape or other) for this purpose, but bear in mind this will likely rip paint off your wall if you<br />
remove your wall-<strong>com</strong>m later, so you may want to consider another means of display or use something that<br />
won’t damage your wall.<br />
For a related prop kit that will look great on display with your wall-<strong>com</strong>m, <strong>Roddenberry</strong>.<strong>com</strong> re<strong>com</strong>mends the<br />
<strong>Star</strong> <strong>Trek</strong> <strong>TOS</strong> Desktop <strong>Communicator</strong> #1788.<br />
IMPORTANT NOTES:<br />
The physical reproduction by any means known or yet to be invented (including molding and recasting,<br />
reverse-engineering, and stereo lithography scanning and printing) of the <strong>Roddenberry</strong>.<br />
<strong>com</strong> <strong>Star</strong> <strong>Trek</strong> <strong>TOS</strong> <strong>Wall</strong> <strong>Communicator</strong> #1787 or its parts and graphics; or reproducing/<br />
replicating any pre-existing products, parts, or graphics is expressly prohibited under U.S. and<br />
International copyright and product protection laws.<br />
Copyright © 2009 <strong>Roddenberry</strong> Productions.<br />
<strong>Star</strong> <strong>Trek</strong> and related marks and logos are Trademarks of CBS Studios Inc. All rights reserved.