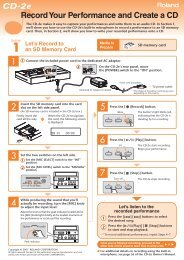
Using the JUNO-STAGE with a Computer - Roland New Zealand
Using the JUNO-STAGE with a Computer - Roland New Zealand
Using the JUNO-STAGE with a Computer - Roland New Zealand

You also want an ePaper? Increase the reach of your titles
YUMPU automatically turns print PDFs into web optimized ePapers that Google loves.
<strong>Using</strong> <strong>the</strong> <strong>JUNO</strong>-<strong>STAGE</strong> as a Controller and<br />
Sound Module<br />
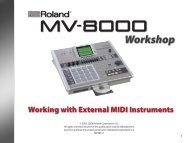
Piano<br />
MIDI<br />
Channel 1<br />
Part 1—GM 001 PIANO 001<br />
You can use <strong>the</strong> <strong>JUNO</strong>-<strong>STAGE</strong>’s keyboard as a MIDI controller for a DAW<br />
whose tracks are playing <strong>JUNO</strong>-<strong>STAGE</strong> sounds. Here’s how to set this up:<br />
1<br />
Press <strong>the</strong> <strong>JUNO</strong>-<strong>STAGE</strong>’s MENU button.<br />
Bass<br />
Drums<br />
MIDI<br />
Channel 2<br />
MIDI<br />
Channel 10<br />
Part 2—GM 079 Fingered Bs<br />
Part 10—GM 001 STANDARD<br />
DAW tracks<br />
<strong>JUNO</strong>-<strong>STAGE</strong> performance parts<br />
2<br />
Press ENTER to display <strong>the</strong> first system screen.<br />
The performance’s parts are also set to respond to various MIDI<br />
Program Change, Bank Select, and Control Change messages. All<br />
of <strong>the</strong> parts are also set to default levels you can change <strong>with</strong> MIDI<br />
messages from <strong>the</strong> DAW.<br />
3<br />
Press F3 (MIDI/SYNC) to display <strong>the</strong> MIDI screen.<br />
To learn about MIDI Program Change, Bank Select, and Control Change<br />
messages, see our An Introduction to MIDI InFocus booklet. To learn<br />
how to work <strong>with</strong> <strong>the</strong>m in your DAW, see your DAW’s documentation.<br />
4 Set Local Switch to Off. (For an explanation of why you should do<br />
this, see <strong>the</strong> above explanation of MIDI Controller mode’s Local Sw<br />
parameter.)<br />
5 Press F6 (WRITE) to save <strong>the</strong> change you’ve made.<br />
6 Press <strong>the</strong> PERFORM button and select PRST 033 GM2 Template. This<br />
performance sets up <strong>the</strong> <strong>JUNO</strong>-<strong>STAGE</strong> for use as multitimbral sound<br />
module, and allows you to play up to 16 separate <strong>JUNO</strong>-<strong>STAGE</strong><br />
sounds from your DAW.<br />
In this performance, <strong>the</strong> 16 parts are lined up <strong>with</strong> <strong>the</strong> 16 MIDI<br />
channels so that Parts 1-16 receive MIDI data on MIDI Channels 1-16,<br />
respectively. Each DAW track sends out data on <strong>the</strong> MIDI channel<br />
corresponding to <strong>the</strong> part that plays its sound.<br />
7<br />
You’re now set up.<br />
As you sequence tracks, <strong>the</strong>re’s nothing you need to do on <strong>the</strong> <strong>JUNO</strong>-<br />
<strong>STAGE</strong> o<strong>the</strong>r than play. Everything else takes place in <strong>the</strong> DAW.<br />
About Selecting <strong>JUNO</strong>-<strong>STAGE</strong> Sounds for Use <strong>with</strong> a DAW<br />
No matter how you decide to select sounds for use <strong>with</strong> a DAW, we<br />
recommend starting <strong>with</strong> PRST 033 GM2 Template.<br />
When you’re playing <strong>JUNO</strong>-<strong>STAGE</strong> sounds from a DAW, <strong>the</strong>re are three ways<br />
to select <strong>the</strong> sounds in <strong>the</strong> <strong>JUNO</strong>-<strong>STAGE</strong> performance you use.<br />
• You can create a performance <strong>with</strong> <strong>the</strong> desired sounds on <strong>the</strong><br />
<strong>JUNO</strong>-<strong>STAGE</strong>—Here’s how:<br />
1<br />
With your performance selected, press <strong>the</strong> PART<br />
SELECT button.<br />
11