1/4â Dome, PTZ, Day&Night;, 22x EDMC-3221/E - eneo Home EN
1/4â Dome, PTZ, Day&Night;, 22x EDMC-3221/E - eneo Home EN
1/4â Dome, PTZ, Day&Night;, 22x EDMC-3221/E - eneo Home EN
You also want an ePaper? Increase the reach of your titles
YUMPU automatically turns print PDFs into web optimized ePapers that Google loves.
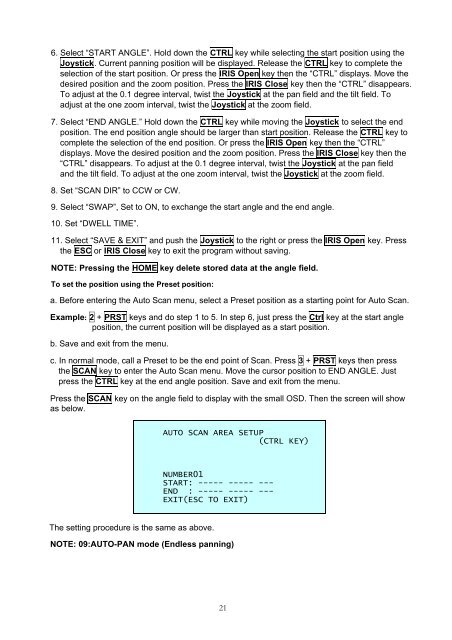
6. Select “START ANGLE”. Hold down the CTRL key while selecting the start position using the<br />
Joystick. Current panning position will be displayed. Release the CTRL key to complete the<br />
selection of the start position. Or press the IRIS Open key then the “CTRL” displays. Move the<br />
desired position and the zoom position. Press the IRIS Close key then the “CTRL” disappears.<br />
To adjust at the 0.1 degree interval, twist the Joystick at the pan field and the tilt field. To<br />
adjust at the one zoom interval, twist the Joystick at the zoom field.<br />
7. Select “<strong>EN</strong>D ANGLE.” Hold down the CTRL key while moving the Joystick to select the end<br />
position. The end position angle should be larger than start position. Release the CTRL key to<br />
complete the selection of the end position. Or press the IRIS Open key then the “CTRL”<br />
displays. Move the desired position and the zoom position. Press the IRIS Close key then the<br />
“CTRL” disappears. To adjust at the 0.1 degree interval, twist the Joystick at the pan field<br />
and the tilt field. To adjust at the one zoom interval, twist the Joystick at the zoom field.<br />
8. Set “SCAN DIR” to CCW or CW.<br />
9. Select “SWAP”, Set to ON, to exchange the start angle and the end angle.<br />
10. Set “DWELL TIME”.<br />
11. Select “SAVE & EXIT” and push the Joystick to the right or press the IRIS Open key. Press<br />
the ESC or IRIS Close key to exit the program without saving.<br />
NOTE: Pressing the HOME key delete stored data at the angle field.<br />
To set the position using the Preset position:<br />
a. Before entering the Auto Scan menu, select a Preset position as a starting point for Auto Scan.<br />
Example: 2 + PRST keys and do step 1 to 5. In step 6, just press the Ctrl key at the start angle<br />
position, the current position will be displayed as a start position.<br />
b. Save and exit from the menu.<br />
c. In normal mode, call a Preset to be the end point of Scan. Press 3 + PRST keys then press<br />
the SCAN key to enter the Auto Scan menu. Move the cursor position to <strong>EN</strong>D ANGLE. Just<br />
press the CTRL key at the end angle position. Save and exit from the menu.<br />
Press the SCAN key on the angle field to display with the small OSD. Then the screen will show<br />
as below.<br />
AUTO SCAN AREA SETUP<br />
(CTRL KEY)<br />
NUMBER01<br />
START: ----- ----- ---<br />
<strong>EN</strong>D : ----- ----- ---<br />
EXIT(ESC TO EXIT)<br />
The setting procedure is the same as above.<br />
NOTE: 09:AUTO-PAN mode (Endless panning)<br />
21


