
You also want an ePaper? Increase the reach of your titles
YUMPU automatically turns print PDFs into web optimized ePapers that Google loves.
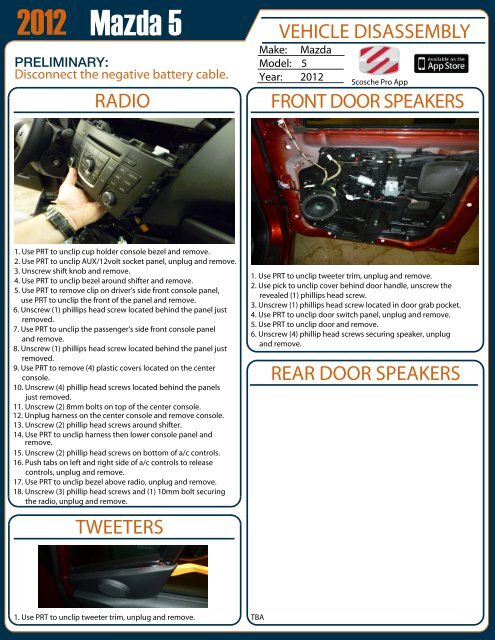
<strong>2012</strong> <strong>Mazda</strong> 5<br />
VEHICLE DISASSEMBLY<br />
PRELIMINARY:<br />
Disconnect the negative battery cable.<br />
RADIO<br />
Make: <strong>Mazda</strong><br />
Model: 5<br />
Year: <strong>2012</strong><br />
Scosche Pro App<br />
FRONT DOOR SPEAKERS<br />
1. Use PRT to unclip cup holder console bezel and remove.<br />
2. Use PRT to unclip AUX/12volt socket panel, unplug and remove.<br />
3. Unscrew shift knob and remove.<br />
4. Use PRT to unclip bezel around shifter and remove.<br />
5. Use PRT to remove clip on driver's side front console panel,<br />
use PRT to unclip the front of the panel and remove.<br />
6. Unscrew (1) phillips head screw located behind the panel just<br />
removed.<br />
7. Use PRT to unclip the passenger's side front console panel<br />
and remove.<br />
8. Unscrew (1) phillips head screw located behind the panel just<br />
removed.<br />
9. Use PRT to remove (4) plastic covers located on the center<br />
console.<br />
10. Unscrew (4) phillip head screws located behind the panels<br />
just removed.<br />
11. Unscrew (2) 8mm bolts on top of the center console.<br />
12. Unplug harness on the center console and remove console.<br />
13. Unscrew (2) phillip head screws around shifter.<br />
14. Use PRT to unclip harness then lower console panel and<br />
remove.<br />
15. Unscrew (2) phillip head screws on bottom of a/c controls.<br />
16. Push tabs on left and right side of a/c controls to release<br />
controls, unplug and remove.<br />
17. Use PRT to unclip bezel above radio, unplug and remove.<br />
18. Unscrew (3) phillip head screws and (1) 10mm bolt securing<br />
the radio, unplug and remove.<br />
TWEETERS<br />
1. Use PRT to unclip tweeter trim, unplug and remove.<br />
2. Use pick to unclip cover behind door handle, unscrew the<br />
revealed (1) phillips head screw.<br />
3. Unscrew (1) phillips head screw located in door grab pocket.<br />
4. Use PRT to unclip door switch panel, unplug and remove.<br />
5. Use PRT to unclip door and remove.<br />
6. Unscrew (4) phillip head screws securing speaker, unplug<br />
and remove.<br />
REAR DOOR SPEAKERS<br />
1. Use PRT to unclip tweeter trim, unplug and remove.<br />
TBA