Create successful ePaper yourself
Turn your PDF publications into a flip-book with our unique Google optimized e-Paper software.
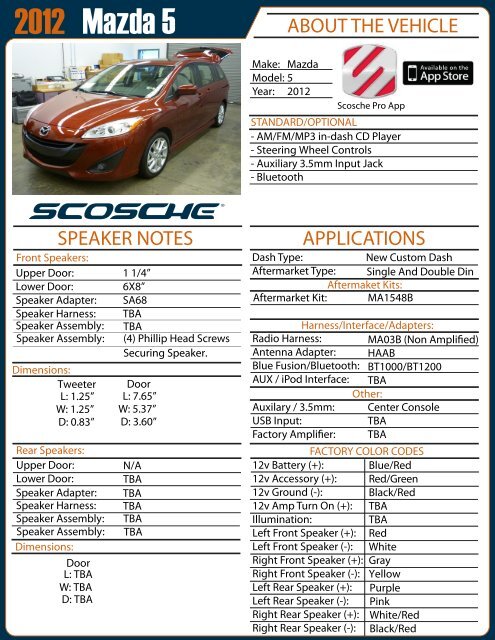
<strong>2012</strong><br />
<strong>Mazda</strong> 5<br />
ABOUT THE VEHICLE<br />
Make: <strong>Mazda</strong><br />
Model: 5<br />
Year: <strong>2012</strong><br />
Scosche Pro App<br />
STANDARD/OPTIONAL<br />
- AM/FM/MP3 in-dash CD Player<br />
- Steering Wheel Controls<br />
- Auxiliary 3.5mm Input Jack<br />
- Bluetooth<br />
SPEAKER NOTES<br />
Front Speakers:<br />
Upper Door:<br />
Lower Door:<br />
Speaker Adapter:<br />
Speaker Harness:<br />
Speaker Assembly:<br />
Speaker Assembly:<br />
Dimensions:<br />
Tweeter<br />
L: 1.25”<br />
W: 1.25”<br />
D: 0.83”<br />
Rear Speakers:<br />
Upper Door:<br />
Lower Door:<br />
Speaker Adapter:<br />
Speaker Harness:<br />
Speaker Assembly:<br />
Speaker Assembly:<br />
Dimensions:<br />
Door<br />
L: TBA<br />
W: TBA<br />
D: TBA<br />
1 1/4”<br />
6X8”<br />
SA68<br />
TBA<br />
TBA<br />
(4) Phillip Head Screws<br />
Securing Speaker.<br />
Door<br />
L: 7.65”<br />
W: 5.37”<br />
D: 3.60”<br />
N/A<br />
TBA<br />
TBA<br />
TBA<br />
TBA<br />
TBA<br />
APPLICATIONS<br />
Dash Type:<br />
New Custom Dash<br />
Aftermarket Type: Single And Double Din<br />
Aftermaket Kits:<br />
Aftermarket Kit: MA1548B<br />
Harness/Interface/Adapters:<br />
Radio Harness:<br />
Antenna Adapter:<br />
Blue Fusion/Bluetooth:<br />
AUX / iPod Interface:<br />
Auxilary / 3.5mm:<br />
USB Input:<br />
HAAB<br />
BT1000/BT1200<br />
TBA<br />
Other:<br />
Center Console<br />
TBA<br />
TBA<br />
FACTORY COLOR CODES<br />
12v Battery (+): Blue/Red<br />
12v +12 Accessory Volt Acessory: (+): Red/Green P<br />
12v Ground (-): Black/Red<br />
12v Amp Turn On (+): TBA<br />
Illumination:<br />
TBA<br />
Left Front Speaker (+): Red<br />
Left Front Speaker (-): White<br />
Right Front Speaker (+): Gray<br />
Right Front Speaker (-): Yellow<br />
Left Rear Speaker (+): Purple<br />
Left Rear Speaker (-): Pink<br />
Right Rear Speaker (+): White/Red<br />
Right Rear Speaker (-): Black/Red
<strong>2012</strong> <strong>Mazda</strong> 5<br />
VEHICLE DISASSEMBLY<br />
PRELIMINARY:<br />
Disconnect the negative battery cable.<br />
RADIO<br />
Make: <strong>Mazda</strong><br />
Model: 5<br />
Year: <strong>2012</strong><br />
Scosche Pro App<br />
FRONT DOOR SPEAKERS<br />
1. Use PRT to unclip cup holder console bezel and remove.<br />
2. Use PRT to unclip AUX/12volt socket panel, unplug and remove.<br />
3. Unscrew shift knob and remove.<br />
4. Use PRT to unclip bezel around shifter and remove.<br />
5. Use PRT to remove clip on driver's side front console panel,<br />
use PRT to unclip the front of the panel and remove.<br />
6. Unscrew (1) phillips head screw located behind the panel just<br />
removed.<br />
7. Use PRT to unclip the passenger's side front console panel<br />
and remove.<br />
8. Unscrew (1) phillips head screw located behind the panel just<br />
removed.<br />
9. Use PRT to remove (4) plastic covers located on the center<br />
console.<br />
10. Unscrew (4) phillip head screws located behind the panels<br />
just removed.<br />
11. Unscrew (2) 8mm bolts on top of the center console.<br />
12. Unplug harness on the center console and remove console.<br />
13. Unscrew (2) phillip head screws around shifter.<br />
14. Use PRT to unclip harness then lower console panel and<br />
remove.<br />
15. Unscrew (2) phillip head screws on bottom of a/c controls.<br />
16. Push tabs on left and right side of a/c controls to release<br />
controls, unplug and remove.<br />
17. Use PRT to unclip bezel above radio, unplug and remove.<br />
18. Unscrew (3) phillip head screws and (1) 10mm bolt securing<br />
the radio, unplug and remove.<br />
TWEETERS<br />
1. Use PRT to unclip tweeter trim, unplug and remove.<br />
2. Use pick to unclip cover behind door handle, unscrew the<br />
revealed (1) phillips head screw.<br />
3. Unscrew (1) phillips head screw located in door grab pocket.<br />
4. Use PRT to unclip door switch panel, unplug and remove.<br />
5. Use PRT to unclip door and remove.<br />
6. Unscrew (4) phillip head screws securing speaker, unplug<br />
and remove.<br />
REAR DOOR SPEAKERS<br />
1. Use PRT to unclip tweeter trim, unplug and remove.<br />
TBA


