
Create successful ePaper yourself
Turn your PDF publications into a flip-book with our unique Google optimized e-Paper software.
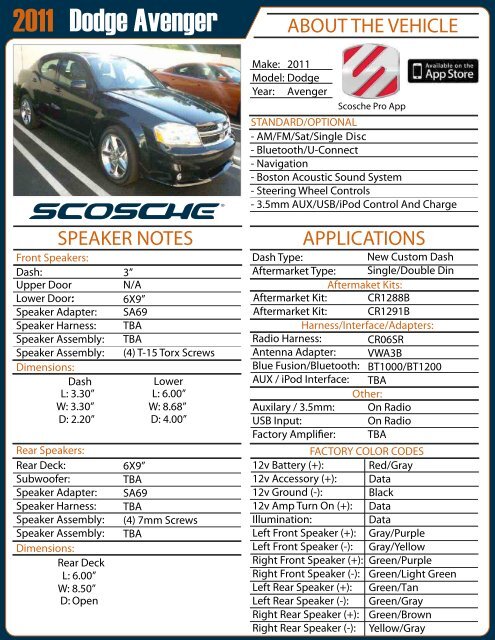
<strong>2011</strong> <strong>Dodge</strong> <strong>Avenger</strong> ABOUT THE VEHICLE<br />
Make: <strong>2011</strong><br />
Model: <strong>Dodge</strong><br />
Year: <strong>Avenger</strong><br />
<strong>Scosche</strong> Pro App<br />
STANDARD/OPTIONAL<br />
- AM/FM/Sat/Single Disc<br />
- Bluetooth/U-Connect<br />
- Navigation<br />
- Boston Acoustic Sound System<br />
- Steering Wheel Controls<br />
- 3.5mm AUX/USB/iPod Control And Charge<br />
SPEAKER NOTES<br />
Front Speakers:<br />
Dash:<br />
Upper Door<br />
Lower Door: :<br />
Speaker Adapter:<br />
Speaker Harness:<br />
Speaker Assembly:<br />
Speaker Assembly:<br />
Dimensions:<br />
Dash<br />
L: 3.30”<br />
W: 3.30”<br />
D: 2.20”<br />
Rear Speakers:<br />
Rear Deck:<br />
Subwoofer:<br />
Speaker Adapter:<br />
Speaker Harness:<br />
Speaker Assembly:<br />
Speaker Assembly:<br />
Dimensions:<br />
Rear Deck<br />
L: 6.00”<br />
W: 8.50”<br />
D: Open<br />
3”<br />
N/A<br />
6X9”<br />
SA69<br />
TBA<br />
TBA<br />
(4) T-15 Torx Screws<br />
Lower<br />
L: 6.00”<br />
W: 8.68”<br />
D: 4.00”<br />
6X9”<br />
TBA<br />
SA69<br />
TBA<br />
(4) 7mm Screws<br />
TBA<br />
APPLICATIONS<br />
Dash Type:<br />
Aftermarket Type:<br />
New Custom Dash<br />
Single/Double Din<br />
Aftermaket Kits:<br />
Aftermarket Kit: CR1288B<br />
Aftermarket Kit: CR1291B<br />
Harness/Interface/Adapters:<br />
Radio Harness: CR06SR<br />
Antenna Adapter: VWA3B<br />
Blue Fusion/Bluetooth: BT1000/BT1200<br />
AUX / iPod Interface: TBA<br />
Auxilary / 3.5mm:<br />
USB Input:<br />
12v Battery (+):<br />
12v Accessory (+):<br />
12v Ground (-):<br />
12v Amp Turn On (+):<br />
Illumination:<br />
Left Front Speaker (+):<br />
Left Front Speaker (-):<br />
Right Front Speaker (+):<br />
Right Front Speaker (-):<br />
Left Rear Speaker (+):<br />
Left Rear Speaker (-):<br />
Right Rear Speaker (+):<br />
Right Rear Speaker (-):<br />
Other:<br />
On Radio<br />
On Radio<br />
TBA<br />
FACTORY COLOR CODES<br />
Red/Gray<br />
Data<br />
Black<br />
Data<br />
Data<br />
Gray/Purple<br />
Gray/Yellow<br />
Green/Purple<br />
Green/Light Green<br />
Green/Tan<br />
Green/Gray<br />
Green/Brown<br />
Yellow/Gray
<strong>2011</strong> <strong>Dodge</strong> <strong>Avenger</strong> VEHICLE DISASSEMBLY<br />
PRELIMINARY:<br />
Disconnect the negative battery cable.<br />
RADIO<br />
Make:<br />
Model:<br />
Year:<br />
<strong>Dodge</strong><br />
<strong>Avenger</strong><br />
<strong>2011</strong><br />
<strong>Scosche</strong> Pro App<br />
SIDE DASH SPEAKERS<br />
1. Use PRT to unclip a/c controls, unplug and remove.<br />
2. Use PRT to unclip panel above radio bezel and remove.<br />
3. Use PRT to unclip radio bezel, unplug and remove.<br />
4. Unscrew (4) T-20 torx securing radio, unplug and remove.<br />
5. To fit double din unscrew (3) T-20 torx securing factory<br />
bracket and remove.<br />
FRONT DOOR SPEAKERS<br />
1. Pull down rubber door seal along a-pillar on driver and<br />
passenger side.<br />
2. Use PRT to unclip a-pillar panel and remove on driver and<br />
passenger side.<br />
3. Use PRT to unclip top dash panel and remove.<br />
4. Unscrew (2) T-20 torx securing the peaker, unplug and<br />
remove.<br />
REAR DECK SPEAKERS<br />
1. Use PRT to unclip plastic mirror cover.<br />
2. Use PRT to remove cover in door.<br />
3. Unscrew (2) T-15 torx behind the panel just removed.<br />
4. Use pick to remove plastic cover behind the door handle.<br />
5. Unscrew (1) T-15 torx behind the panel just removed.<br />
6. Use PRT to unclip window switch panel, unplug and remove.<br />
7. Use PRT to unclip door panel, unplug and remove.<br />
8. Unscrew (4) T-15 torx secuing the speaker, unplug and<br />
remove.<br />
1. Fold down rear seat back.<br />
2. Use PRT to unclip (2) panel fasteners.<br />
3. Use PRT to unclip c-pillar panel on driver and passenger side.<br />
4. Use PRT to unclip rear deck lid and remove.<br />
5. Unscrew (4) 7mm bolts securing the speaker, unplug and<br />
remove.