
You also want an ePaper? Increase the reach of your titles
YUMPU automatically turns print PDFs into web optimized ePapers that Google loves.
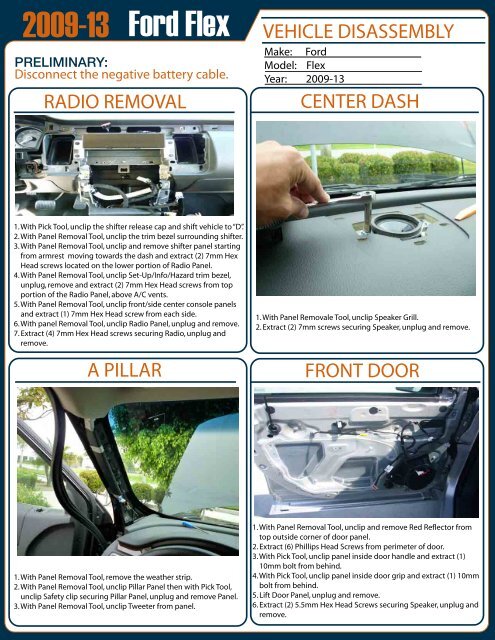
<strong>2009</strong>-13<br />
<strong>Ford</strong> <strong>Flex</strong><br />
PRELIMINARY:<br />
Disconnect the negative battery cable.<br />
RADIO REMOVAL<br />
VEHICLE DISASSEMBLY<br />
Make:<br />
<strong>Ford</strong><br />
Model: <strong>Flex</strong><br />
Year: <strong>2009</strong>-13<br />
CENTER DASH<br />
1. With Pick Tool, unclip the shifter release cap and shift vehicle to “D”.<br />
2. With Panel Removal Tool, unclip the trim bezel surrounding shifter.<br />
3. With Panel Removal Tool, unclip and remove shifter panel starting<br />
from armrest moving towards the dash and extract (2) 7mm Hex<br />
Head screws located on the lower portion of Radio Panel.<br />
4. With Panel Removal Tool, unclip Set-Up/Info/Hazard trim bezel,<br />
unplug, remove and extract (2) 7mm Hex Head screws from top<br />
portion of the Radio Panel, above A/C vents.<br />
5. With Panel Removal Tool, unclip front/side center console panels<br />
and extract (1) 7mm Hex Head screw from each side.<br />
6. With panel Removal Tool, unclip Radio Panel, unplug and remove.<br />
7. Extract (4) 7mm Hex Head screws securing Radio, unplug and<br />
remove.<br />
A PILLAR<br />
1. With Panel Removale Tool, unclip Speaker Grill.<br />
2. Extract (2) 7mm screws securing Speaker, unplug and remove.<br />
FRONT DOOR<br />
OEM COLOR CODES<br />
+12 Volt Constant: Lt. Green/ Purple<br />
+12 Volt Acessory: Pink/ Black<br />
Ground: Black/ Lt. Green<br />
1. With Panel Removal Tool, remove the weather strip.<br />
2. With Panel Removal Tool, unclip Pillar Panel then with Pick Tool,<br />
unclip Safety clip securing Pillar Panel, unplug and remove Panel.<br />
3. With Panel Removal Tool, unclip Tweeter from panel.<br />
Rear Right Positive:<br />
Rear Right Negative:<br />
Orange/ Red<br />
Brown/ Pink<br />
1. With Panel Removal Tool, unclip and remove Red Reflector from<br />
top outside corner of door panel.<br />
2. Extract (6) Phillips Head Screws from perimeter of door.<br />
3. With Pick Tool, unclip panel inside door handle and extract (1)<br />
<strong>10</strong>mm bolt from behind.<br />
4. With Pick Tool, unclip panel inside door grip and extract (1) <strong>10</strong>mm<br />
bolt from behind.<br />
5. Lift Door Panel, unplug and remove.<br />
6. Extract (2) 5.5mm Hex Head Screws securing Speaker, unplug and<br />
remove.