
You also want an ePaper? Increase the reach of your titles
YUMPU automatically turns print PDFs into web optimized ePapers that Google loves.
To switch to Native mode:<br />
• Press 3D while viewing 3D mode.<br />
• Press 3D while viewing 2D to 3D mode.<br />
NOTE: When 3D format signal with 3D Auto<br />
Detect Information is received, it is not possible to<br />
switch to Native.<br />
• From the Quick Menu in 2D mode.<br />
a<br />
b<br />
c<br />
In the Quick Menu, press B or b to select<br />
3D Settings and press OK.<br />
Press B or b to select 2D Format Select<br />
and press OK.<br />
Press C or c to select Native.<br />
NOTE: When Frame Packing is input, 2D<br />
Format Select will be grayed out.<br />
To switch to 2D to 3D mode:<br />
Press 3D while viewing 2D or Native mode.<br />
NOTE: Depending on the input mode, the display<br />
mode switches between 2D and 3D.<br />
Setting the auto start mode<br />
Controls what the TV does when it detects a 3D signal.<br />
a<br />
b<br />
c<br />
d<br />
e<br />
Option<br />
3D<br />
2D<br />
Off<br />
Press MENU / C c to highlight Setup icon.<br />
Press B/C c to highlight Preferences icon<br />
and press OK.<br />
Press B or b to select 3D Setup and press<br />
OK.<br />
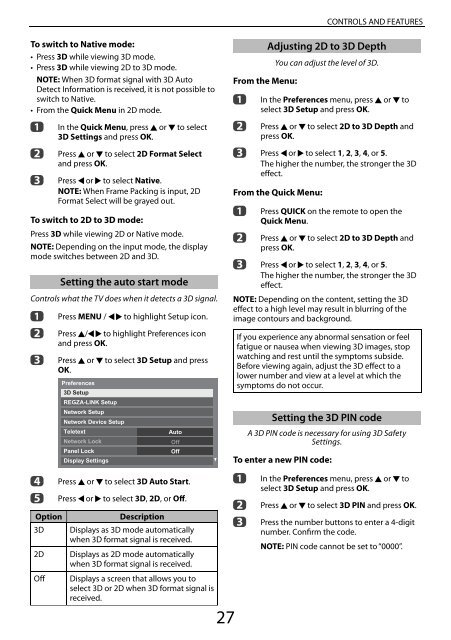
Preferences<br />
3D Setup<br />
REGZA-LINK Setup<br />
Network Setup<br />
Network Device Setup<br />
Teletext<br />
Network Lock<br />
Panel Lock<br />
Display Settings<br />
Auto<br />
Off<br />
Off<br />
Press B or b to select 3D Auto Start.<br />
Press C or c to select 3D, 2D, or Off.<br />
Description<br />
Displays as 3D mode automatically<br />
when 3D format signal is received.<br />
Displays as 2D mode automatically<br />
when 3D format signal is received.<br />
Displays a screen that allows you to<br />
select 3D or 2D when 3D format signal is<br />
received.<br />
27<br />
From the Menu:<br />
a<br />
b<br />
CONTROLS AND FEATURES<br />
Adjusting 2D to 3D Depth<br />
You can adjust the level of 3D.<br />
In the Preferences menu, press B or b to<br />
select 3D Setup and press OK.<br />
Press B or b to select 2D to 3D Depth and<br />
press OK.<br />
c Press C or c to select 1, 2, 3, 4, or 5.<br />
The higher the number, the stronger the 3D<br />
effect.<br />
From the Quick Menu:<br />
a<br />
b<br />
Press QUICK on the remote to open the<br />
Quick Menu.<br />
Press B or b to select 2D to 3D Depth and<br />
press OK.<br />
c Press C or c to select 1, 2, 3, 4, or 5.<br />
The higher the number, the stronger the 3D<br />
effect.<br />
NOTE: Depending on the content, setting the 3D<br />
effect to a high level may result in blurring of the<br />
image contours and background.<br />
If you experience any abnormal sensation or feel<br />
fatigue or nausea when viewing 3D images, stop<br />
watching and rest until the symptoms subside.<br />
Before viewing again, adjust the 3D effect to a<br />
lower number and view at a level at which the<br />
symptoms do not occur.<br />
Setting the 3D PIN code<br />
A 3D PIN code is necessary for using 3D Safety<br />
Settings.<br />
To enter a new PIN code:<br />
a<br />
b<br />
c<br />
In the Preferences menu, press B or b to<br />
select 3D Setup and press OK.<br />
Press B or b to select 3D PIN and press OK.<br />
Press the number buttons to enter a 4-digit<br />
number. Confirm the code.<br />
NOTE: PIN code cannot be set to “0000”.