
You also want an ePaper? Increase the reach of your titles
YUMPU automatically turns print PDFs into web optimized ePapers that Google loves.
CONTROLS AND FEATURES<br />
c<br />
Press OK to display Digital Audio Output<br />
menu and press B or b to select an option.<br />
Audio Format:<br />
Press C or c to select PCM or Auto.<br />
PCM: This mode outputs PCM format<br />
to the digital audio output<br />
socket.<br />
Auto: This mode outputs Dolby Digital<br />
(if available) or PCM to the digital<br />
audio output socket.<br />
Dolby Digital S Dolby Digital<br />
Dolby Digital Plus S Dolby Digital<br />
MPEG S PCM<br />
HE-AAC S Dolby Digital<br />
Audio Delay:<br />
Press C or c to select Auto or Manual.<br />
Auto: This mode automatically adjusts<br />
the audio timing to meet the<br />
video timing.<br />
NOTE: The time lag might<br />
be large between the image<br />
and sound depending on the<br />
connected equipment (amplifier<br />
etc.). In that case, select Manual.<br />
Manual: You can <strong>manual</strong>ly adjust the<br />
audio signal timing to meet the<br />
video signal timing.<br />
Delay Adjustment:<br />
Press C or c to adjust the audio signal<br />
timing (0 – 250ms) to meet the video signal<br />
timing.<br />
NOTE:<br />
• This feature is grayed out when Audio<br />
Delay is in Auto.<br />
• A time lag will occur when the video signal<br />
or audio signal is changed. Adjust the<br />
timing accordingly.<br />
• When adjusting the timing, turn down the<br />
volume of the AV equipment used as far<br />
as possible. Depending on the equipment,<br />
noise etc. may occur when the signal is<br />
changed.<br />
• Depending on the connected equipment<br />
(amplifier, etc.), adjustment may not be<br />
possible.<br />
• When the optical digital output setting<br />
(Auto t PCM) is changed, it may be<br />
necessary to adjust the timing again.<br />
• Do not use other than for audio output<br />
from the AV amplifier, etc. (Malfunction<br />
may occur)<br />
Using REGZA-LINK<br />
This is a new feature that uses CEC technology<br />
and allows you to control <strong>Toshiba</strong> REGZA-LINK<br />
compatible devices from the television remote<br />
control via HDMI connection (page 12).<br />
When the Enable REGZA-LINK item in the REGZA-<br />
LINK Setup menu is set to On, individual functions<br />
also set to On will be activated.<br />
a<br />
b<br />
c<br />
d<br />
Enable REGZA-LINK<br />
Press MENU / C c to highlight Setup icon.<br />
Press B/C c to highlight Preferences icon<br />
and press OK.<br />
Press B or b to select REGZA-LINK Setup<br />
and press OK.<br />
Press b to select Enable REGZA-LINK and<br />
press C or c to select On.<br />
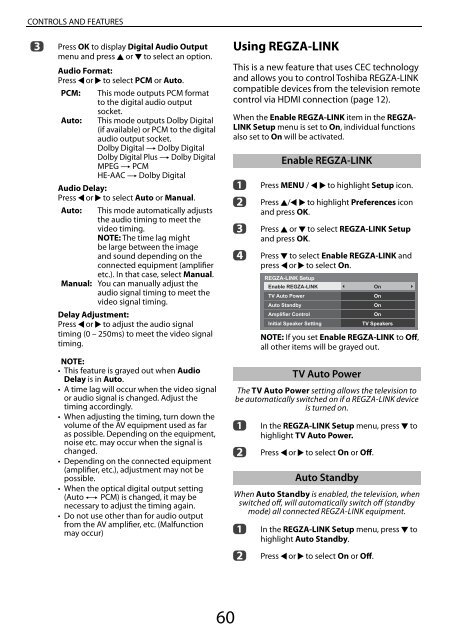
REGZA-LINK Setup<br />
Enable REGZA-LINK<br />
TV Auto Power<br />
Auto Standby<br />
Amplifier Control<br />
Initial Speaker Setting<br />
On<br />
On<br />
On<br />
On<br />
TV Speakers<br />
NOTE: If you set Enable REGZA-LINK to Off,<br />
all other items will be grayed out.<br />
TV Auto Power<br />
The TV Auto Power setting allows the television to<br />
be automatically switched on if a REGZA-LINK device<br />
is turned on.<br />
a<br />
b<br />
In the REGZA-LINK Setup menu, press b to<br />
highlight TV Auto Power.<br />
Press C or c to select On or Off.<br />
Auto Standby<br />
When Auto Standby is enabled, the television, when<br />
switched off, will automatically switch off (standby<br />
mode) all connected REGZA-LINK equipment.<br />
a<br />
b<br />
In the REGZA-LINK Setup menu, press b to<br />
highlight Auto Standby.<br />
Press C or c to select On or Off.<br />
60