
Create successful ePaper yourself
Turn your PDF publications into a flip-book with our unique Google optimized e-Paper software.
CONTROLS AND FEATURES<br />
To close the Media Player:<br />
a<br />
Press EXIT.<br />
Using the Media Player with a DLNA<br />
CERTIFIED Server<br />
You need to configure a home network before<br />
using this feature (see page 14).<br />
a<br />
b<br />
c<br />
Press MENU / C c to highlight Media<br />
Player icon.<br />
Press B / C c to highlight Network Media<br />
Player and press OK.<br />
Select the server you want to use and press<br />
OK.<br />
Multi View will appear.<br />
Multi View (DMS)<br />
Network Media Player<br />
///Folder name 5/9999<br />
Return<br />
xxxxxxxxx.mpg<br />
xxxxxxxxx.mp3<br />
xxxxxxxxx<br />
xxxxxxxxx.mpg<br />
xxxxxxxxx.mp3<br />
xxxxxxxxx.jpg<br />
xxxxxxxxx.jpg<br />
xxxxxxxxx.jpg<br />
xxxxxxxxx.mp3<br />
xxxxxxxxx.mpg<br />
xxxxxxxxx.jpg<br />
Photo, Movie and Music files and folders are<br />
displayed in the Multi View (DMS).<br />
Files are displayed according to the type first<br />
selected (Photo, Movie or Music).<br />
e.g. If you first selected a Photo file, only Photo files<br />
will be displayed.<br />
To select a file in the Multi View:<br />
a<br />
b<br />
Press Bb C c to select a file or folder.<br />
Press OK to move to the next layer, or press<br />
BACK to return to the previous layer.<br />
NOTE: You can also return to the previous layer by<br />
selecting the icon at the top left of the Multi View<br />
screen and pressing OK.<br />
To close the Media Player:<br />
a<br />
Press EXIT.<br />
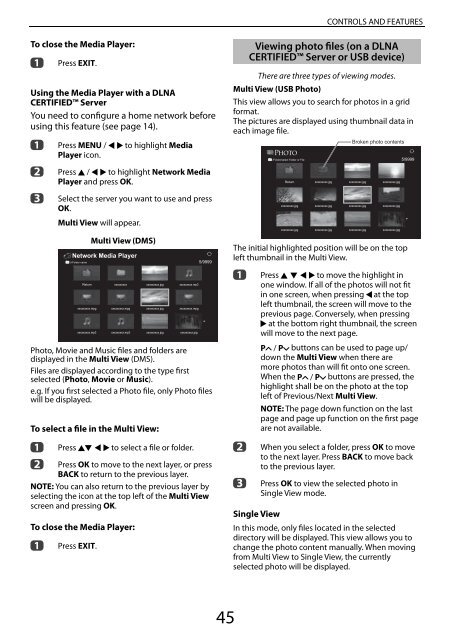
Viewing photo files (on a DLNA<br />
CERTIFIED Server or USB device)<br />
There are three types of viewing modes.<br />
Multi View (USB Photo)<br />
This view allows you to search for photos in a grid<br />
format.<br />
The pictures are displayed using thumbnail data in<br />
each image file.<br />
/Folder/select Folder or File<br />
Return<br />
xxxxxxxxx.jpg<br />
xxxxxxxxx.jpg<br />
xxxxxxxxx.jpg<br />
xxxxxxxxx.jpg<br />
xxxxxxxxx.jpg<br />
Broken photo contents<br />
xxxxxxxxx.jpg<br />
xxxxxxxxx.jpg<br />
xxxxxxxxx.jpg<br />
xxxxxxxxx.jpg<br />
xxxxxxxxx.jpg<br />
xxxxxxxxx.jpg<br />
The initial highlighted position will be on the top<br />
left thumbnail in the Multi View.<br />
a<br />
b<br />
c<br />
5/9999<br />
Press B b C c to move the highlight in<br />
one window. If all of the photos will not fit<br />
in one screen, when pressing C at the top<br />
left thumbnail, the screen will move to the<br />
previous page. Conversely, when pressing<br />
c at the bottom right thumbnail, the screen<br />
will move to the next page.<br />
PU / Pu buttons can be used to page up/<br />
down the Multi View when there are<br />
more photos than will fit onto one screen.<br />
When the PU / Pu buttons are pressed, the<br />
highlight shall be on the photo at the top<br />
left of Previous/Next Multi View.<br />
NOTE: The page down function on the last<br />
page and page up function on the first page<br />
are not available.<br />
When you select a folder, press OK to move<br />
to the next layer. Press BACK to move back<br />
to the previous layer.<br />
Press OK to view the selected photo in<br />
Single View mode.<br />
Single View<br />
In this mode, only files located in the selected<br />
directory will be displayed. This view allows you to<br />
change the photo content <strong>manual</strong>ly. When moving<br />
from Multi View to Single View, the currently<br />
selected photo will be displayed.<br />
45