Horizon Seafari Model 450-1800 Owner's Manual - Zanshin
Horizon Seafari Model 450-1800 Owner's Manual - Zanshin
Horizon Seafari Model 450-1800 Owner's Manual - Zanshin

You also want an ePaper? Increase the reach of your titles
YUMPU automatically turns print PDFs into web optimized ePapers that Google loves.
HROSystems <strong>Horizon</strong> <strong>Seafari</strong> “Section E” Installation<br />
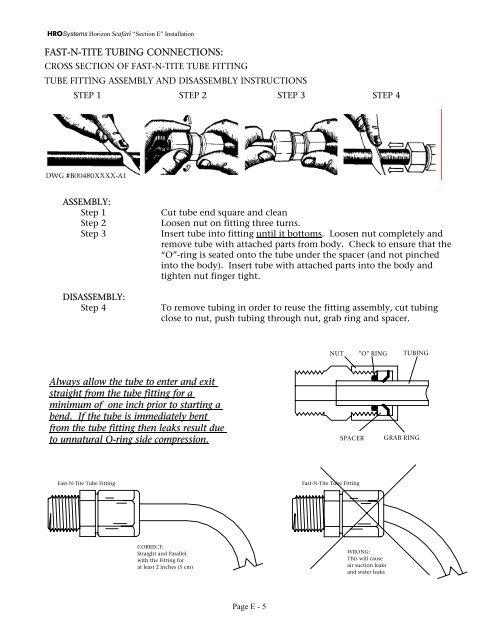
FAST-N-TITE TUBING CONNECTIONS:<br />
CROSS SECTION OF FAST-N-TITE TUBE FITTING<br />
TUBE FITTING ASSEMBLY AND DISASSEMBLY INSTRUCTIONS<br />
STEP 1 STEP 2 STEP 3 STEP 4<br />
ASSEMBLY:<br />
Step 1<br />
Step 2<br />
Step 3<br />
DISASSEMBLY:<br />
Step 4<br />
Cut tube end square and clean<br />
Loosen nut on fitting three turns.<br />
Insert tube into fitting until it bottoms. Loosen nut completely and<br />
remove tube with attached parts from body. Check to ensure that the<br />
“O”-ring is seated onto the tube under the spacer (and not pinched<br />
into the body). Insert tube with attached parts into the body and<br />
tighten nut finger tight.<br />
To remove tubing in order to reuse the fitting assembly, cut tubing<br />
close to nut, push tubing through nut, grab ring and spacer.<br />
NUT "O" RING TUBING<br />
Always allow the tube to enter and exit<br />
straight from the tube fitting for a<br />
minimum of one inch prior to starting a<br />
bend. If the tube is immediately bent<br />
from the tube fitting then leaks result due<br />
to unnatural O-ring side compression.<br />
SPACER<br />
GRAB RING<br />
Fast-N-Tite Tube Fitting<br />
Fast-N-Tite Tube Fitting<br />
CORRECT:<br />
Straight and Parallel<br />
with the Fitting for<br />
at least 2 inches (5 cm)<br />
WRONG:<br />
This will cause<br />
air suction leaks<br />
and water leaks<br />
Page E - 5