

PDF Download - Glidewell Dental Labs
PDF Download - Glidewell Dental Labs
PDF Download - Glidewell Dental Labs

You also want an ePaper? Increase the reach of your titles
YUMPU automatically turns print PDFs into web optimized ePapers that Google loves.
Clinical Delivery<br />
The following procedure outlines the specific steps for placing<br />
an Inclusive All-Zirconia Abutment with its matching jig.<br />
As noted, the same steps may be applied when placing other<br />
Inclusive Custom Abutments or screw-retained restorations.<br />
To properly seat a custom abutment with its custommatched<br />
jig:<br />
1<br />
2<br />
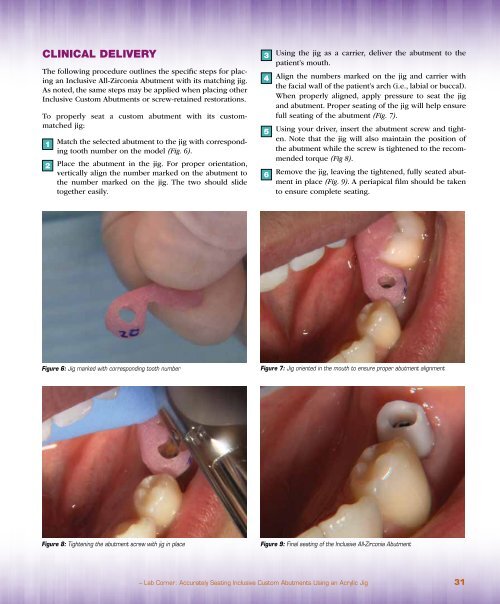
Match the selected abutment to the jig with corresponding<br />
tooth number on the model (Fig. 6).<br />
Place the abutment in the jig. For proper orientation,<br />
vertically align the number marked on the abutment to<br />
the number marked on the jig. The two should slide<br />
together easily.<br />
3<br />
4<br />
5<br />
6<br />
Using the jig as a carrier, deliver the abutment to the<br />
patient’s mouth.<br />
Align the numbers marked on the jig and carrier with<br />
the facial wall of the patient’s arch (i.e., labial or buccal).<br />
When properly aligned, apply pressure to seat the jig<br />
and abutment. Proper seating of the jig will help ensure<br />
full seating of the abutment (Fig. 7).<br />
Using your driver, insert the abutment screw and tighten.<br />
Note that the jig will also maintain the position of<br />
the abutment while the screw is tightened to the recommended<br />
torque (Fig 8).<br />
Remove the jig, leaving the tightened, fully seated abutment<br />
in place (Fig. 9). A periapical film should be taken<br />
to ensure complete seating.<br />
Figure 6: Jig marked with corresponding tooth number<br />
Figure 7: Jig oriented in the mouth to ensure proper abutment alignment<br />
Figure 8: Tightening the abutment screw with jig in place<br />
Figure 9: Final seating of the Inclusive All-Zirconia Abutment<br />
– Lab Corner: Accurately Seating Inclusive Custom Abutments Using an Acrylic Jig 31


