ELECTRIC COMPANY INC. , - Lyon
ELECTRIC COMPANY INC. , - Lyon
ELECTRIC COMPANY INC. , - Lyon

Create successful ePaper yourself
Turn your PDF publications into a flip-book with our unique Google optimized e-Paper software.
PAGE 4 BULLETIN NO. 281-179<br />
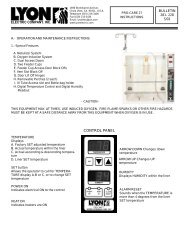
SECTION 4: PLACING PROFI INTO OPERATION. Plug the power cord into a receptacle of the proper voltage. The fan should go<br />
on and the indicator lamp should go on indicating that the unit's heater is operating. Make any temperature adjustments as covered<br />
in section two.<br />
<strong>INC</strong>UBATOR WARM UP PERIOD: The incubator should be turned on and allowed to warm up for a period of 24 to 48 hours before<br />
placing eggs in it. IT TAKES AT LEAST 24 HOURS TO STABILIZE THE TEMPERATURE AND HAVE THE WALLS OF THE<br />
<strong>INC</strong>UBATOR REACH SATURATION TEMPERATURE. Due to the size of the incubator, any temperature adjustment, etc. will take<br />
time to reflect that change. Recovery from opening the incubator door may take up to an hour to reestablish the temperature.<br />
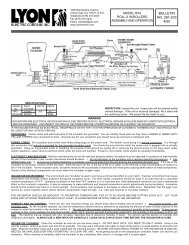
AIR VENT ADJUSTMENT: The unit is shipped with the AIR VENTS CLOSED. DO NOT ATTEMPT ANY AIR ADJUSTMENT FOR AT<br />
LEAST 24 HOURS. There are three intake ventilation holes near the raised part on top of the dome that ALWAYS take in fresh air.<br />
It will not take much additional air through the air intakes to supply adequate air for the eggs because the incubator is designed to<br />
constantly replace a small amount of the air in the incubator. Four exhaust ventilation holes are located above the fan motor near the<br />
center of the dome.<br />
THE AIR INTAKES NEED TO BE OPEN ONLY A SMALL AMOUNT DURING <strong>INC</strong>UBATION, <strong>INC</strong>REASE ONLY IF LIVE BIRDS ARE<br />
KEPT IN THE UNIT.<br />
Whenever the heater in the PROFI is turned on by the thermostat, the indicator light will go on. It goes off when the heater coil is<br />
turned off by the thermostat. The actual on/off cycling times will depend on the ambient temperature around the incubator.<br />
Take your time and don’t rush the temperature stabilization of the incubator or hatcher.<br />
The eggs you place in the incubator have a lower temperature than the incubator setting. If eggs were cooled for storage, bring them<br />
to room temperature before placing them in the incubator. The amount of eggs and their temperature may cause the incubator to take<br />
some time to adjust. (Remember that the incubator had to warm up the walls and all the trays, etc. in it). The PROFI must now bring<br />
the eggs to the desired incubating temperature. How cold the eggs are will determine how long it will take the incubator to react and<br />
bring them to the incubating temperature you have set. DO NOT MAKE ANY ADJUSTMENTS TO THE TEMPERATURE CONTROL<br />
UNTIL THE PROFI HAS HAD TIME TO WARM UP THE EGGS.<br />
SECTION 5: WET BULB OR HUMIDITY READINGS. The humidity must be regulated manually. With the water and electrical<br />
connections made and the incubator set to its operating temperature, observe the wet bulb thermometer through the window with the<br />
incubator door closed.<br />
A wet bulb or humidity reading of 86° F is normal for most eggs with the incubator operating at 99½° F. Virtually all avian eggs will<br />
hatch at that humidity setting. When the incubator is totally devoted to waterfowl eggs, humidity may be elevated to 87° F - 90° F.<br />
Eggs of birds that are native to the desert or very dry climates may produce better hatches with the humidity lower than 86° . Slight<br />
humidity adjustments upwards may be needed for eggs that are several days old when they are put in the incubator, particularly if<br />
they are produced in dry climate where they may have a degree of dehydration from exposure to the natural atmosphere. Incubators<br />
in high mountain altitudes may need a humidity elevation of a degree or two.<br />
Be sure to look up the particular requirements for temperature and humidity for the species of bird you will hatch.<br />
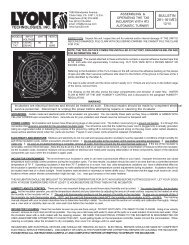
SECTION 6: REGULATING THE HUMIDITY. Check the float valve, it should be at the lowest point in the water pan. When the<br />
incubator has gone through several minutes of cycling on and off, a wet bulb reading will indicate the humidity. If it is too low, open<br />
the door and adjust the float valve to increase the water depth in the pan. Close the door for several minutes to allow the humidity and<br />
temperature to stabilize. Read the wet bulb again. Continue to adjust the float valve until the wet bulb holds a steady reading of 86°<br />
or the desired temperature. CAUTION: The plastic adjusting screw and housing break easily - DO NOT FORCE - make small, slow<br />
adjustments.<br />
On following visits to the incubator, check the humidity and make adjustments as they are indicated.<br />
If the humidity is elevated above that desired by accidently overfilling the pan, some water may be dipped out after the float valve is<br />
adjusted downward.<br />
Many operators never change the float valve setting if the humidity regulation has been made under average weather conditions.<br />
Others prefer to adjust the humidity when the weather changes. Others read the wet bulb daily and make adjustments if the reading<br />
has changed. Devise a system that works well for you.