Operating instructions for Grumbach Incubators - Lyon
Operating instructions for Grumbach Incubators - Lyon
Operating instructions for Grumbach Incubators - Lyon

Create successful ePaper yourself
Turn your PDF publications into a flip-book with our unique Google optimized e-Paper software.
<strong>Operating</strong> <strong>instructions</strong> <strong>for</strong> <strong>Grumbach</strong><br />
<strong>Incubators</strong><br />
Thank you <strong>for</strong> choosing and entrusting <strong>Grumbach</strong> <strong>Incubators</strong> to incubate your valuable eggs. On receiving your<br />
incubator please un-pack it and make sure it is fitted with the features you ordered. Please check all rollers are<br />
present plus mercury thermometer and dial hygrometer. Fill in the guarantee card and the I.D. number of your<br />
incubator is printed on the back cover of the incubator, send your card to your purchasing agent, all <strong>Grumbach</strong><br />
incubators are guaranteed <strong>for</strong> twelve months from the time of purchase.<br />
Both the B.S.S. and S84 range of incubators are similar in the operating procedures with operating ease and<br />
precision at the <strong>for</strong>efront of their design. It is a good idea to store the shipping crate and pallet in case the<br />
incubator requires shipping to us <strong>for</strong> an overhaul or service in future years.<br />
Please ignore any operating <strong>instructions</strong> <strong>for</strong> features not fitted on your individual incubator.<br />
Where to site your incubator.<br />
The site chosen <strong>for</strong> any incubator is vitally important <strong>for</strong> the optimum per<strong>for</strong>mance of the machine.<br />
An incubators temperature control works to its optimum when its surrounding environment has a reasonably<br />
constant temperature. <strong>Grumbach</strong> incubators have great insulation properties, but large external variations in<br />
temperature will affect even these machines temperature control. Do not site your incubator where direct<br />
sunlight falls on it, as this will increase the incubators temperature due to the ‘green house effect’.<br />
As relative humidity can only be increased within the incubator, it is important that the room where the<br />
incubator is sited, has as low as possible ambient humidity. This in turn will give you a greater field of control<br />
on humidity settings within the incubator. Kitchens and bathrooms generally have high ambient humidity levels<br />
so should be avoided.<br />
The surface that the incubator is placed on, should be level to decreases the problem of ‘egg creep’ on the<br />
turning rollers. Make sure you have sufficient room to open the door fully to allow removal of the egg trays.<br />
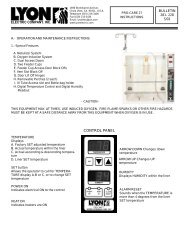
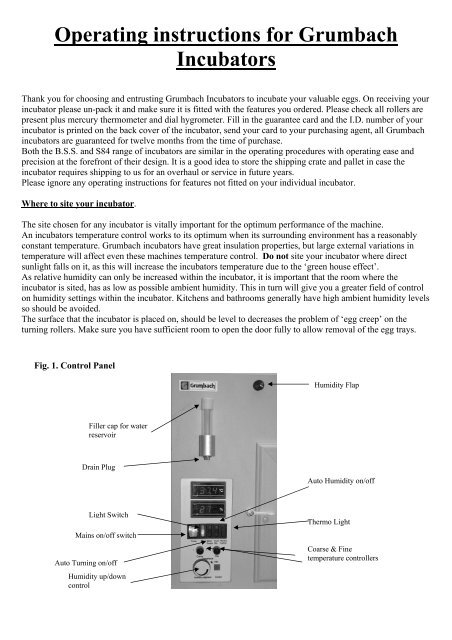
Fig. 1. Control Panel<br />
Humidity Flap<br />
Filler cap <strong>for</strong> water<br />
reservoir<br />
Drain Plug<br />
Auto Humidity on/off<br />
Light Switch<br />
Mains on/off switch<br />
Auto Turning on/off<br />
Humidity up/down<br />
control<br />
Thermo Light<br />
Coarse & Fine<br />
temperature controllers
Temperature Control<br />
Once your machine is sited, plug the Incubator into the mains and turn on the mains power switch. If digital<br />
readers are fitted these will light along with the power switch. Leave the incubator running <strong>for</strong> several hours to<br />
heat up and allow the internal temperature to equilibrate. The ‘Thermo Light’ will be lit continuous while the<br />
incubator is heating up and will start to flash on/off as it reaches the temperature it is set at. The temperature<br />
settings will be set either at or very close to 37.5 C in the factory prior to shipment. The two knobs marked<br />
coarse and fine are your temperature controllers. The coarse knob should be used to adjust the temperature to<br />
close to the desired temperature and then the final adjustments made with the fine knob. Whenever making<br />
adjustments please ensure you check the temperature regularly after, as the increase or decrease is not instant<br />
and will take a few minutes to equilibrate throughout the entire incubator.<br />
Each incubator is fitted with two additional safety thermostats. On the left hand side panel a mechanical safety<br />
thermostat is fitted. This will stop your incubator from overheating if there was a failure with the electronic<br />
primary thermostat. This is preset at the factory and should not need altering.<br />
A third electronic thermostat is fitted close to the fan housing. This is a safety feature and will stop the any<br />
heater damage should the fan stop working. This is fitted under E.E.C. law and should not be tampered with.<br />
Thermometers<br />
Each incubator comes with a laboratory high-grade mercury thermometer. These thermometers are very precise<br />
and we strongly advise that if you have a digital thermometer fitted to your machine, that you calibrate it to the<br />
same reading as the mercury thermometer. The thermometer fits into the bracket supplied on one of the turning<br />
trays and should be viewed straight on to see the blue mercury. Whenever cleaning the thermometer only use<br />
cold water.<br />
Digital thermometers have a far quicker reaction time to small changes in temperature than mercury<br />
thermometers. Once the desired temperature established within the incubator (set by the mercury) calibrate the<br />
digital unit to the same reading if required.<br />
To calibrate simply remove the black plastic frame that surrounds the red plastic front, this clips off by mildly<br />
prising it with a knife or screwdriver then remove the plastic front. Then simply use a screwdriver to turn the<br />
adjusting screw clockwise to turn the thermometer reading up or anti clockwise to turn it down. Once the<br />
desired reading is achieved replace the front. This is safely achieved with the incubator turned on.<br />
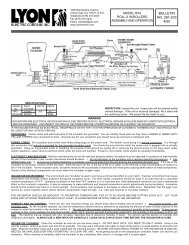
Fig 4. Mercury Thermometer in<br />
bracket.<br />
Fig 3. Digital thermometer<br />
with front removed<br />
Adjusting screw
Auto Turning<br />
When setting up the turning tray with the rollers, make sure that the rollers are at right angles to each other.<br />
Simply count the number of spaces between rollers so each end of the rollers are the same number of slots apart<br />
from each other. The desired distance between rollers is dependant on the size of egg you are incubating. The<br />
egg should sit on the rollers with the bottom of the egg not touching the turning tray. To minimise ‘egg creep’<br />
along the rollers it is best to alternate each egg so the top of one egg faces the front of the incubator and the next<br />
the back and so on. When placing the turning tray into the incubator make sure that the brass rod on the turning<br />
tray enters into the <strong>for</strong>k on the turning arm.<br />
The auto turning will only work when the switch on the control panel is turned on and it lights up. To set the<br />
frequency and length of turn the timing clock on the side of the incubator will have to be set.<br />
The 24-hour time clock has I digit per 15 minutes around the out side of the clock face. When one digit is<br />
pushed in this is equal to the turner moving <strong>for</strong> that period of time. 15 minutes of turning equals approximately<br />
half a stroke. For small eggs such as quail and partridge this is about a 180degree turn. For the larger eggs a full<br />
stroke (two digits pushed in) will be needed <strong>for</strong> each turning session. Please remember to start the turner at one<br />
side <strong>for</strong> larger eggs as if set off in the middle of its stroke each 30-minute turn will end back at the middle of the<br />
incubator. As a rule of thumb a chicken egg will need two digits in then the next four out (no turning) and so on<br />
around the clock. This will give you half an hour turning (one stroke) and one hour of no turning. But the<br />
frequency and amount of turning is down to your individual choice.<br />
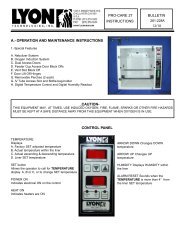
Fig 4. Eggs on rollers<br />
Fig 5. Turning Timer<br />
Fig 6. Turning Fork with<br />
tray in correct position
Humidity Control<br />
On incubators where the auto-Humidity feature is not fitted the humidity can be increased via filling the bottom<br />
tray with water. As relative humidity is directly proportional to the surface area of water, small receptacles may<br />
be placed on the floor of the incubator with different surface areas until the desired humidity level is obtained.<br />
On auto-humidity incubators the reservoir should be filled using distilled water to combat lime scale build up<br />
within the reservoir. Opening or closing the Humidity flap to various degrees can alter the humidity level to<br />
suit most incubation needs. If when the flap is fully open (white line is at three o’clock) the humidity is still not<br />
as high as you require then switch on the Humidity on/off switch. By turning the Humidity up/down switch this<br />
will increase the humidity level up to 100%.. Once the on/ off switch is turned on there is a small heater<br />
situated under the water reservoir, which warms the water, and so assists in evaporation hence increasing the<br />
humidity level. The up/down switch is a simple thermostat that allows you control over how warm the water<br />
gets. By using this facility in conjunction with the flap, you can control the humidity level to your exact<br />
requirements<br />
Make sure the water level is topped up this is easily viewed through the plastic filling tube. Whenever the<br />
incubator is not in use or is being moved, empty any water from the reservoir into a bowl by removing the<br />
drain plug at the base of the filling tube and tilt the incubator <strong>for</strong>ward slightly.<br />
To calibrate the dial humidity gauge, wrap it up in a damp cloth <strong>for</strong> 15 minutes. Then with a small screwdriver<br />
turn the pointer via the screw in the back off the gauge to 100%. Then leave <strong>for</strong> it to drop to ambient humidity<br />
level (generally between 30-50 %).<br />
To calibrate the digital Hygrometer remove the front the same as the digital thermometer. The two calibration<br />
screws are found on the side of each digital digit.<br />
Calibration Screws<br />
Fig 7. Dial Hygrometer<br />
Fig 8. Digital Hygrometer Calibration
Cool Down Timer<br />
Cool down timers are only generally used when incubating waterfowl eggs The time clock is set the same as the<br />
turning/ timer, with each digit inserted equalling 15 minutes of no heat<br />
Air vent.<br />
The air vent is a circular rose on the top front of the S84 incubator and a larger oblong grate on B.S.S. models.<br />
This allows you to manipulate how much fresh air enters the machine. For most eggs this will be left fully open,<br />
but some geese and other waterfowl eggs seem to require a slightly stale air environment, so the flap may be<br />
either partially or fully closed to suit your individual needs.<br />
Cleaning your incubator<br />
Each incubator has been designed <strong>for</strong> ease of cleaning. All surfaces can be cleaned with warm water and a mild<br />
disinfectant. Fumigation with Formaldehyde gas is recommended between hatches. Please do not place the<br />
rollers in a dishwasher as they will bend and distort. The filter gauze should be changed annually under normal<br />
conditions but under heavy use this will require a more frequent change. A water-sanitising tablet may be used<br />
in the water reservoir.<br />
Essential Spare parts<br />
<strong>Grumbach</strong> incubators are built with reliability in mind. However over time certain parts may become warn and<br />
fail as with any other machine. This always seems to happen at the most inopportune moments and we strongly<br />
advise you to have a small number of spare parts to hand to get the incubator back up in use swiftly. These<br />
include a spare fan motor, turner motor, thermostat card and a few 3amp fuses.<br />
A quick problem and answer guide.<br />
Problem<br />
Temperature fails to reach desired level.<br />
Discrepancy between mercury thermometer and<br />
digital thermometer<br />
Turner not working<br />
No power to incubator.<br />
Probable cause or answer<br />
1. Fan failure<br />
2. Thermostat card failure<br />
Calibrate Digital thermometer.<br />
1. Make sure turner is switched on, on control<br />
panel<br />
2. Make sure turning tray is engaged in turning<br />
are <strong>for</strong>k<br />
3. Make sure digits are pushed in on timer.<br />
4. Turner motor failure.<br />
1. Check and change the two 3 amp fuses inside left<br />
side panel near where power cable enters the back of<br />
the incubator.<br />
Warning unplug power source be<strong>for</strong>e removing any<br />
panels<br />
2. Make sure cool down timer is not engaged.