Operating instructions for Grumbach Incubators - Lyon
Operating instructions for Grumbach Incubators - Lyon
Operating instructions for Grumbach Incubators - Lyon

Create successful ePaper yourself
Turn your PDF publications into a flip-book with our unique Google optimized e-Paper software.
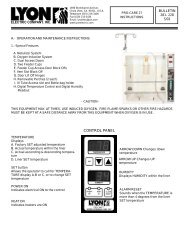
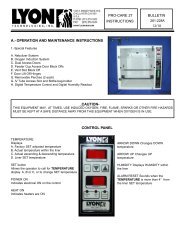
Humidity Control<br />
On incubators where the auto-Humidity feature is not fitted the humidity can be increased via filling the bottom<br />
tray with water. As relative humidity is directly proportional to the surface area of water, small receptacles may<br />
be placed on the floor of the incubator with different surface areas until the desired humidity level is obtained.<br />
On auto-humidity incubators the reservoir should be filled using distilled water to combat lime scale build up<br />
within the reservoir. Opening or closing the Humidity flap to various degrees can alter the humidity level to<br />
suit most incubation needs. If when the flap is fully open (white line is at three o’clock) the humidity is still not<br />
as high as you require then switch on the Humidity on/off switch. By turning the Humidity up/down switch this<br />
will increase the humidity level up to 100%.. Once the on/ off switch is turned on there is a small heater<br />
situated under the water reservoir, which warms the water, and so assists in evaporation hence increasing the<br />
humidity level. The up/down switch is a simple thermostat that allows you control over how warm the water<br />
gets. By using this facility in conjunction with the flap, you can control the humidity level to your exact<br />
requirements<br />
Make sure the water level is topped up this is easily viewed through the plastic filling tube. Whenever the<br />
incubator is not in use or is being moved, empty any water from the reservoir into a bowl by removing the<br />
drain plug at the base of the filling tube and tilt the incubator <strong>for</strong>ward slightly.<br />
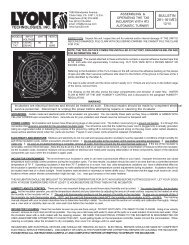
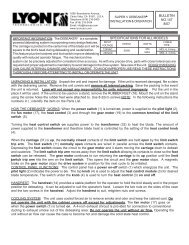
To calibrate the dial humidity gauge, wrap it up in a damp cloth <strong>for</strong> 15 minutes. Then with a small screwdriver<br />
turn the pointer via the screw in the back off the gauge to 100%. Then leave <strong>for</strong> it to drop to ambient humidity<br />
level (generally between 30-50 %).<br />
To calibrate the digital Hygrometer remove the front the same as the digital thermometer. The two calibration<br />
screws are found on the side of each digital digit.<br />
Calibration Screws<br />
Fig 7. Dial Hygrometer<br />
Fig 8. Digital Hygrometer Calibration