bulletin control panel pro-care 27 instructions -caution- a ... - Lyon
bulletin control panel pro-care 27 instructions -caution- a ... - Lyon
bulletin control panel pro-care 27 instructions -caution- a ... - Lyon

Create successful ePaper yourself
Turn your PDF publications into a flip-book with our unique Google optimized e-Paper software.
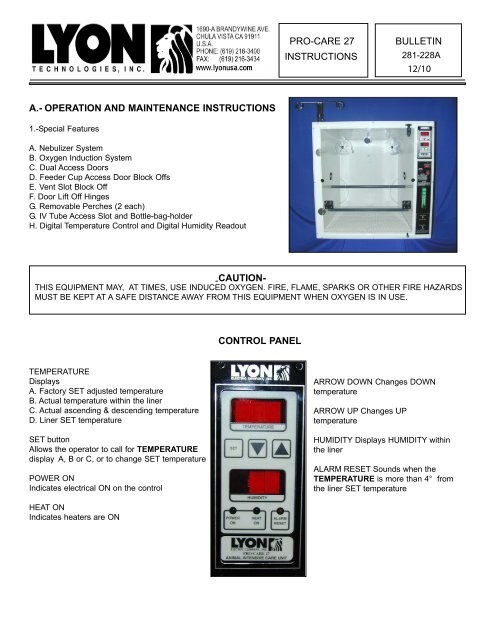
PRO-CARE <strong>27</strong><br />
INSTRUCTIONS<br />
BULLETIN<br />
281-228A<br />
12/10<br />
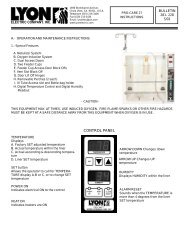
A.- OPERATION AND MAINTENANCE INSTRUCTIONS<br />
1.-Special Features<br />
A. Nebulizer System<br />
B. Oxygen Induction System<br />
C. Dual Access Doors<br />
D. Feeder Cup Access Door Block Offs<br />
E. Vent Slot Block Off<br />
F. Door Lift Off Hinges<br />
G. Removable Perches (2 each)<br />
G. IV Tube Access Slot and Bottle-bag-holder<br />
H. Digital Temperature Control and Digital Humidity Readout<br />
- CAUTION-<br />
THIS EQUIPMENT MAY, AT TIMES, USE INDUCED OXYGEN. FIRE, FLAME, SPARKS OR OTHER FIRE HAZARDS<br />
MUST BE KEPT AT A SAFE DISTANCE AWAY FROM THIS EQUIPMENT WHEN OXYGEN IS IN USE.<br />
CONTROL PANEL<br />
TEMPERATURE<br />
Displays<br />
A. Factory SET adjusted temperature<br />
B. Actual temperature within the liner<br />
C. Actual ascending & descending temperature<br />
D. Liner SET temperature<br />
SET button<br />
Allows the operator to call for TEMPERATURE<br />
display A, B or C, or to change SET temperature<br />
POWER ON<br />
Indicates electrical ON on the <strong>control</strong><br />
ARROW DOWN Changes DOWN<br />
temperature<br />
ARROW UP Changes UP<br />
temperature<br />
HUMIDITY Displays HUMIDITY within<br />
the liner<br />
ALARM RESET Sounds when the<br />
TEMPERATURE is more than 4° from<br />
the liner SET temperature<br />
HEAT ON<br />
Indicates heaters are ON
B.- OPERATION<br />
281-228 Page 2<br />
1.- The PRO-CARE <strong>27</strong> may be operated with or without induced oxygen, and/or the nebulizer sys<br />
tem.<br />
A. Basic Operation (ie. without oxygen and nebulizer)<br />
B. Plug the unit into a 120 V 60 Hz. electrical outlet<br />
NOTE: The unit should run a minimum of 3 hours, before any settings are made. This<br />
allows the temperature to stabilize.<br />
C. The <strong>control</strong> <strong>panel</strong> will display the "FACTORY SET TEMPERATURE", ambient liner "HUMIDITY",<br />
POWER ON and HEAT ON if the "SET" Temperature is greater than the ambient temperature.<br />
The ALARM RESET will sound and blink if the SET and ACTUAL temperature difference is<br />
greater than 4 degrees farenheit. To silence the alarm just push the ALARM RESET.<br />
D. To establish the desired liner operating temperature "T", push the "SET" pad 1 time. This will<br />
display the current ambient "T". Using the UP or DOWN buttons, set the desired operating "T".<br />
(The sequence of events is as follows: Pluging in the unit will cause the <strong>control</strong> to display 94º<br />
or 96º This is the factory set "T". Pushing the "SET" pad changes the display to the actual<br />
ambient "T" within the liner.<br />
This "T" is changed to the desired operating "T" by pressing the "UP" or "DOWN" arrow pad.)<br />
Because of the difference between the desired operating "T" and the ambient "T" the alarm<br />
may sound. Press the ALARM RESET to silence the alarm.<br />
E. During operation the HEAT ON light will be ON anf OFF showing the heaters are operating to<br />
reach the SET operating temperature. The alarm may sound unitl the differnece is less than 4º.<br />
Depressing the ALARM RESET pad will silence the alarm.º<br />
F. The unit should be allowed to run to reach the SET operating "T" before use. (The time neces<br />
sary to reach the SET "T" depends on many factors, some of which are: Ambient and differential<br />
"T", Humidity, Open and closed ports, Nebulizer and/or Oxygen use, Unit Location, etc.)<br />
2. NEBULIZER SYSTEM<br />
A. Attach the nebulizer bracket to the door.<br />
B. Fill the nebulizer bottle with water, for humidity only, or with the medication to be dispensed.<br />
C. Slide the nebulizer bottle into the bracket hole and attach the tube from the bottle through the<br />
door hole.<br />
D. Attach the hose connector to the nebulizer connector. CAUTION: There is a push lock on the<br />
connector.<br />
Do not try to pull the hose from the connector without depressing the lock.<br />
E. Set the amount of water/medication desired by the graduations on the bottle neck.<br />
F. Be sure to put "CABINET OXYGEN-NEBULIZER OXYGEN" switch in the down position with<br />
oxygen attached. (See paragraph 3).<br />
CAUTION:<br />
If the switch is not on the "NEBULIZER OXYGEN SWITCH DOWN" position, pressure will not<br />
be created in the nebulizer bottle and no flow from the bottle to the cabinet will occur.<br />
G. The amount of nebulizer flow may have an effect on the humidity. If a specific humidity is required,<br />
adjusting the nebulizer bottle will affect the humidity. Additional humidity can be created by<br />
filling the feeder cups with water, and/or a separate water basin set in the unit.
281-228 Page 3<br />
3. OXYGEN SYSTEM<br />
CAUTION<br />
As with any oxygen system, a danger exists if fire, flame or sparks are within the vicinity of the<br />
oxygen. Therefore, assure that the immediate area around the PRO-CARE <strong>27</strong> is free of fire, flames<br />
or any type of potential ignition source.<br />
A. Connect the oxygen source to the oxygen connection in the back of the PRO-CARE <strong>27</strong> cabinet.<br />
B. Set the oxygen outlet pressure not to exceed 55 PSI.<br />
C. Adjust the green flow meter on the front <strong>panel</strong> of the unit to the "MINIMUM FLOW RATE".<br />
D. Set the "CABINET OXYGEN" switch to the "SWITCH UP" position.<br />
E. Turn the oxygen flow meter knob to allow the amount of oxygen desired up to 12 LPM (Liter per minute). Should the<br />
actual oxygen concentration wish to be known, an "Oxygen Analizer" is availble for purchase. Refer to our catalog.<br />
F. When the need for oxygen is finished, turn the oxygen pressure valve off first. Turn the outlet pressure valve off and<br />
disconnect the hose from the PRO-CARE <strong>27</strong> fitting. By disconnecting the oxygen supply hose, this assures that there<br />
will be no residual oxygen in the PRO-CARE <strong>27</strong> system.<br />
4. RE-CALIBRATING THE PROCARE <strong>27</strong> CONTROLLER<br />
The <strong>control</strong>ler, temperature sensor, and connecting wire in your Pro Care <strong>27</strong> AICU were calibrated, as a set, prior to<br />
installation, using a temperature calibration unit to ensure that the <strong>control</strong>ler display and the temperature sensor were<br />
matched exact. If you believe that the Pro Care <strong>27</strong> <strong>control</strong>ler is not displaying the temperature accurately, you can verify<br />
and reset the temperature display as follows:<br />
You need to unscrew the <strong>control</strong>ler door located on the right hand side of the unit to have access to the <strong>control</strong> box.<br />
To calibrate unit you need to hook up the black wire to the connector that is in the center of the black <strong>control</strong>ler box.<br />
You must use a mercury filled thermometer of certified accuracy or a digital thermometer that is very accurate.<br />
1. Place the thermometer in the center (left to right and front to back) of the Pro-Care <strong>27</strong>. Place it on a support so that it is<br />
ap<strong>pro</strong>ximately six to eight inches above the floor.<br />
2. Turn the Pro Care <strong>27</strong> on, close the door securely, and set the temperature to 97 degrees Farenheit. Allow the unit to<br />
run, without changing the set point, for at least a couple of hours.<br />
3. Observe the reading on the thermometer.<br />
4. If the Pro Care <strong>27</strong> display does not agree with the thermometer:<br />
While pressing the "SET" (Temperature) button, press the Up or Down Arrow button until the temperature readout<br />
matches the reading of the test thermometer inside the unit. Each push of the Up or Down arrows is equivalent to<br />
.5 degree.<br />
5. Check the thermometer and the Pro Care <strong>27</strong> <strong>control</strong>ler display after 2 hours. If they are equal, you are finished.<br />
6. If there is still a significant difference (>2 0 F), then repeat step 4, above.<br />
To calibrate the Humidity reading you must use inside the unit either a digital hygrometer or a wet bulb hygrometer that<br />
allows you to convert to the relative humidity percent.<br />
1. Place the hygrometer in the center (left to right and front to back) of the Pro-Care <strong>27</strong>. Place it on a support so that it is<br />
ap<strong>pro</strong>ximately six to eight inches above the floor.<br />
2. Turn the Pro Care <strong>27</strong> on, close the door securely, and set the temperature to the desired reading. Allow the unit to<br />
run, without changing the set point, for at least several hours.<br />
3. Observe the reading on the hygrometer.<br />
4. If the Pro Care <strong>27</strong> display does not agree with the hygrometer:<br />
While pressing the "ALARM RESET" button, press the Up or Down Arrow button until the HUMIDITY readout<br />
matches the reading of the test hygrometer inside the unit.<br />
5. Check the hygrometer and the Pro Care <strong>27</strong> <strong>control</strong>ler display after 2 hours. If they are equal, you are finished.<br />
6. If there is still a significant difference (>2%), then repeat step 4, above.<br />
Once the unit is calibrated, remove the black wire from the calibration connector, and screw the cover in.
281-228 Page 4<br />
OXYGEN SATURATION<br />
TEMP.<br />
(Attachment to Bulletin 281-228)<br />
The Pro-Care <strong>27</strong> unit has undergone extensive testing to determine the oxygen saturation at<br />
flow rates of 4, 6, and 12 LPM at a supply pressure of 55psig. A chart is included above so<br />
that the user may determine the ap<strong>pro</strong>ximate oxygen saturation at various flow rates (LPM).<br />
Conditions affecting saturation include the following:<br />
1. Operating temperature.<br />
2. Ambient temperature<br />
3. Vents open vs. closed.<br />
4. Oxygen flow in LPM, from 1 to 12.<br />
5. Body heat coming from the patient.<br />
6. Number of times that the doors or access <strong>panel</strong>s are opened.<br />
7. Location of the unit (in direct sunlight or in a cool location).<br />
8. The amount of humidity in the room.<br />
Temperature set point of the unit will also effect the oxygen saturation. In general (refer to the<br />
chart above): at temperatures from 84º F to 100ºF, with a flow rate of 4 LPM, oxygen saturation<br />
varies from 47% to 37.5%, with 6 LPM saturation varies from 61% to 46%, and with 12 LPM,<br />
oxygen saturation varies from 72% to 70%.<br />
If precise measurement of % oxygen is required, <strong>Lyon</strong> Electric Company sells an oxygen<br />
meter. Refer to our catalog, or call our Sales Office.