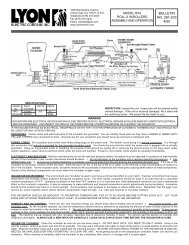
Operating instructions for Grumbach Incubators - Lyon
Operating instructions for Grumbach Incubators - Lyon
Operating instructions for Grumbach Incubators - Lyon

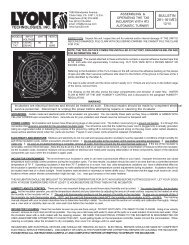
Create successful ePaper yourself
Turn your PDF publications into a flip-book with our unique Google optimized e-Paper software.
Temperature Control<br />
Once your machine is sited, plug the Incubator into the mains and turn on the mains power switch. If digital<br />
readers are fitted these will light along with the power switch. Leave the incubator running <strong>for</strong> several hours to<br />
heat up and allow the internal temperature to equilibrate. The ‘Thermo Light’ will be lit continuous while the<br />
incubator is heating up and will start to flash on/off as it reaches the temperature it is set at. The temperature<br />
settings will be set either at or very close to 37.5 C in the factory prior to shipment. The two knobs marked<br />
coarse and fine are your temperature controllers. The coarse knob should be used to adjust the temperature to<br />
close to the desired temperature and then the final adjustments made with the fine knob. Whenever making<br />
adjustments please ensure you check the temperature regularly after, as the increase or decrease is not instant<br />
and will take a few minutes to equilibrate throughout the entire incubator.<br />
Each incubator is fitted with two additional safety thermostats. On the left hand side panel a mechanical safety<br />
thermostat is fitted. This will stop your incubator from overheating if there was a failure with the electronic<br />
primary thermostat. This is preset at the factory and should not need altering.<br />
A third electronic thermostat is fitted close to the fan housing. This is a safety feature and will stop the any<br />
heater damage should the fan stop working. This is fitted under E.E.C. law and should not be tampered with.<br />
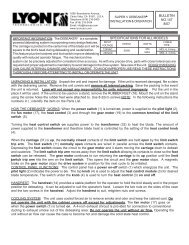
Thermometers<br />
Each incubator comes with a laboratory high-grade mercury thermometer. These thermometers are very precise<br />
and we strongly advise that if you have a digital thermometer fitted to your machine, that you calibrate it to the<br />
same reading as the mercury thermometer. The thermometer fits into the bracket supplied on one of the turning<br />
trays and should be viewed straight on to see the blue mercury. Whenever cleaning the thermometer only use<br />
cold water.<br />
Digital thermometers have a far quicker reaction time to small changes in temperature than mercury<br />
thermometers. Once the desired temperature established within the incubator (set by the mercury) calibrate the<br />
digital unit to the same reading if required.<br />
To calibrate simply remove the black plastic frame that surrounds the red plastic front, this clips off by mildly<br />
prising it with a knife or screwdriver then remove the plastic front. Then simply use a screwdriver to turn the<br />
adjusting screw clockwise to turn the thermometer reading up or anti clockwise to turn it down. Once the<br />
desired reading is achieved replace the front. This is safely achieved with the incubator turned on.<br />
Fig 4. Mercury Thermometer in<br />
bracket.<br />
Fig 3. Digital thermometer<br />
with front removed<br />
Adjusting screw