
Create successful ePaper yourself
Turn your PDF publications into a flip-book with our unique Google optimized e-Paper software.
SECTION 5: Adjustments<br />
4. Move hands away from 8'' disc.<br />
The idler and drive rollers are slightly crowned to<br />
keep the belt centered on the rollers. This will not<br />
correct improper tracking. Tracking must be periodically<br />
adjusted (particularly after belt replacement)<br />
to keep the belt properly aligned to the<br />
rollers and the platen. To adjust tracking:<br />
1. Unplug the machine!<br />
With the exception of<br />
belt tracking, adjustments<br />
to your Sander<br />
should be made with the<br />
power off and the<br />
machine unplugged!<br />
Belt Tracking<br />
2. Remove the Sanding Belt Table and<br />
Sanding Belt Guards.<br />
5. Plug sander into power and turn machine on<br />
and off quickly. Inspect tracking.<br />
6. Repeat steps 1-5 until the belt is centered on<br />
the rollers.<br />
If the belt tracks properly on the two front rollers,<br />
but not on the rear roller, the rear roller must be<br />
adjusted. The roller shaft axle is slightly bent. By<br />
turning the axle, belt tracking will be affected.<br />
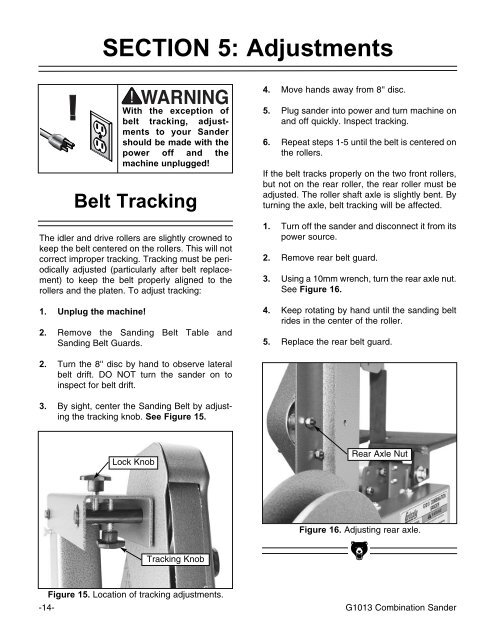
1. Turn off the sander and disconnect it from its<br />
power source.<br />
2. Remove rear belt guard.<br />
3. Using a 10mm wrench, turn the rear axle nut.<br />
See Figure 16.<br />
4. Keep rotating by hand until the sanding belt<br />
rides in the center of the roller.<br />
5. Replace the rear belt guard.<br />
2. Turn the 8'' disc by hand to observe lateral<br />
belt drift. DO NOT turn the sander on to<br />
inspect for belt drift.<br />
3. By sight, center the Sanding Belt by adjusting<br />
the tracking knob. See Figure 15.<br />
Lock Knob<br />
Rear Axle Nut<br />
Figure 16. Adjusting rear axle.<br />
Tracking Knob<br />
Figure 15. Location of tracking adjustments.<br />
-14- <strong>G1013</strong> Combination Sander