Kalani Crib and Changer Combo with Toddler Rail ... - DaVinci Baby
Kalani Crib and Changer Combo with Toddler Rail ... - DaVinci Baby
Kalani Crib and Changer Combo with Toddler Rail ... - DaVinci Baby

Create successful ePaper yourself
Turn your PDF publications into a flip-book with our unique Google optimized e-Paper software.
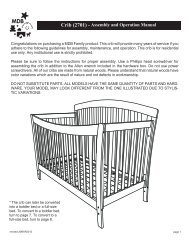
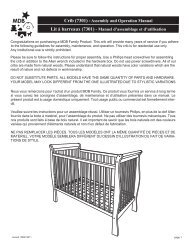
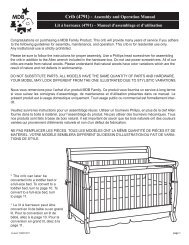
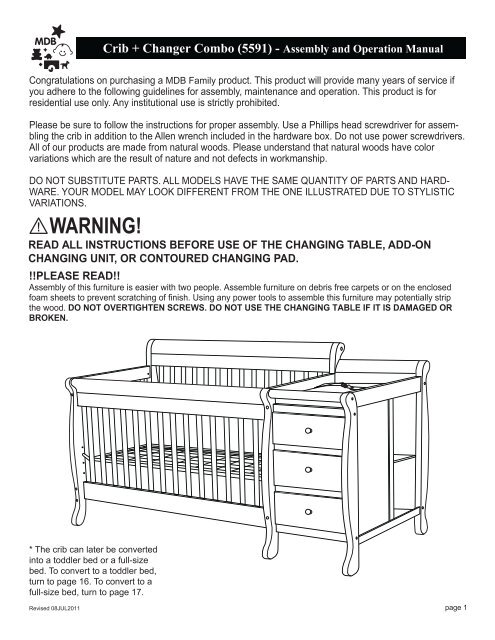
<strong>Crib</strong> + <strong>Changer</strong> <strong>Combo</strong> (5591) - Assembly <strong>and</strong> Operation Manual<br />
Congratulations on purchasing a MDB Family product. This product will provide many years of service if<br />
you adhere to the following guidelines for assembly, maintenance <strong>and</strong> operation. This product is for<br />
residential use only. Any institutional use is strictly prohibited.<br />
Please be sure to follow the instructions for proper assembly. Use a Phillips head screwdriver for assembling<br />
the crib in addition to the Allen wrench included in the hardware box. Do not use power screwdrivers.<br />
All of our products are made from natural woods. Please underst<strong>and</strong> that natural woods have color<br />
variations which are the result of nature <strong>and</strong> not defects in workmanship.<br />
DO NOT SUBSTITUTE PARTS. ALL MODELS HAVE THE SAME QUANTITY OF PARTS AND HARD-<br />
WARE. YOUR MODEL MAY LOOK DIFFERENT FROM THE ONE ILLUSTRATED DUE TO STYLISTIC<br />
VARIATIONS.<br />
WARNING!<br />
!<br />
READ ALL INSTRUCTIONS BEFORE USE OF THE CHANGING TABLE, ADD-ON<br />
CHANGING UNIT, OR CONTOURED CHANGING PAD.<br />
!!PLEASE READ!!<br />
Assembly of this furniture is easier <strong>with</strong> two people. Assemble furniture on debris free carpets or on the enclosed<br />
foam sheets to prevent scratching of finish. Using any power tools to assemble this furniture may potentially strip<br />
the wood. DO NOT OVERTIGHTEN SCREWS. DO NOT USE THE CHANGING TABLE IF IT IS DAMAGED OR<br />
BROKEN.<br />
* The crib can later be converted<br />
into a toddler bed or a full-size<br />
bed. To convert to a toddler bed,<br />
turn to page 16. To convert to a<br />
full-size bed, turn to page 17.<br />
Revised 08JUL2011 page 1
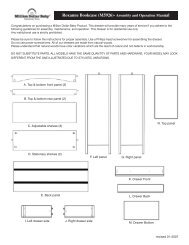
PARTS<br />
A. Back Panel<br />
B. Front Panel<br />
C. Right Side Panel D. Left Side Panel E. Center Panel<br />
F-1. Right<br />
Back Post<br />
H. <strong>Crib</strong> Top Panel X 2<br />
K. Spring Frame<br />
F-2. Left<br />
Back Post<br />
F-3. Back<br />
Post<br />
G-1. Right<br />
Front Post<br />
G-2. Left<br />
Front Post<br />
G-3. Front<br />
Post<br />
L. Guardrail<br />
P. Drawer<br />
Back (3)<br />
Q. Drawer<br />
Bottom<br />
Board (3)<br />
R. Dresser Back<br />
Top Panel<br />
M. Drawer<br />
Front (3)<br />
N. Right Drawer<br />
Panel (3)<br />
O. Left Drawer<br />
Panel (3)<br />
page 2
S. Dresser Back<br />
Panel<br />
T. Dresser Front<br />
Top Bar<br />
U. Dresser Center<br />
Bar (2)<br />
V. Dresser Middle<br />
Bar (2)<br />
W. Dresser Top<br />
Bar<br />
X. Dresser Bottom<br />
Bar (2)<br />
AA-1. Dresser<br />
Shelf<br />
AA-2. Dresser<br />
Shelf (<strong>with</strong> pre-drilled<br />
screw holes)<br />
Tools Needed<br />
(not included)<br />
Y. Dresser<br />
Center Board<br />
Z. Dresser<br />
Top Board<br />
BB. Pad<br />
Phillips<br />
screwdriver<br />
HARDWARE<br />
H1. 3 -1/2” Allen Head Bolt (8) H2. 2 -3/4” Allen Head Bolt (2)<br />
H3. 2 -1/2” Allen Head Bolt (16) H4. 1 -3/4” Allen Head Bolt (8)<br />
H5. 1” Allen<br />
Head Bolt (4)<br />
H6. Barrel<br />
Nut (24)<br />
H7. 1-1/4” Wood<br />
Screw (24) H9. 1” Metal Pin (20)<br />
H13. 1/2” Small Wood<br />
Screw for Glides (36)<br />
H14. 1-1/8” Bolt<br />
for Knob (3)<br />
H16. Right Panel Glide (3)<br />
H18. Left Panel Glide (3)<br />
H15. Knob (3)<br />
H17. Right Drawer Glide (3)<br />
H19. Left Drawer Glide (3)<br />
H20. Strap<br />
H21. Wood<br />
Screw (2)<br />
H24. Allen<br />
Wrench<br />
H25. Lock<br />
washer (38)<br />
H26. Washer (4) H27. 7/8" Wood<br />
Screw (2)<br />
GUARDRAIL HARDWARE<br />
H22. 2” Allen Head Bolt (4) H23. Lock washer (4)<br />
page 3
STEP 1. Assemble all drawers<br />
Q. Drawer Bottom<br />
Board<br />
1A<br />
1B<br />
H7<br />
H7<br />
O. Left<br />
Drawer<br />
Panel<br />
N. Right<br />
Drawer<br />
Panel<br />
M. Drawer<br />
Front<br />
1C<br />
H7<br />
H7<br />
H7<br />
H7<br />
P. Drawer Back<br />
DO NOT OVERTIGHTEN.<br />
H7<br />
H7<br />
1D<br />
H19. Left<br />
Drawer<br />
Glide<br />
1E<br />
H13<br />
H14<br />
H17. Right<br />
Drawer<br />
Glide<br />
H13<br />
H13<br />
H13<br />
H13<br />
H13<br />
H15<br />
page 4
STEP 2. Attach posts to center panel<br />
H6<br />
H25<br />
H1<br />
H6<br />
H25<br />
H2<br />
F-1. Right<br />
Back Post<br />
H25<br />
E. Center Panel<br />
H1<br />
H2<br />
H25<br />
G-1. Right<br />
Front Post<br />
DO NOT OVERTIGHTEN.<br />
STEP 3. Attach panel glides <strong>and</strong> metal pins to center <strong>and</strong> right side panel<br />
H9<br />
H9<br />
H13<br />
H13<br />
H9<br />
H13<br />
H13<br />
H13<br />
H13<br />
H9<br />
H13<br />
H13<br />
H13<br />
H13<br />
H18<br />
H13<br />
E. Center Panel<br />
C. Right Side Panel<br />
H13<br />
H16<br />
H18. Left Panel Glide<br />
H16. Right Panel Glide<br />
page 5
STEP 4. Attach dresser panels <strong>and</strong><br />
bars to right side panel<br />
T<br />
W<br />
X<br />
H6<br />
H9<br />
H25<br />
H9<br />
H25<br />
H3<br />
H4<br />
H6<br />
H25<br />
H3<br />
H6<br />
R<br />
C. Right Side Panel<br />
X<br />
H6<br />
H9<br />
S<br />
H9<br />
H25<br />
H25<br />
H4<br />
H3<br />
H25<br />
H3<br />
DO NOT OVERTIGHTEN.<br />
STEP 5. Attach dresser bars to<br />
right side panel<br />
U<br />
V<br />
U<br />
V<br />
H9<br />
H9<br />
page 6
STEP 6. Attach dresser boards<br />
to the dresser<br />
Z. Dresser Top Board<br />
Y. Dresser<br />
Center Board<br />
STEP 7. Attach center panel to<br />
the dresser<br />
H3 H4<br />
H25<br />
DO NOT OVERTIGHTEN.<br />
H25<br />
H3<br />
H9<br />
E. Center Panel<br />
H3 H4<br />
H25<br />
H6<br />
H25<br />
H25<br />
H9<br />
H3<br />
H9<br />
H6<br />
H25<br />
H9<br />
H9<br />
H6<br />
H9<br />
H6<br />
page 7
STEP 8. Attach posts to left side panel<br />
H6<br />
H25<br />
H1<br />
H6<br />
H6 H6<br />
H25<br />
H1<br />
H1<br />
H25<br />
H6 H6<br />
H25<br />
H1<br />
D. Left Side Panel<br />
F-2. Left<br />
Back Post<br />
STEP 9. Attach the crib top<br />
panel <strong>and</strong> back panel<br />
DO NOT OVERTIGHTEN.<br />
H25<br />
H1<br />
H1<br />
H25<br />
H4<br />
H3<br />
H25<br />
D. Left Side Panel<br />
H3<br />
G-2. Left<br />
front post<br />
H25<br />
DO NOT OVERTIGHTEN.<br />
H6<br />
H. <strong>Crib</strong> Top Panel<br />
H6<br />
H25<br />
H4<br />
H3<br />
A. Back Panel<br />
H25<br />
H3<br />
page 8
STEP 10. Attach spring frame<br />
Swing out four hangers at corner of the spring frame (K) carefully. Attach spring frame FLAT SIDE UP.<br />
Choose the height of the spring frame. Start at the highest level <strong>and</strong> adjust accordingly.<br />
Bolt the spring frame (K) to legs using Allen head bolts (H5), washers (H26), lock washers (H25) <strong>and</strong> Allen<br />
wrench (H24). As the child grows, it is important to lower the spring.<br />
Make sure the spring frame is level.<br />
Do not overtighten.<br />
H26<br />
K<br />
H25<br />
H5<br />
K. Spring Frame<br />
Make sure the mattress support frame is installed FLAT SIDE UP. Make sure the mattress<br />
support frame is level when installing.<br />
*As your child grows, it is important to lower the mattress support.<br />
page 9
STEP 11. Attach the crib top<br />
panel <strong>and</strong> front panel<br />
DO NOT OVERTIGHTEN.<br />
H4<br />
H3<br />
H25<br />
H6<br />
H25<br />
H. <strong>Crib</strong> Top Panel<br />
H6<br />
H3<br />
H25<br />
H25<br />
H4<br />
H25<br />
H3<br />
B. Front Panel<br />
STEP 12. Place dresser shelves<br />
into the dresser<br />
H3<br />
H25<br />
AA-1<br />
H27<br />
AA-2<br />
AA-2<br />
H27<br />
Fix the dresser shelf (<strong>with</strong> predrilled<br />
screw holes) (AA-2) using<br />
two 7/8" wood screws (H27).<br />
page 10
STEP 13. Slide drawers to the<br />
dresser<br />
STEP 14. Attach the strap<br />
H21<br />
H20<br />
H21<br />
H20<br />
H21<br />
H21<br />
DO NOT OVERTIGHTEN.<br />
page 11
STEP 15. Place the pad onto the changer<br />
BB. Pad<br />
KEEP THIS MANUAL IN A SAFE<br />
PLACE FOR FUTURE REFERENCE.<br />
The recommended maximum weight of<br />
the occupant is 30 lbs on changing table.<br />
Be sure to tighten the cross bar screws now that you have installed to the stationary side. Recheck all screws<br />
<strong>and</strong> bolts to be sure they are fastened securely.<br />
Before placing your mattress in the crib, you can make your own mattress protector by cutting the cardboard<br />
packing insert to 27” x 51”. Place it on the spring frame under the mattress to extend the life of the mattress.<br />
CAUTION: ANY MATTRESS USED IN THIS CRIB MUST BE AT LEAST 27 1/4 INCHES (69CM)<br />
BY 51 5/8 INCHES (131CM) WITH A THICKNESS NOT EXCEEDING 6 INCHES (15CM).<br />
Please refer to the label (sample below) on the inside face<br />
of the headboard. Record the model/ item number <strong>and</strong> serial<br />
number of your crib, the name of the store where you made<br />
the purchase, the date of purchase <strong>and</strong> the wood nish in<br />
the box to the lower right.<br />
WE WILL ASK YOU FOR YOUR SERIAL NUMBER FOR ALL<br />
WARRANTY AND REPLACEMENT PART REQUESTS. PLEASE<br />
REFER TO THE LAST PAGE OF THIS INSTRUCTION SHEET FOR<br />
WARRANTY INFORMATION. KEEP THIS MANUAL FOR FUTURE<br />
REFERENCE.<br />
CAUTION: ANY MATTRESS USED IN THIS CRIB<br />
MUST BE AT LEAST 27 1/4 INCHES (69CM) BY<br />
51 5/8 INCHES (131CM) WITH A THICKNESS<br />
NOT EXCEEDING 6 INCHES (15CM).<br />
THIS PRODUCT CONFORMS TO THE<br />
APPLICABLE REGULATIONS OF THE<br />
CONSUMER PRODUCTS SAFETY COMMISSION.<br />
www.themdbfamily.com<br />
SAMPLE LABEL<br />
Please read the Caution <strong>and</strong> Warning<br />
Statements insert before using your crib.<br />
page 12
WARNING:<br />
Failure to follow these warnings <strong>and</strong><br />
the assembly instructions could result<br />
in serious injury or death.<br />
READ ALL INSTRUCTIONS BEFORE ASSEMBLING<br />
CRIB. KEEP THE MANUAL FOR FUTURE USE.<br />
WARNING:<br />
Parents should ensure a safe environment for the<br />
child by checking regularly, before placing the<br />
child in the product, that every component is<br />
properly <strong>and</strong> securely in place.<br />
• Do not use this crib if you cannot exactly follow the accompanying instructions.<br />
• Infants can suffocate on soft bedding. Never add a pillow or comforter. Never<br />
place additional padding under an infant.<br />
• To reduce the risk of SIDS, pediatricians recommend healthy infants be placed<br />
on their backs to sleep, unless otherwise advised by your physician.<br />
• Strings can cause strangulation! Do not place items <strong>with</strong> a string around a<br />
child’s neck, such as hood strings or pacifier cords. Do not place cords, straps,<br />
or similar items that could become wound around the child’s neck in or near this<br />
crib. Do not suspend strings over a crib or attach strings to toys.<br />
• To help prevent strangulation tighten all fasteners. A child can trap parts of the<br />
body or clothing on loose fasteners.<br />
• DO NOT place a crib near a window where cords from blinds or drapes may<br />
strangle a child. Do not place this crib near a window or a patio door where a<br />
child could reach the cord of a blind or curtain <strong>and</strong> be strangled.<br />
• When a child is able to pull to a st<strong>and</strong>ing position, set the mattress to the lowest<br />
position <strong>and</strong> remove bumper pads, large toys <strong>and</strong> other objects that could serve<br />
as steps for climbing out.<br />
• Do not use this crib if the child is able to climb out unaided or is taller than<br />
35 in. (89cm).<br />
• Check this product for damaged hardware, loose joints, loose bolts or other<br />
fasteners, missing parts or sharp edges before <strong>and</strong> after assembly <strong>and</strong> frequently<br />
during use. Securely tighten loose bolts <strong>and</strong> other fasteners. DO NOT use crib if<br />
any parts are missing, damaged or broken. DO NOT substitute parts. Contact<br />
MDB FAMILY for replacement parts <strong>and</strong> instructional literature if needed.<br />
• DO NOT use a water mattress <strong>with</strong> this crib.<br />
• For cribs equipped <strong>with</strong> teething rails, replace teething rail if damaged, cracked<br />
or loose.<br />
• If refinishing, use a non-toxic finish specified for children’s products.<br />
• Never use plastic shipping bags or other plastic films as mattress covers<br />
because they can cause suffocation.<br />
• Infants can suffocate in gaps between crib sides when used <strong>with</strong> a mattress<br />
that is too small.<br />
• Follow warnings on all products in a crib.<br />
• Ensure that the sides are properly latched or locked in place when the crib is<br />
occupied.<br />
• The mattress used <strong>with</strong> this crib should not be more than 15cm thick <strong>and</strong><br />
should be of such length <strong>with</strong> width that the gap between the mattress <strong>and</strong> the<br />
sides of the crib is no more than 3cm when the mattress is pushed into the<br />
corner of the crib.<br />
WARNING:<br />
Please do NOT remove any wood screws<br />
in the normal disassembly of the crib.<br />
ONE YEAR LIMITED WARRANTY:<br />
We will replace any missing parts at the time<br />
of purchase or any defective item <strong>with</strong>in a one<br />
year period from the date of original purchase.<br />
Please keep your receipt so that we may<br />
process your warranty request. This warranty<br />
only covers new units <strong>with</strong> original packaging<br />
<strong>and</strong> ownership, <strong>and</strong> is not transferable. It does<br />
not cover any used, secondh<strong>and</strong> or demo<br />
models.<br />
This warranty does not cover any damaged or<br />
defective parts that result from installation <strong>and</strong><br />
assembly, normal wear <strong>and</strong> tear, abuse, negligence,<br />
improper use or alteration to the finish,<br />
design, <strong>and</strong> hardware of the crib. The specific<br />
legal rights of this warranty may vary from<br />
state to state. Some states do not allow any<br />
exclusion or limitation of incidental damages.<br />
Some states do not allow limitation on how<br />
long an implied warranty lasts.<br />
Storage:<br />
• Pine woods exchange moisture <strong>with</strong> the air adjusting<br />
to major changes in room temperature <strong>and</strong><br />
humidity. Therefore, it is best to place your furniture<br />
away from heating or air-conditioning vents.<br />
• Sunlight is not friendly to solid wood furniture <strong>and</strong><br />
prolonged direct exposure to harsh sunlight can<br />
discolor the finish. Be careful not to place your furniture<br />
in direct sunlight for extended periods of time. As<br />
<strong>with</strong> all your fine furniture, blot up spills immediately.<br />
Care <strong>and</strong> Cleaning:<br />
• Do not scratch or chip the finish. Do not use abrasive<br />
chemicals for cleaning. Clean <strong>with</strong> mild soap on<br />
a soft rag. Rinse <strong>and</strong> dry thoroughly. If you ever<br />
refinish this furniture, be sure to use only a non-toxic<br />
finish specified for children’s products. If you choose<br />
to refinish this furniture, the warranty will be voided.<br />
Registering your product is even easier than<br />
before. You can register your product on our<br />
website at : www.themdbfamily.com<br />
IF YOU WOULD LIKE TO ORDER<br />
REPLACEMENT OR MISSING PARTS<br />
PLEASE VISIT US AT:<br />
WWW.THEMDBFAMILY.COM<br />
OR YOU CAN CONTACT US BY MAIL:<br />
MDB FAMILY<br />
855 WASHINGTON BLVD.<br />
MONTEBELLO, CA 90640<br />
revised05MAY2011
WARNING!<br />
FALL HAZARD<br />
TO PREVENT DEATH OR SERIOUS<br />
INJURY, ALWAYS KEEP CHILD WITHIN<br />
ARM’S REACH.<br />
READ ALL INSTRUCTIONS BEFORE ASSEMBLING THIS<br />
PRODUCT. KEEP THE MANUAL FOR FUTURE USE.<br />
WARNING:<br />
•Read all instructions before use of the changing table.<br />
•Do not use changing table if it is damaged or broken.<br />
•This product is not intended to be used as a changing<br />
table <strong>with</strong>out adult supervision. Use of the product<br />
<strong>with</strong>out this may result in death or serious injury to your<br />
child from falling. Follow all instructions on attaching<br />
<strong>and</strong> using the changing table.<br />
•Only use the pad provided by MDB FAMILY .<br />
•The maximum weight of the child for which the changing<br />
table is intended is 30 lbs.<br />
•Stop using this changing table when the child is able to<br />
sit up or roll over.<br />
•As <strong>with</strong> all infant <strong>and</strong> baby furniture, it is important to<br />
check fasteners, screws, <strong>and</strong> bolts periodically for tightness.<br />
Parents should ensure a safe environment for<br />
their child by checking the furniture regularly before<br />
placing the child in the product.<br />
•When using this product, always secure the child <strong>with</strong><br />
the safety strip.<br />
WARNING!<br />
FALL HAZARD<br />
To prevent death or<br />
serious injury, always<br />
keep child <strong>with</strong>in arm’s<br />
reach. Never leave child<br />
unattended <strong>and</strong> always<br />
use restraining system.<br />
ONE YEAR LIMITED WARRANTY:<br />
We will replace any missing parts at the<br />
time of purchase or any defective item<br />
<strong>with</strong>in a one year period from the date of<br />
original purchase. Please keep your receipt<br />
so that we may process your warranty<br />
request. This warranty only covers new<br />
units <strong>with</strong> original packaging <strong>and</strong> ownership,<br />
<strong>and</strong> is not transferable. It does not<br />
cover any used, secondh<strong>and</strong> or demo<br />
models.<br />
This warranty does not cover any damaged<br />
or defective parts that result from installation<br />
<strong>and</strong> assembly, normal wear <strong>and</strong> tear,<br />
abuse, negligence, improper use or alteration<br />
to the finish, design, <strong>and</strong> hardware of<br />
the crib. The specific legal rights of this<br />
warranty may vary from state to state.<br />
Some states do not allow any exclusion or<br />
limitation of incidental damages. Some<br />
states do not allow limitation on how long<br />
an implied warranty lasts.<br />
Registering your product is even easier than<br />
before. You can register your product on our<br />
website at : www.themdbfamily.com<br />
IF YOU WOULD LIKE TO ORDER<br />
REPLACEMENT OR MISSING PARTS<br />
PLEASE VISIT US AT:<br />
WWW.THEMDBFAMILY.COM<br />
OR YOU CAN CONTACT US BY MAIL:<br />
MDB FAMILY<br />
855 WASHINGTON BLVD.<br />
MONTEBELLO, CA 90640<br />
page 14
WARNING:<br />
Restraint System<br />
During the diaper changing process, be sure always to keep one h<strong>and</strong> on the baby to prevent the baby from falling off the<br />
changing pad. Falling from the changing pad could cause severe injury or even death to the baby.<br />
Step 1.<br />
Place a baby on the pad <strong>with</strong> his/her bottom on the<br />
top of the diaper. Safely secure the baby on the pad<br />
<strong>with</strong> the safety straps <strong>and</strong> buckle on the pad. This<br />
helps prevent the baby from falling off the pad,<br />
which can result in severe injury or even death of<br />
the baby.<br />
Step 2.<br />
Remove the dirty diaper from the baby.<br />
Step 3.<br />
Push the baby’s legs forward <strong>and</strong> create a cavity<br />
under the baby’s bottom. Clean the baby.<br />
Step 4.<br />
Reattach the new diaper to a clean <strong>and</strong> happy<br />
baby!<br />
page 15
<strong>Crib</strong> + <strong>Changer</strong> <strong>Combo</strong> (5591)-<strong>Toddler</strong> Bed Conversion Assembly<br />
* All of the parts <strong>and</strong> hardware you will need are<br />
supplied <strong>with</strong> the crib at the time of purchase.<br />
STEP 1. STEP 2.<br />
Unscrew the Allen head bolts <strong>and</strong><br />
remove the front panel assembly.<br />
Move the spring frame to the lowest level.<br />
STEP 3.<br />
Attach the guardrail (L) to the front posts using<br />
four Allen head bolts (H22) <strong>and</strong> lock washer<br />
(H23). The guardrail (L) can be installed <strong>with</strong><br />
the high end facing either to the left or the<br />
right.<br />
Check to make sure that all of the bolts are<br />
fastened securely.<br />
DO NOT OVERTIGHTEN.<br />
H23<br />
H22<br />
H23<br />
H22<br />
H22<br />
H23<br />
L. Guardrail<br />
H22 H23<br />
L<br />
L<br />
The mattress intended for use on the bed shall be a full-size crib mattress having<br />
minimum dimensions of 51-5/8 in. (1310mm) in length, 27-1/4 in. (690mm) in width<br />
<strong>and</strong> 4 in. (100mm) in thickness, or a greater thickness not exceeding 6 in (152mm).<br />
The intended user’s minimum age must be at<br />
least 15 months old <strong>and</strong> maximum weight must not exceed 50 lbs (22.7 kg).<br />
WARNING :<br />
Failure to follow these warnings <strong>and</strong> the assembly instructions could result in<br />
serious injury or death from entrapment or strangulation.<br />
DO NOT place bed near windows where cords from blinds or drapes may strangle a child. DO NOT place<br />
items <strong>with</strong> a string, cord, or ribbon, around a child’s neck, such as hood strings or pacifier cords. DO NOT<br />
suspend strings over a toddler bed for any reason. If guard rails are used as the mattress containment<br />
means, guard rails provided must be used to avoid the formation of a gap between the mattress <strong>and</strong> the bed<br />
that could cause an entrapment.<br />
page 16
<strong>Crib</strong> + <strong>Changer</strong> <strong>Combo</strong> (5591) - Full Size Conversion Assembly<br />
* For all 4 in 1 cribs, please contact a retailer to order your full size<br />
adult wooden bed rails for your full size bed conversion.<br />
STEP 1.<br />
3” Phillips Head Bolt X 8<br />
Unscrew the Allen head bolts <strong>and</strong> remove<br />
the left side panel (D).<br />
STEP 2.<br />
Barrel Nut X 8<br />
H9<br />
H1<br />
H25<br />
H25<br />
H4<br />
H3<br />
H25<br />
Separate the dresser from the crib.<br />
Replace the posts in the center panel <strong>with</strong><br />
front <strong>and</strong> back posts (G-3 & F-3) as illustrated.<br />
STEP 3.<br />
Insert barrel nuts into bed rails. Use 3” Phillips<br />
head bolts (A) to attach the rails. Tighten bolts<br />
securely <strong>with</strong> a Phillips screwdriver.<br />
H9<br />
H3<br />
H2<br />
H25 H25<br />
F-3<br />
Be sure to keep the extra bolts <strong>and</strong> barrel nuts<br />
for future use.<br />
DO NOT OVERTIGHTEN.<br />
Bed <strong>Rail</strong>s<br />
Bed <strong>Rail</strong>s<br />
G-3<br />
page 17