Model Deluxe 62I - Bulldog Security
Model Deluxe 62I - Bulldog Security
Model Deluxe 62I - Bulldog Security

Create successful ePaper yourself
Turn your PDF publications into a flip-book with our unique Google optimized e-Paper software.
NEUTRAL SAFETY SWITCH<br />
PROGRAMMING INSTRUCTIONS<br />
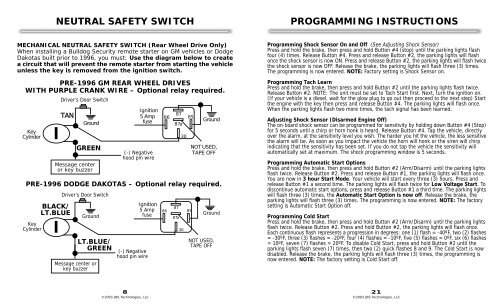
MECHANICAL NEUTRAL SAFETY SWITCH (Rear Wheel Drive Only)<br />
When installing a <strong>Bulldog</strong> <strong>Security</strong> remote starter on GM vehicles or Dodge<br />
Dakotas built prior to 1996, you must: Use the diagram below to create<br />
a circuit that will prevent the remote starter from starting the vehicle<br />
unless the key is removed from the ignition switch.<br />
PRE-1996 GM REAR WHEEL DRIVES<br />
WITH PURPLE CRANK WIRE – Optional relay required.<br />
Key<br />
Cylinder<br />
PRE-1996 DODGE DAKOTAS – Optional relay required.<br />
Key<br />
Cylinder<br />
BLACK/<br />
LT.BLUE<br />
Driver’s Door Switch<br />
TAN<br />
Ground<br />
GREEN<br />
Message center<br />
or key buzzer<br />
Driver’s Door Switch<br />
Ground<br />
LT.BLUE/<br />
GREEN<br />
Message center or<br />
key buzzer<br />
Ignition<br />
5 Amp<br />
fuse<br />
(-) Negative<br />
hood pin wire<br />
Ignition<br />
5 Amp<br />
fuse<br />
(-) Negative<br />
hood pin wire<br />
86<br />
86<br />
87<br />
87a<br />
87<br />
87a<br />
30<br />
30<br />
85<br />
85<br />
Ground<br />
NOT USED,<br />
TAPE OFF<br />
Ground<br />
NOT USED,<br />
TAPE OFF<br />
Programming Shock Sensor On and Off (See Adjusting Shock Sensor)<br />
Press and hold the brake, then press and hold Button #4 (stop) until the parking lights flash<br />
four (4) times. Release Button #4. Press and release Button #2, the parking lights will flash<br />
once the shock sensor is now ON. Press and release Button #2, the parking lights will flash twice<br />
the shock sensor is now OFF. Release the brake, the parking lights will flash three (3) times.<br />
The programming is now entered. NOTE: Factory setting is Shock Sensor on.<br />
Programming Tach Learn<br />
Press and hold the brake, then press and hold Button #2 until the parking lights flash twice.<br />
Release Button #2. NOTE: The unit must be set to Tach Start first. Next, turn the ignition on.<br />
(If your vehicle is a diesel, wait for the glow plug to go out then proceed to the next step) Start<br />
the engine with the key then press and release Button #4. The parking lights will flash once.<br />
When the parking lights flash two more times, the tach signal has been learned.<br />
Adjusting Shock Sensor (Disarmed Engine Off)<br />
The on-board shock sensor can be programmed for sensitivity by holding down Button #4 (Stop)<br />
for 5 seconds until a chirp or horn honk is heard. Release Button #4. Tap the vehicle, directly<br />
over the alarm, at the sensitivity level you wish. The harder you hit the vehicle, the less sensitive<br />
the alarm will be. As soon as you impact the vehicle the horn will honk or the siren will chirp<br />
indicating that the sensitivity has been set. If you do not tap the vehicle the sensitivity will<br />
automatically set at maximum. The shock programming window is 5 seconds.<br />
Programming Automatic Start Options<br />
Press and hold the brake, then press and hold Button #2 (Arm/Disarm) until the parking lights<br />
flash twice. Release Button #2. Press and release Button #1, the parking lights will flash once.<br />
You are now in 3 hour Start Mode. Your vehicle will start every three (3) hours. Press and<br />
release Button #1 a second time. The parking lights will flash twice for Low Voltage Start. To<br />
discontinue automatic start options, press and release Button #1 a third time. The parking lights<br />
will flash three (3) times, the Automatic Start Option is now off. Release the brake, the<br />
parking lights will flash three (3) times. The programming is now entered. NOTE: The factory<br />
setting is Automatic Start Option off.<br />
Programming Cold Start<br />
Press and hold the brake, then press and hold Button #2 (Arm/Disarm) until the parking lights<br />
flash twice. Release Button #2. Press and hold Button #2, the parking lights will flash once.<br />
Each continuous flash represents a progression in degrees: one (1) flash = -40ºF, two (2) flashes<br />
= -30ºF, three (3) flashes = -20ºF, four (4) flashes = -10ºF, five (5) flashes = 0ºF, six (6) flashes<br />
= 10ºF, seven (7) flashes = 20ºF. To disable Cold Start, press and hold Button #2 until the<br />
parking lights flash seven (7) times, then two (2) quick flashes 8 and 9. The Cold Start is now<br />
disabled. Release the brake, the parking lights will flash three (3) times, the programming is<br />
now entered. NOTE: The factory setting is Cold Start off.<br />
8<br />
21<br />
©2003 JBS Technologies, LLC ©2003 JBS Technologies, LLC