1969 Camaro - Classic Auto Air
1969 Camaro - Classic Auto Air
1969 Camaro - Classic Auto Air
You also want an ePaper? Increase the reach of your titles
YUMPU automatically turns print PDFs into web optimized ePapers that Google loves.
31<br />
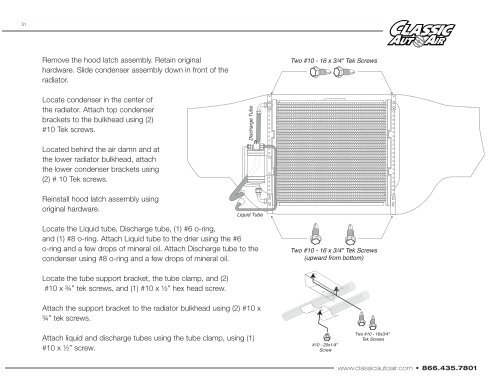
Remove the hood latch assembly. Retain original<br />
hardware. Slide condenser assembly down in front of the<br />
radiator.<br />
Two #10 - 16 x 3/4" Tek Screws<br />
Locate condenser in the center of<br />
the radiator. Attach top condenser<br />
brackets to the bulkhead using (2)<br />
#10 Tek screws.<br />
Discharge Tube<br />
Located behind the air damn and at<br />
the lower radiator bulkhead, attach<br />
the lower condenser brackets using<br />
(2) # 10 Tek screws.<br />
Reinstall hood latch assembly using<br />
original hardware.<br />
Liquid Tube<br />
Locate the Liquid tube, Discharge tube, (1) #6 o-ring,<br />
and (1) #8 o-ring. Attach Liquid tube to the drier using the #6<br />
o-ring and a few drops of mineral oil. Attach Discharge tube to the<br />
condenser using #8 o-ring and a few drops of mineral oil.<br />
Two #10 - 16 x 3/4" Tek Screws<br />
(upward from bottom)<br />
Locate the tube support bracket, the tube clamp, and (2)<br />
#10 x ¾” tek screws, and (1) #10 x ½” hex head screw.<br />
Attach the support bracket to the radiator bulkhead using (2) #10 x<br />
¾” tek screws.<br />
Attach liquid and discharge tubes using the tube clamp, using (1)<br />
#10 x ½” screw.<br />
#10 - 20x1/4"<br />
Screw<br />
Two #10 - 16x3/4"<br />
Tek Screws<br />
www.classicautoair.com • 866.435.7801


