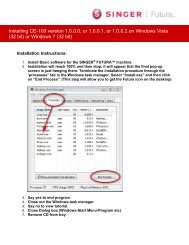
English - Editing Software Manual - SINGER Futura Support
English - Editing Software Manual - SINGER Futura Support
English - Editing Software Manual - SINGER Futura Support

Create successful ePaper yourself
Turn your PDF publications into a flip-book with our unique Google optimized e-Paper software.
add-on<br />
<strong>Editing</strong><br />
User’s <strong>Manual</strong>
<strong>Futura</strong> - <strong>Editing</strong> Option - <strong>English</strong> 3-01
<strong>Futura</strong> - <strong>Editing</strong> Option - <strong>English</strong> 3-01<br />
Inside Block Edit<br />
Outline Edit<br />
The features of this software make it possible to Edit or change an<br />
embroidery design.<br />
If a design has been digitized using <strong>Software</strong>, all of the information<br />
of a block (a segment of the design) can be modified. The Outline<br />
(the points of the shape), Stitch Angle, Entry/Exit Points, Embroidery<br />
Settings, and Stitch Type are all the ingredients that make up a<br />
block, and that can be easily changed.<br />
add-on<br />
<strong>Editing</strong><br />
In order to follow along with these<br />
guidelines, a .FHE design must be open<br />
on-screen.<br />
Notice that the cursor (symbol) changes<br />
when over a point or line.<br />
<strong>Editing</strong> can also very successfully be<br />
applied to the result generated by the<br />
optional FUTURA products like ‘AutoPunch’<br />
and ‘HyperFont’<br />
Outline Mode<br />
The points can be moved on any object even after stitches have<br />
been applied.<br />
To move, add, or delete points in Outline Mode<br />
Step Action Result<br />
>1 Select <strong>Editing</strong> icon. The <strong>Editing</strong> toolbar will<br />
open.<br />
>2 Click on block to be<br />
changed.<br />
>3 Click and drag on any point<br />
to move to a new position.<br />
>4 Right-click and select Insert<br />
Point and click in the<br />
desired position (between<br />
points, etc.) to add a point.<br />
>5 Right-click and select Delete<br />
Point (after clicking on<br />
a point). Continue to hit<br />
Delete on the keyboard to<br />
delete points sequentially.<br />
The block will be highlighted<br />
with original stitch points.<br />
Continues ><br />
<strong>Editing</strong>:<br />
Inside <strong>Editing</strong><br />
1
add-on<br />
<strong>Editing</strong><br />
Step Action Result<br />
>6 Select Stitch It from the<br />
editing toolbar.<br />
The stitches will regenerate<br />
with changes.<br />
Holding the space bar down will allow you<br />
to use the mouse to scroll on the working<br />
area of the software.<br />
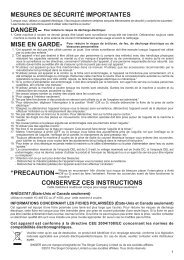
<strong>Futura</strong> - <strong>Editing</strong> Option - <strong>English</strong> 3-01<br />
Click and Drag<br />
Points to MOVE<br />
The line (between two points) can also be<br />
moved!<br />
Image 1<br />
Move points on outline.<br />
Stitch Angle<br />
The Stitch Angle can be changed, adding interest and variation to<br />
the design.<br />
To change the Stitch Angle<br />
Step Action Result<br />
>1 Select <strong>Editing</strong> icon. The <strong>Editing</strong> toolbar will<br />
open.<br />
>2 Click on block to be<br />
changed.<br />
The block will be highlighted<br />
with original input points.<br />
>3 Choose Stitch Angle from<br />
the Edit drop-down list.<br />
>4 Click blue line on either end<br />
(that represents the stitch<br />
angle).<br />
>5 Swing line to the desired<br />
angle.<br />
>6 Select Stitch It from editing<br />
toolbar.<br />
The stitches will regenerate<br />
with change.<br />
2<br />
<strong>Editing</strong>:<br />
Inside <strong>Editing</strong>
Entry/Exit Points<br />
It is also possible to change the location of the Entry and/or Exit<br />
points – where the 1 st stitch enters, and the last stitch leaves the<br />
shape. Smooth-running embroidery has a carefully plotted path.<br />
add-on<br />
<strong>Editing</strong><br />
<strong>Futura</strong> - <strong>Editing</strong> Option - <strong>English</strong> 3-01<br />
Points, Stitch Angle, and Entry/Exit<br />
points can all be changed at once (before<br />
applying “Stitch It”) without changing<br />
the <strong>Editing</strong> Mode in the list.<br />
The mode will change if either of the options<br />
is clicked.<br />
To change the Entry/Exit Point(s):<br />
Step Action Result<br />
>1 Select <strong>Editing</strong> icon. The <strong>Editing</strong> toolbar will<br />
open.<br />
>2 Click on the block to be<br />
changed.<br />
The block will be highlighted<br />
with original input information.<br />
>3 Choose Entry & Exit Point<br />
from the Edit drop-down<br />
list.<br />
>4 Click and drag the Entry<br />
and/or Exit point to a new<br />
location.<br />
>5 Select Stitch It. The stitches will regenerate<br />
with change.<br />
DRAG<br />
Stitch Angle<br />
DRAG<br />
Entry/Exit<br />
Point<br />
<strong>Editing</strong>:<br />
Inside <strong>Editing</strong><br />
3
add-on<br />
<strong>Editing</strong><br />
Embroidery Settings in <strong>Editing</strong> mode<br />
Other factors, such as Density, Underlay, Stitch Type and their<br />
relative Embroidery Settings can be changed after stitches have<br />
been applied.<br />
Changing Embroidery Settings in <strong>Editing</strong> mode<br />
Changing the Embroidery Settings of any block in <strong>Editing</strong> only<br />
requires one additional step from the procedure of using Embroidery<br />
Settings - That is to be active in <strong>Editing</strong> mode.<br />
The Additional Step for Embroidery Settings changes in <strong>Editing</strong><br />
mode.<br />
<strong>Futura</strong> - <strong>Editing</strong> Option - <strong>English</strong> 3-01<br />
Step Action Result<br />
>1 Select <strong>Editing</strong> icon. The <strong>Editing</strong> toolbar will<br />
open.<br />
>2 Click on the block to be<br />
changed.<br />
>3 Right-click and select<br />
Embroidery Settings and<br />
choose/change any categories.<br />
>4 Select Apply at the bottom<br />
of the Embroidery Settings<br />
box.<br />
The block will be highlighted<br />
with original input information.<br />
The stitches will regenerate<br />
with change(s).<br />
4<br />
<strong>Editing</strong>:<br />
Inside <strong>Editing</strong>
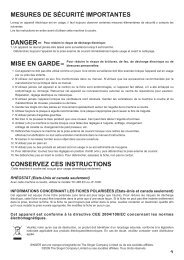
Image 1<br />
Change Embroidery Settings for a block<br />
add-on<br />
<strong>Editing</strong><br />
<strong>Futura</strong> - <strong>Editing</strong> Option - <strong>English</strong> 3-01<br />
Changing Preset Fabric in <strong>Editing</strong> Mode<br />
Step Action Result<br />
>1 Select <strong>Editing</strong> icon. The <strong>Editing</strong> toolbar will<br />
open.<br />
>2 Click on Block to change<br />
Fabric Settings.<br />
>3 Right-click and choose Embroidery<br />
Settings from the<br />
pop-out menu.<br />
>4 Click (any) category and<br />
type desired value.<br />
Original input points will be<br />
highlighted.<br />
Embroidery Settings box will<br />
open with relevant settings.<br />
The category will be highlighted<br />
for change.<br />
>5 Choose apply. The selected block will regenerated<br />
with changes.<br />
<strong>Editing</strong>:<br />
Inside <strong>Editing</strong><br />
5
add-on<br />
<strong>Editing</strong><br />
Changing Stitch Types in <strong>Editing</strong> mode<br />
Changing the Stitch Type of any block in <strong>Editing</strong> only requires one<br />
additional step from the procedure of using Stitch Types - That is<br />
to be active in <strong>Editing</strong> mode. See “Inside Stitch Types”.<br />
The additional Step for changing Stitch Type in <strong>Editing</strong> mode.<br />
Step Action Result<br />
>1 Select <strong>Editing</strong> icon. The <strong>Editing</strong> toolbar will<br />
open.<br />
>2 Click on the block to be<br />
changed.<br />
>3 Right-click and select Embroidery<br />
Settings/Stitch<br />
Types and choose from the<br />
list.<br />
>4 Select Apply at the bottom<br />
of the Embroidery Settings<br />
box.<br />
The block will be highlighted<br />
with original input information.<br />
The stitches will regenerate<br />
with new Stitch Type.<br />
<strong>Futura</strong> - <strong>Editing</strong> Option - <strong>English</strong> 3-01<br />
6<br />
<strong>Editing</strong>:<br />
Inside <strong>Editing</strong><br />
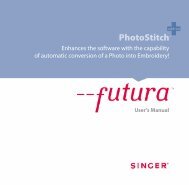
Additional Settings<br />
Image 1<br />
Stitch type list.
<strong>Futura</strong> - <strong>Editing</strong> Option - <strong>English</strong> 3-01<br />
Inside Embroidery settings<br />
The ‘Embroidery settings’ is the basic dialogue from within the<br />
software related to editing the embroidery settings of any block, it<br />
can be considered as the ‘embroidery core’ of the software.<br />
This window allows editing and alteration of all embroidery<br />
attributes of one (or more than one) embroidery blocks, settings that<br />
can be changed include :<br />
add-on<br />
<strong>Editing</strong><br />
Density - to change the density of a block<br />
Stitch angle (for complex fill blocks) – to give in specific angle for a<br />
complex fill block<br />
Underlay – to add Underlay to a block.<br />
There are various types of underlay :<br />
• Central underlay – adds a central running stitch to the block<br />
(only available for column blocks)<br />
• Edgewalk underlay – adds a perimetric underlay to the block<br />
• Fill underlay – ads a ‘zig-zag’ fill underlay to the block<br />
Running/Satin outline – to add automatic outline, either running<br />
stitch or satin around one block.<br />
There is also the option to assign a different ‘Outline color’ to the<br />
automatic outline.<br />
Short stitches – for column blocks, to insert short stitches in<br />
difficult (usually curve) areas where many stitches gather together<br />
on a close spot, and this way ‘lighten up’ the specific areas and<br />
achieve a better result.<br />
Stretch – to stretch the stitches of block further outside their<br />
original outline, to compensate for any push/pull effect of the<br />
fabric that it will be embroidered on.<br />
<strong>Editing</strong>:<br />
Inside <strong>Editing</strong><br />
7
add-on<br />
<strong>Editing</strong><br />
The same window also allows for call and use of the ‘Preset fabrics’<br />
which automatically apply a set of fabric specific values to the various<br />
embroidery settings, while even these proposed values can then be<br />
further edited.<br />
The standard way of editing the<br />
‘Embroidery settings’ is by selecting<br />
each desired block and editing it’s<br />
settings, then click on ‘Apply’ to have<br />
the changes take effect.<br />
You can have the ‘Embroidery settings<br />
window open at all time while working<br />
or you can set it to ‘roll up’ each time<br />
the mouse is being moved away from it.<br />
Choose the way which comforts you while<br />
working.<br />
<strong>Futura</strong> - <strong>Editing</strong> Option - <strong>English</strong> 3-01<br />
In case a stitch format design is<br />
opened (like .dst, which contains<br />
no ‘block outline’ information) and<br />
parts of it selected, the Embroidery<br />
settings window will display more<br />
generic information on the design or<br />
parts of the design selected, such as :<br />
Dimensions , number of stitches and<br />
list of colors.<br />
As described, the ‘Embroidery settings’<br />
window can only display the above<br />
information when block(s) of the design<br />
that contain outline information are<br />
selected – that is blocks that originated<br />
from the automated wizards (like<br />
AutoPunch and HyperFont) or as a result of<br />
a ‘Stitch to Block’ conversion.<br />
8<br />
<strong>Editing</strong>:<br />
Inside <strong>Editing</strong>
<strong>Futura</strong> - <strong>Editing</strong> Option - <strong>English</strong> 3-01<br />
Inside Edit Preset Fabric<br />
Preset Fabric are the factory preset Embroidery Settings for particular<br />
types of fabrics or apparel. There are two ways in which use<br />
Preset Fabric – before digitizing a segment and after digitizing<br />
a segment, in <strong>Editing</strong> Mode.<br />
How to use Edit Preset Fabric<br />
add-on<br />
<strong>Editing</strong><br />
Preset Frabric settings can also be used to<br />
apply to the whole of the design.<br />
From the menu item ‘Design’ choose the<br />
option ‘Apply fabric’.<br />
If the values of Preset Fabric are not giving<br />
the desired results,<br />
choose “<strong>Manual</strong> Settings” (though <strong>Editing</strong><br />
Mode)<br />
and adjust as required.<br />
Step Action Result<br />
>1 Select <strong>Editing</strong> icon. The <strong>Editing</strong> toolbar will<br />
open.<br />
>2 Click on the block to be<br />
changed.<br />
The block will be highlighted<br />
with original input information.<br />
>3 Right-click and choose Embroidery<br />
Settings from the<br />
pop-up menu.<br />
>4 Select Preset Fabric tab. A Select Fabric dialogue box<br />
will open.<br />
>5 Select Garment (of your<br />
choice) from left-hand<br />
column.<br />
>6 Select Type from the righthand<br />
column.<br />
>7 Click Ok. The Embroidery Settings box<br />
will open with current fabric<br />
values.<br />
These settings are only suggestions. There are many factors that<br />
come into play when putting an embroidery design onto apparel.<br />
The Embroidery Settings that appear (after a fabric is chosen) can<br />
be changed.<br />
<strong>Editing</strong>:<br />
Inside <strong>Editing</strong><br />
9
add-on<br />
<strong>Editing</strong><br />
Modify Settings<br />
As you experiment and learn the meaning of the categories in Embroidery<br />
Settings, you may want to make minor changes.<br />
Apply<br />
To activate any/all changes made within the Embroidery Settings<br />
dialogue box, select Apply at the bottom of the dialogue box.<br />
<strong>Futura</strong> - <strong>Editing</strong> Option - <strong>English</strong> 3-01<br />
Select to ‘Change Parameters’<br />
This option allows for editing of embroidery settings of multiple<br />
blocks.<br />
Select the desired blocks, click the right mouse button and choose to<br />
‘Change Parameters’.<br />
The changes performed to the values of the embroidery settings will<br />
apply to all of the select blocks.<br />
The change of values to embroidery<br />
settings will only apply to block(s) that<br />
correspond to a particular embroidery<br />
setting, for example it is not possible to<br />
change ‘density’ to a running stitch block,<br />
as this type of block does not relate to<br />
such a value.<br />
Inside Edit Lettering<br />
Text created from within the <strong>Software</strong> can be edited in two ways,<br />
• either by editing the outlines of the text objects, following the<br />
guidelines provided above for ‘Outline Edit’.<br />
All editing options presented can also<br />
be applied to text objects.<br />
• or by going one step further to edit all attributes of the text in the<br />
‘wireframe’ mode from within the lettering environment.<br />
Simply click on ‘OutlineEdit’, select the text and click on the<br />
button.<br />
10<br />
<strong>Editing</strong>:<br />
Inside <strong>Editing</strong>
<strong>Futura</strong> - <strong>Editing</strong> Option - <strong>English</strong> 3-01<br />
Inside Stitch Types<br />
Stitch Types offer creative options for digitizing. While the traditional<br />
(default) Stitch Type for Freeform, for example, “Step Satin”<br />
is Fill; texture and interest may be obtained by selecting a different<br />
style of stitches such as “Random”. Choosing a special Stitch Type is<br />
up to you, the user.<br />
add-on<br />
<strong>Editing</strong><br />
Step Action Result<br />
>1 Choose ‘Edit’ and select a<br />
block.<br />
>2 Right-click and select Embroidery<br />
Settings from the<br />
pop-out menu.<br />
The floating Embroidery Settings<br />
box will open.<br />
>3 Select Stitch Type tab. A list of available Freeform<br />
Stitch Types will appear.<br />
>4 Select a type from the<br />
column.<br />
>5 Select Apply at the bottom. The selected Stitch Type will<br />
fill the next shape.<br />
<strong>Editing</strong>:<br />
Inside <strong>Editing</strong><br />
11
add-on<br />
<strong>Editing</strong><br />
Stitch Type Values<br />
Each of the Stitch Types also has associated values that are unique.<br />
The Default values create quality stitching. Experiment with the<br />
values to create different effects.<br />
To change any of the values, simply highlight the category, and type<br />
the new value.<br />
<strong>Futura</strong> - <strong>Editing</strong> Option - <strong>English</strong> 3-01<br />
Associated Values<br />
12<br />
<strong>Editing</strong>:<br />
Inside <strong>Editing</strong>
<strong>Futura</strong> - <strong>Editing</strong> Option - <strong>English</strong> 3-01<br />
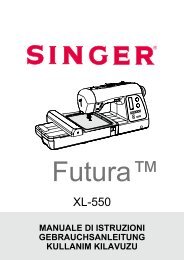
Image 1<br />
Satin<br />
Image 2<br />
Step 1/1<br />
Image 3<br />
Step1/2<br />
Image 4<br />
Step Satin<br />
Image 5<br />
Random<br />
Image 6<br />
Step 1/3<br />
Freeform Stitch Types<br />
The following image shows the available Stitch Types for Freeform.<br />
Experimentation is the key to discovering your favorites!<br />
1<br />
4<br />
2<br />
5<br />
3<br />
6<br />
add-on<br />
<strong>Editing</strong><br />
Column Stitch Types<br />
The following image shows the available Stitch Types for Column.<br />
7<br />
8<br />
9<br />
Image 7<br />
Satin<br />
Image 8<br />
Step 1/1<br />
Image 9<br />
Step 1/2<br />
Image 10<br />
Step 1/3<br />
Image 11<br />
Step Satin<br />
Image 12<br />
Random<br />
10<br />
11 12<br />
<strong>Editing</strong>:<br />
Inside <strong>Editing</strong><br />
13
add-on<br />
<strong>Editing</strong><br />
Freeform’s Normal Fill- Pattern, Elastic and Motif Stitch Types<br />
These are stitch types that have repeated patterns. Step Pattern<br />
and Elastic are like “carved” shapes inside a block. Motif has “lacy”<br />
elements that typically leave the background showing.<br />
Step Pattern can be found in the following: Freeform & Shapes/<br />
Normal Fill; Column/ Normal Fill. Motif can be found: Freeform<br />
& Shapes/ Normal Fill & Running Stitch.<br />
<strong>Futura</strong> - <strong>Editing</strong> Option - <strong>English</strong> 3-01<br />
Use Stitch Types<br />
To use these stitch types, choose one from the Stitch Types list.<br />
Then, click on “Catalog” and choose a pattern or motif from the list.<br />
Click “Apply” and the pattern will be generated in the block.<br />
Step Pattern<br />
Stitch Type<br />
Motif<br />
Increase values for<br />
LARGER, and decrease<br />
for SMALLER pattern.<br />
Pattern list<br />
14<br />
<strong>Editing</strong>:<br />
Inside <strong>Editing</strong>
<strong>Futura</strong> - <strong>Editing</strong> Option - <strong>English</strong> 3-01<br />
If working with a Block file<br />
(that was digitized with FUTURA),<br />
all Stitch Edit changes will be lost<br />
if Block <strong>Editing</strong> is done afterwards.<br />
To prevent this, do all stitch editing last!<br />
Inside Stitch Edit<br />
Stitch Edit<br />
With the Stitch Edit feature, individual stitches can be moved, deleted<br />
and inserted, and blocks can be divided using “Split Block”.<br />
The Stitch Edit function can be used with “block format”- the native<br />
language of your software, or “machine stitch format” - stock<br />
designs that were not digitized using the <strong>Software</strong>.<br />
To edit individual stitches:<br />
Step Action Result<br />
add-on<br />
<strong>Editing</strong><br />
>1 Select <strong>Editing</strong>/Stitch Edit<br />
icon.<br />
>2 Click and drag any stitch to<br />
MOVE to a new position.<br />
>3 Right-Click to “locate” on<br />
desired stitch. Travel with<br />
up and down arrows (on<br />
keyboard).<br />
>4 Choose the Delete key or<br />
Delete Icon to DELETE a<br />
stitch, or hold down key to<br />
delete an area.<br />
>5 Right-Click to “locate” on<br />
desired stitch.<br />
>6 Choose the Insert Icon.<br />
>7 Click two times to Insert a<br />
stitch.<br />
>8 Select Esc. Alternatively,<br />
Click <strong>Editing</strong> icon again.<br />
The mouse cursor will<br />
change appearance.<br />
The stitch(es) will be<br />
“erased”.<br />
The 1 st Click is locating; the<br />
2 nd Click is positioning.<br />
<strong>Editing</strong> mode will end.<br />
<strong>Editing</strong>:<br />
Inside <strong>Editing</strong><br />
15
add-on<br />
<strong>Editing</strong><br />
Inside Stitches to Blocks<br />
The ‘Stitches to Blocks’ function allows for transformation of a<br />
design in stitch format (only stitch information) into block outline<br />
information, thus allowing for advanced outline editing.<br />
What the software does is by looking at the stitches of a design (and<br />
its color parts) to try to assume how these parts where built and,<br />
based on this information, to rebuild the blocks.<br />
During this process it is expected for the software not to be able to<br />
rebuild it exactly as it had been originally digitized.<br />
Make sure to save any design that has been<br />
converted with ‘Stitches to blocks’ to the<br />
FUTURA native file format (.fhe), in order to<br />
maintain full editing capabilities anytime<br />
opening the design.<br />
<strong>Futura</strong> - <strong>Editing</strong> Option - <strong>English</strong> 3-01<br />
Nevertheless, this feature provides the powerful capability of taking<br />
a design that due to its format (for example .dst) allows for only<br />
limited editing capabilities and convert it into a format that provides<br />
unlimited capabilities to edit outlines, stitch direction, stitch types<br />
etc. and take advantage of the power provided through the features<br />
offered in the FUTURA <strong>Editing</strong> module.<br />
Inside Optimize<br />
The ‘Optimize’ option allows ‘cleaning’ of unnecessary very small<br />
stitches and also jump stitches that might be likely to cause thread<br />
breakage.<br />
The FUTURA editing module provides the option through this<br />
feature to specifically set the value of length of stitches that should<br />
be eliminated.<br />
16<br />
<strong>Editing</strong>:<br />
Inside <strong>Editing</strong>