You also want an ePaper? Increase the reach of your titles
YUMPU automatically turns print PDFs into web optimized ePapers that Google loves.
B) Change from <strong>Humeca</strong> ® V-10 (<strong>and</strong> Zimmer ® ) <strong>carriers</strong> to<br />
<strong>Humeca</strong> ® V-15 (<strong>and</strong> Aesculap ® /B.Braun ® ) <strong>carriers</strong>.<br />
16<br />
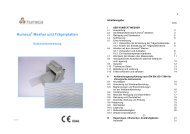
Loosen both adjustment screws (11) at the bottom of the mesher<br />
(shown in fig. 10) counter clockwise about two turns (it may be a little<br />
heavy). Now there will be some vertical play in the transport axis <strong>and</strong> the<br />
mesher is ready for use with <strong>Humeca</strong> ® V-15 (<strong>and</strong> Aesculap ® /B.Braun ® )<br />
<strong>carriers</strong>.<br />
II-6. The procedure of meshing<br />
II-6.1 Mounting the mesher after sterilization<br />
After sterilization the bridge of the mesher is open <strong>and</strong> the blades axis<br />
might be stored separately. To prepare the mesher for cutting, please<br />
proceed as follows:<br />
- Replace the blades axis at its correct position in the mesher.<br />
- Close the bridge (turn the h<strong>and</strong>le a little if the gearwheels don’t grip)<br />
<strong>and</strong> fix the locking screws (4 in fig. 8) by turning them clockwise until<br />
complete fixation.<br />
- Check proper operation by rotating the h<strong>and</strong>le (6) a few turns. It<br />
should run easily.<br />
II-6.2 Meshing<br />
- Spread the graft, preferably epidermal side down, on the carrier. Be<br />
sure the type of carrier matches with the adjustment of the mesher. In<br />
case of doubt, please check (see section II-5.1).<br />
Warning I:<br />
Using a <strong>Humeca</strong> ® V-15 (or Aesculap ® /B.Braun ® ) carrier in a<br />
mesher that was adjusted for <strong>Humeca</strong> ® V-10 (or Zimmer ® ) <strong>carriers</strong><br />
may seriously damage the blades! Considerable force will be<br />
required to turn the h<strong>and</strong>le. In such a case immediately<br />
counterturn the h<strong>and</strong>le, take out the carrier <strong>and</strong> replace it or readjust<br />
the mesher.