

instruction book - Janome
instruction book - Janome
instruction book - Janome

You also want an ePaper? Increase the reach of your titles
YUMPU automatically turns print PDFs into web optimized ePapers that Google loves.
2<br />
1<br />
3<br />
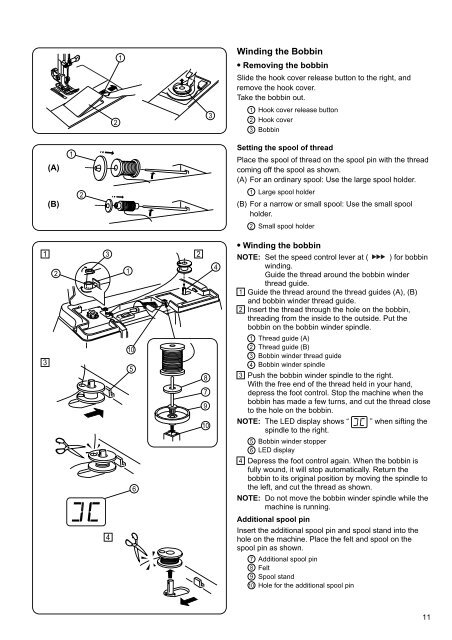
Winding the Bobbin<br />
• Removing the bobbin<br />
Slide the hook cover release button to the right, and<br />
remove the hook cover.<br />
Take the bobbin out.<br />
1<br />
2<br />
3<br />
Hook cover release button<br />
Hook cover<br />
Bobbin<br />
(A)<br />
(B)<br />
1<br />
2<br />
Setting the spool of thread<br />
Place the spool of thread on the spool pin with the thread<br />
coming off the spool as shown.<br />
(A) For an ordinary spool: Use the large spool holder.<br />
1 Large spool holder<br />
(B) For a narrow or small spool: Use the small spool<br />
holder.<br />
2<br />
Small spool holder<br />
1 3<br />
2<br />
2 1<br />
10<br />
3<br />
5<br />
8<br />
7<br />
9<br />
10<br />
6<br />
4<br />
4<br />
• Winding the bobbin<br />
NOTE: Set the speed control lever at ( ) for bobbin<br />
winding.<br />
Guide the thread around the bobbin winder<br />
thread guide.<br />
1 Guide the thread around the thread guides (A), (B)<br />
and bobbin winder thread guide.<br />
2 Insert the thread through the hole on the bobbin,<br />
threading from the inside to the outside. Put the<br />
bobbin on the bobbin winder spindle.<br />
1<br />
2<br />
3<br />
4<br />
Thread guide (A)<br />
Thread guide (B)<br />
Bobbin winder thread guide<br />
Bobbin winder spindle<br />
3 Push the bobbin winder spindle to the right.<br />
With the free end of the thread held in your hand,<br />
depress the foot control. Stop the machine when the<br />
bobbin has made a few turns, and cut the thread close<br />
to the hole on the bobbin.<br />
NOTE: The LED display shows “ ” when sifting the<br />
spindle to the right.<br />
5<br />
6<br />
Bobbin winder stopper<br />
LED display<br />
4 Depress the foot control again. When the bobbin is<br />
fully wound, it will stop automatically. Return the<br />
bobbin to its original position by moving the spindle to<br />
the left, and cut the thread as shown.<br />
NOTE: Do not move the bobbin winder spindle while the<br />
machine is running.<br />
Additional spool pin<br />
Insert the additional spool pin and spool stand into the<br />
hole on the machine. Place the felt and spool on the<br />
spool pin as shown.<br />
7<br />
8<br />
9<br />
10<br />
Additional spool pin<br />
Felt<br />
Spool stand<br />
Hole for the additional spool pin<br />
11


