

instruction book - Janome
instruction book - Janome
instruction book - Janome

You also want an ePaper? Increase the reach of your titles
YUMPU automatically turns print PDFs into web optimized ePapers that Google loves.
3<br />
1<br />
2<br />
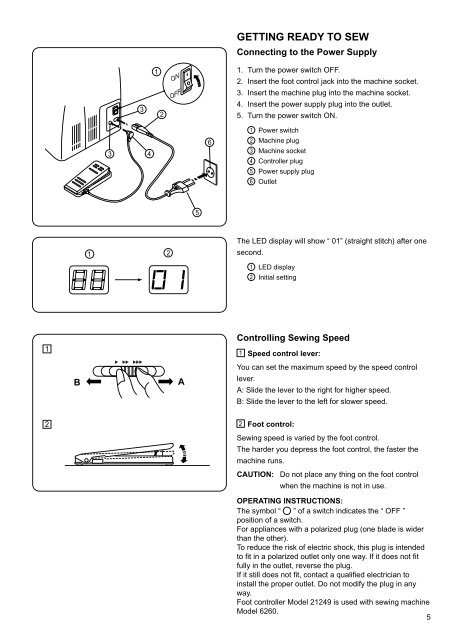
GETTING READY TO SEW<br />
Connecting to the Power Supply<br />
1. Turn the power switch OFF.<br />
2. Insert the foot control jack into the machine socket.<br />
3. Insert the machine plug into the machine socket.<br />
4. Insert the power supply plug into the outlet.<br />
5. Turn the power switch ON.<br />
3<br />
4<br />
6<br />
1<br />
2<br />
3<br />
4<br />
5<br />
6<br />
Power switch<br />
Machine plug<br />
Machine socket<br />
Controller plug<br />
Power supply plug<br />
Outlet<br />
5<br />
1<br />
2<br />
The LED display will show “ 01” (straight stitch) after one<br />
second.<br />
1 LED display<br />
2 Initial setting<br />
1<br />
Controlling Sewing Speed<br />
1 Speed control lever:<br />
You can set the maximum speed by the speed control<br />
B<br />
A<br />
lever.<br />
A: Slide the lever to the right for higher speed.<br />
B: Slide the lever to the left for slower speed.<br />
2<br />
2<br />
Foot control:<br />
Sewing speed is varied by the foot control.<br />
The harder you depress the foot control, the faster the<br />
machine runs.<br />
CAUTION:<br />
Do not place any thing on the foot control<br />
when the machine is not in use.<br />
OPERATING INSTRUCTIONS:<br />
The symbol “ ” of a switch indicates the “ OFF ”<br />
position of a switch.<br />
For appliances with a polarized plug (one blade is wider<br />
than the other).<br />
To reduce the risk of electric shock, this plug is intended<br />
to fit in a polarized outlet only one way. If it does not fit<br />
fully in the outlet, reverse the plug.<br />
If it still does not fit, contact a qualified electrician to<br />
install the proper outlet. Do not modify the plug in any<br />
way.<br />
Foot controller Model 21249 is used with sewing machine<br />
Model 6260.<br />
5


