

instruction book - Janome
instruction book - Janome
instruction book - Janome

You also want an ePaper? Increase the reach of your titles
YUMPU automatically turns print PDFs into web optimized ePapers that Google loves.
1 2 3<br />
01<br />
0<br />
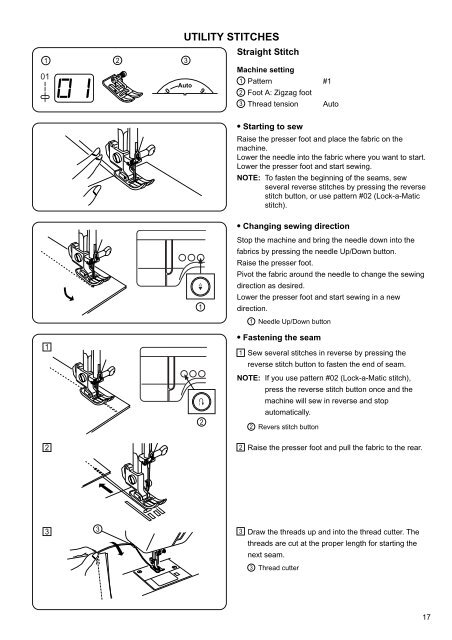
UTILITY STITCHES<br />
Auto<br />
9<br />
Straight Stitch<br />
Machine setting<br />
1 Pattern #1<br />
2 Foot A: Zigzag foot<br />
3 Thread tension Auto<br />
• Starting to sew<br />
Raise the presser foot and place the fabric on the<br />
machine.<br />
Lower the needle into the fabric where you want to start.<br />
Lower the presser foot and start sewing.<br />
NOTE: To fasten the beginning of the seams, sew<br />
several reverse stitches by pressing the reverse<br />
stitch button, or use pattern #02 (Lock-a-Matic<br />
stitch).<br />
1<br />
• Changing sewing direction<br />
Stop the machine and bring the needle down into the<br />
fabrics by pressing the needle Up/Down button.<br />
Raise the presser foot.<br />
Pivot the fabric around the needle to change the sewing<br />
direction as desired.<br />
Lower the presser foot and start sewing in a new<br />
direction.<br />
1<br />
Needle Up/Down button<br />
1<br />
• Fastening the seam<br />
1 Sew several stitches in reverse by pressing the<br />
reverse stitch button to fasten the end of seam.<br />
2<br />
NOTE: If you use pattern #02 (Lock-a-Matic stitch),<br />
press the reverse stitch button once and the<br />
machine will sew in reverse and stop<br />
automatically.<br />
2 Revers stitch button<br />
2<br />
2<br />
Raise the presser foot and pull the fabric to the rear.<br />
3<br />
3<br />
3<br />
Draw the threads up and into the thread cutter. The<br />
threads are cut at the proper length for starting the<br />
next seam.<br />
3<br />
Thread cutter<br />
17


