

Owners Manual - AVR 1600 - Harman Kardon
Owners Manual - AVR 1600 - Harman Kardon
Owners Manual - AVR 1600 - Harman Kardon

Create successful ePaper yourself
Turn your PDF publications into a flip-book with our unique Google optimized e-Paper software.
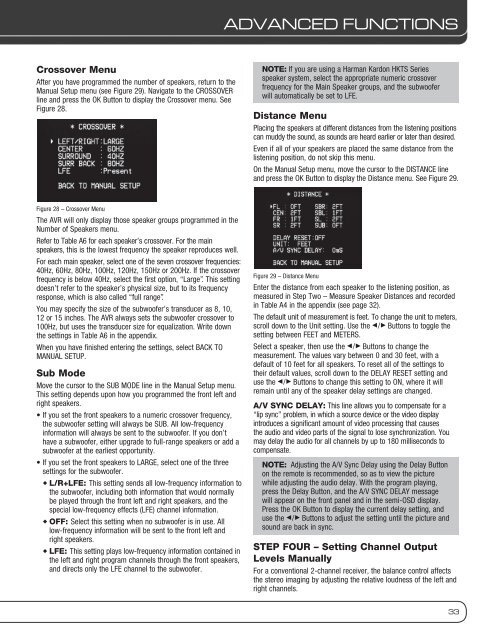
crossover menu<br />
After you have programmed the number of speakers, return to the<br />
<strong>Manual</strong> Setup menu (see Figure 29). Navigate to the CROSSOVER<br />
line and press the OK Button to display the Crossover menu. See<br />
Figure 28.<br />
Figure 28 – Crossover Menu<br />
The <strong>AVR</strong> will only display those speaker groups programmed in the<br />
Number of Speakers menu.<br />
Refer to Table A6 for each speaker’s crossover. For the main<br />
speakers, this is the lowest frequency the speaker reproduces well.<br />
For each main speaker, select one of the seven crossover frequencies:<br />
40Hz, 60Hz, 80Hz, 100Hz, 120Hz, 150Hz or 200Hz. If the crossover<br />
frequency is below 40Hz, select the first option, “Large”. This setting<br />
doesn’t refer to the speaker’s physical size, but to its frequency<br />
response, which is also called “full range”.<br />
You may specify the size of the subwoofer’s transducer as 8, 10,<br />
12 or 15 inches. The <strong>AVR</strong> always sets the subwoofer crossover to<br />
100Hz, but uses the transducer size for equalization. Write down<br />
the settings in Table A6 in the appendix.<br />
When you have finished entering the settings, select BACK TO<br />
MANUAL SETUP.<br />
Sub mode<br />
Move the cursor to the SUB MODE line in the <strong>Manual</strong> Setup menu.<br />
This setting depends upon how you programmed the front left and<br />
right speakers.<br />
• If you set the front speakers to a numeric crossover frequency,<br />
the subwoofer setting will always be SUB. All low-frequency<br />
information will always be sent to the subwoofer. If you don’t<br />
have a subwoofer, either upgrade to full-range speakers or add a<br />
subwoofer at the earliest opportunity.<br />
• If you set the front speakers to LARGE, select one of the three<br />
settings for the subwoofer.<br />
u L/r+Lfe: This setting sends all low-frequency information to<br />
the subwoofer, including both information that would normally<br />
be played through the front left and right speakers, and the<br />
special low-frequency effects (LFE) channel information.<br />
u off: Select this setting when no subwoofer is in use. All<br />
low-frequency information will be sent to the front left and<br />
right speakers.<br />
u Lfe: This setting plays low-frequency information contained in<br />
the left and right program channels through the front speakers,<br />
and directs only the LFE channel to the subwoofer.<br />
ADVAnCED FUnCTiOnS<br />
note: If you are using a <strong>Harman</strong> <strong>Kardon</strong> HKTS Series<br />
speaker system, select the appropriate numeric crossover<br />
frequency for the Main Speaker groups, and the subwoofer<br />
will automatically be set to LFE.<br />
Distance menu<br />
Placing the speakers at different distances from the listening positions<br />
can muddy the sound, as sounds are heard earlier or later than desired.<br />
Even if all of your speakers are placed the same distance from the<br />
listening position, do not skip this menu.<br />
On the <strong>Manual</strong> Setup menu, move the cursor to the DISTANCE line<br />
and press the OK Button to display the Distance menu. See Figure 29.<br />
Figure 29 – Distance Menu<br />
Enter the distance from each speaker to the listening position, as<br />
measured in Step Two – Measure Speaker Distances and recorded<br />
in Table A4 in the appendix (see page 32).<br />
The default unit of measurement is feet. To change the unit to meters,<br />
scroll down to the Unit setting. Use the Buttons to toggle the<br />
setting between FEET and METERS.<br />
Select a speaker, then use the Buttons to change the<br />
measurement. The values vary between 0 and 30 feet, with a<br />
default of 10 feet for all speakers. To reset all of the settings to<br />
their default values, scroll down to the DELAY RESET setting and<br />
use the Buttons to change this setting to ON, where it will<br />
remain until any of the speaker delay settings are changed.<br />
a/V Sync DeLay: This line allows you to compensate for a<br />
“lip sync” problem, in which a source device or the video display<br />
introduces a significant amount of video processing that causes<br />
the audio and video parts of the signal to lose synchronization. You<br />
may delay the audio for all channels by up to 180 milliseconds to<br />
compensate.<br />
note: Adjusting the A/V Sync Delay using the Delay Button<br />
on the remote is recommended, so as to view the picture<br />
while adjusting the audio delay. With the program playing,<br />
press the Delay Button, and the A/V SYNC DELAY message<br />
will appear on the front panel and in the semi-OSD display.<br />
Press the OK Button to display the current delay setting, and<br />
use the Buttons to adjust the setting until the picture and<br />
sound are back in sync.<br />
Step four – Setting Channel Output<br />
Levels manually<br />
For a conventional 2-channel receiver, the balance control affects<br />
the stereo imaging by adjusting the relative loudness of the left and<br />
right channels.<br />
33


