Moulding Clips Installation - Mar-K
Moulding Clips Installation - Mar-K
Moulding Clips Installation - Mar-K

You also want an ePaper? Increase the reach of your titles
YUMPU automatically turns print PDFs into web optimized ePapers that Google loves.
INSTALL CLIPS IN MOLDINGS PROPERLY<br />
Trim moldings are attached to the body sheet metal with clips or retainers spaced every few inches to<br />
hold the molding tightly to the body. There are many types of clips and they must be installed<br />
properly so the molding will be held to the body and not be damaged. Following are some of the<br />
types used and the recommended method of installation.<br />
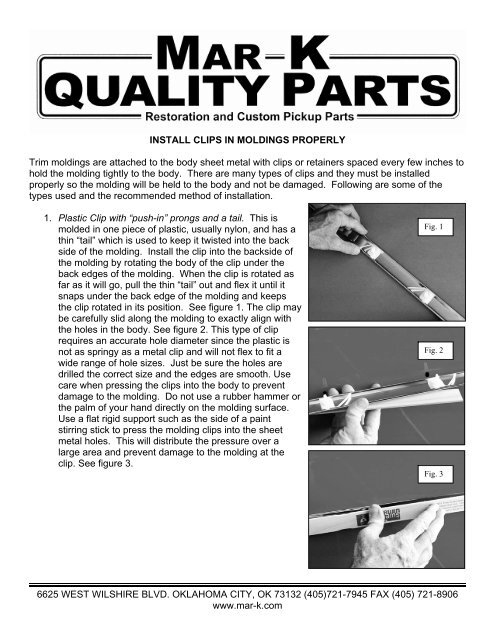
1. Plastic Clip with “push-in” prongs and a tail. This is<br />
molded in one piece of plastic, usually nylon, and has a<br />
thin “tail” which is used to keep it twisted into the back<br />
side of the molding. Install the clip into the backside of<br />
the molding by rotating the body of the clip under the<br />
back edges of the molding. When the clip is rotated as<br />
far as it will go, pull the thin “tail” out and flex it until it<br />
snaps under the back edge of the molding and keeps<br />
the clip rotated in its position. See figure 1. The clip may<br />
be carefully slid along the molding to exactly align with<br />
the holes in the body. See figure 2. This type of clip<br />
requires an accurate hole diameter since the plastic is<br />
not as springy as a metal clip and will not flex to fit a<br />
wide range of hole sizes. Just be sure the holes are<br />
drilled the correct size and the edges are smooth. Use<br />
care when pressing the clips into the body to prevent<br />
damage to the molding. Do not use a rubber hammer or<br />
the palm of your hand directly on the molding surface.<br />
Use a flat rigid support such as the side of a paint<br />
stirring stick to press the molding clips into the sheet<br />
metal holes. This will distribute the pressure over a<br />
large area and prevent damage to the molding at the<br />
clip. See figure 3.<br />
Fig. 1<br />
Fig. 2<br />
Fig. 3<br />
6625 WEST WILSHIRE BLVD. OKLAHOMA CITY, OK 73132 (405)721-7945 FAX (405) 721-8906<br />
www.mar-k.com
2. Wireformed Clip This type clip is made from spring wire.<br />
It slides into the back side of the molding and has two<br />
Fig. 4<br />
prongs that snap into a hole in the body. It must be slid<br />
into the molding from one end or from a spot where the<br />
back side of the moldings have been trimmed to provide<br />
a clearance for sliding the clip into the molding. See<br />
figure 4. These clips are designed to fit a specific<br />
molding and to fasten into a specific size hole in the<br />
body. Be sure the hole drilled in the body is the correct<br />
size. As with all “push in” type clips, use care to press<br />
them in to prevent damage to the molding. A flat paint<br />
stirring stick or similar tool may be used to install the molding. Do not use a mallet or the palm<br />
of your hand directly on the molding.<br />
3. Metal Clip with built in stud and a tail. These clips may<br />
be placed into the backside of the molding near the point<br />
where they will be installed and do not have to be slid<br />
into the molding from one end. See figure 5. If they are<br />
not installed properly, they will not stay in place and may<br />
cause damage to the molding or the painted sheet<br />
metal. The clip must be inserted into the molding by<br />
twisting or rotating it to get the ends of the clip under the<br />
molding edges on the back side. After rotating it into the<br />
molding as far as it will go, bend the clip “tail” so that it is<br />
also inserted under the molding back edge and applies<br />
spring tension to keep the clip rotated in its position.<br />
See figure 6. At this point the clips may be carefully<br />
moved along the molding so the studs will exactly align<br />
with the corresponding holes in the body. When the<br />
threaded stud is pushed through the hole, a nut with a<br />
gasket or dab of sealant is used to hold the clip and<br />
molding to the body.<br />
Fig. 5<br />
Fig. 6<br />
6625 WEST WILSHIRE BLVD. OKLAHOMA CITY, OK 73132 (405)721-7945 FAX (405) 721-8906<br />
www.mar-k.com
4. Metal Clip with “push-in” prongs and a tail. These clips<br />
are similar to the clips described in #3 above except<br />
Fig. 7<br />
they must be snapped into a hole in the body instead of<br />
being retained by a stud and nut. They are usually used<br />
to attach a molding where there is not access to the<br />
back side of the body panel. Install this clip into the<br />
molding by rotating it under the edges of the molding on<br />
the back side. Use the springy tail to keep it rotated in<br />
position and slide it along the molding to the proper<br />
location to match the hole in the body. See figure 7. A<br />
word of caution about this type of clip. They are difficult<br />
to remove once installed into the body. Be sure everything is ready for final installation of the<br />
molding before pressing them into the body holes. As with all “push in” type clips, be sure the<br />
hole is the correct diameter and press them in carefully to prevent damage to the molding.<br />
5. Shaped Metal Clip with stud This clip is used on the<br />
end of a molding and is shaped to fit into the back side<br />
of the molding so once installed it will not rotate as the<br />
nut is tightened. See figure 8. Simply slide the clip into<br />
the molding under the back side edges of the molding<br />
and install the molding onto the body with the stud<br />
through the hole in the body. If the clip is loose in the<br />
molding it may be held in position with a small amount of<br />
caulk or body sealant between the molding and clip until<br />
the molding is installed and the nut tightened.<br />
Fig. 8<br />
6. Plastic Clip with Adhesive strip This clip is a precision<br />
shaped piece of plastic that snaps tightly into the back<br />
Fig. 9<br />
side of the molding. It has a patch of adhesive that<br />
holds the clip and molding to the body, so holes in the<br />
body are not needed for this clip. To use this clip,<br />
determine where the clips should be placed on the<br />
molding and snap them into the molding back side.<br />
See figure 9. Do not remove the release paper from the<br />
adhesive patches until right before you are ready to<br />
install the molding. Clean the paint surface where the<br />
molding will be installed with solvent and then with<br />
alcohol or similar cleaner to remove all traces of the<br />
solvent. If the surface is clean, the adhesive will stick permanently to the body. After cleaning<br />
the surface, remove the release paper from the adhesive clips, align the molding where it will<br />
be installed, and press the molding to the body. Apply pressure over each clip to be sure the<br />
adhesive is firmly pressed to the body surface. Do not attempt to move the molding after the<br />
clips are pressed in place. They must be installed correctly the first time.<br />
6625 WEST WILSHIRE BLVD. OKLAHOMA CITY, OK 73132 (405)721-7945 FAX (405) 721-8906<br />
www.mar-k.com
7. Plastic clip fitted to a welded stud. This clip fits over a<br />
small headed stud that is welded to the body. See<br />
Fig. 10<br />
figure 10. The clip is first installed on the stud by<br />
placing it over the head of the stud and sliding it over<br />
the stud until the clip is tight. When properly installed<br />
the clips will be tight against the body and will not<br />
move. Be sure there is a clip on every stud for the<br />
molding and that they are all aligned before installing<br />
the molding. Simply position the molding over the<br />
clips and then snap the molding onto the clips to hold<br />
it in place. If the molding is being installed onto a<br />
body that does not have the welded studs, a body shop can weld them on or you can use<br />
special studs that are attached to the body with small screws.<br />
©Copyright 2005 MAR-K Quality Parts L.L.C. All rights reserved.<br />
6625 WEST WILSHIRE BLVD. OKLAHOMA CITY, OK 73132 (405)721-7945 FAX (405) 721-8906<br />
www.mar-k.com