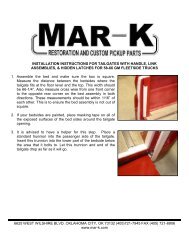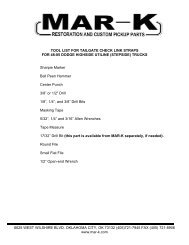
41-53 GM instructions - Mar-K
41-53 GM instructions - Mar-K
41-53 GM instructions - Mar-K

Create successful ePaper yourself
Turn your PDF publications into a flip-book with our unique Google optimized e-Paper software.
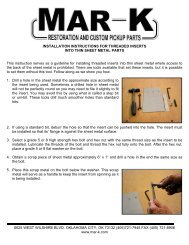
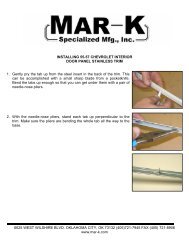
4. Install the check straps to each end of the tailgate usingtwo 1/4-20 x 3/4 “ button head torx screws with a T-25 torxdriver.5. Attach one tailgate hinge to the right or left rear stakepocket with two 5/16-18 x 3/4“ hex head bolts. Leave themloose for now. Slide the tailgate lower hinge tube onto thehinge on the stake pocket. Insert the other hinge into theopposite hinge tube of the tailgate. Attach it to the stakepocket as before.6. Place the check straps onto the bedside pins that arewelded on the inside of the bedside. In order to align theslots in the check straps fold the check straps in theopposite (upward) position while partially closing thetailgate.6625 WEST WILSHIRE BLVD. OKLAHOMA CITY, OK 73132 (405)721-7945 FAX (405) 721-8906www.mar-k.com
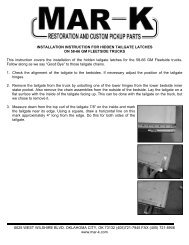
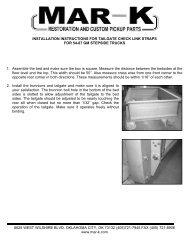
3. Close the tailgate and check for alignment with the bedsides.Adjust hinges if necessary. Once you are happy with the fit,tighten the hinge bolts. Scribe around the tailgate hinges tomark their location.4. Remove one tailgate hinge so that you can remove thetailgate. Set the tailgate aside for now. Re-install the hinge atthe scribed lines.5. Install the template provided onto the hinge so that thetemplate is on the inside of the bedside. The notches in thetemplate should be facing forward. Align the rear most edgeof the template with the rear edge of the bedside. Clamp thetemplate to the bedside.6. <strong>Mar</strong>k the area to be removed on the bedside using thetemplate as shown. Use the inner edges of the notches in thetemplate and the front edge of the template is the depth ofthe cut.7. Remove the template. Use a straight edge to lengthen themark from the notch out to the edge of the bedside. Themarked area should be 3” tall by 1-1/4” deep. <strong>Mar</strong>k the otherbedside in the same manner.Note: The cutting, welding, and grinding steps that follow may beeasier if the bedsides were lying on their sides. It is suggested thatthe box be disassembled at this point.8. Cut out the area marked on the bedsides. Stay on the inside of the lines towards where thepatch will fit. It is easier to make an area larger than to fill it in again. We used a jigsaw but aplasma cutter or high-speed cutoff wheel would also work.6625 WEST WILSHIRE BLVD. OKLAHOMA CITY, OK 73132 (405)721-7945 FAX (405) 721-8906www.mar-k.com
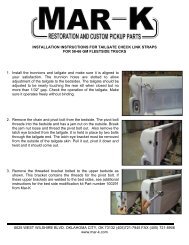
9. Attach the template to the bedside again. Fit the patch panel tothe template. The patch has a hole pattern that matches thetemplate. Check the fit or gap around the patch to the bedside.Clamp the template and patch to the bedside. Make sure thatthe patch and template stay even with the back edge of thebedside. You may use the bolts and 5/16” nuts provided if youwish to bolt the patch to the template.10. Tack-weld the patch into place from the outside of the bedside.Check to see that the patch has not shifted. Remove thetemplate and tack weld from the other side. Do these steps toboth bedsides.Note: You may wish to re-assemble the box at this point to verify the positions of the patches beforepermanently welding them in place.6625 WEST WILSHIRE BLVD. OKLAHOMA CITY, OK 73132 (405)721-7945 FAX (405) 721-8906www.mar-k.com
11. Continue welding the gap between the patch and the bedsideusing short welds. Switch from inside to outside of the patchand from bedside to bedside to minimize heat distortion.12. Grind all welds smooth. Again, be careful not to build up toomuch heat with the grinder.Note: The patch and the bedside should now appear to be thesame metal and be smooth at the weld seam.13. Included with the tailgate kit, you should find two link assemblypivots. These bolt to the bedsides in the lower hole on thebedside. Use a 5/16” –18 x 3/8” long button head screw with awasher under the link pivot. The washer keeps the linkassembly from scratching the paint at final assembly. Makesure that the flats on the sides of the link pivots are horizontalwhen the bolts are tightened. After final adjustment, you willneed to use a thread locking compound on all four screws andtorque them to 375 in-lbs. or 33 ft-lbs. maximum.6625 WEST WILSHIRE BLVD. OKLAHOMA CITY, OK 73132 (405)721-7945 FAX (405) 721-8906www.mar-k.com
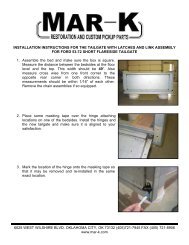
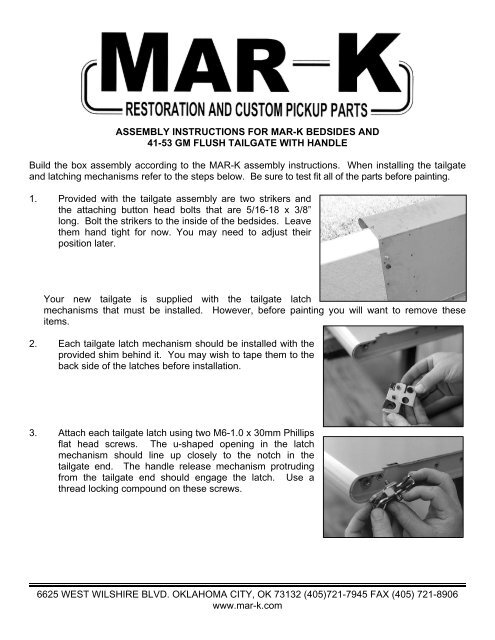
14. Bolt the strikers to the top hole in the bedside patch with the same screws as for the link pivot.15. Re-assemble the bed as before with the tailgate. Make sure to get the hinges in the scribedlocations.16. Install the link assemblies to each end of the tailgate usingtwo 1/4-20 x 3/4 “ button head torx screws with a T-25 torxdriver.Your new tailgate is supplied with the tailgate latchmechanisms that must be installed. However, before painting you will want to remove theseitems.17. Each tailgate latch mechanism should be installed with theprovided shim behind it. You may wish to tape them to theback side of the latches before installation.18. Attach each tailgate latch using two M6-1.0 x 30mm Phillipsflat head screws. The u-shaped opening in the latchmechanism should line up closely to the notch in thetailgate end. The handle release mechanism protrudingfrom the tailgate end should engage the latch. Use athread locking compound on these screws.19. Place the check straps onto the bedside pins that arebolted to the inside of the bedside. In order to align theslots in the check straps fold the check straps in theopposite (upward) position while partially closing thetailgate.6625 WEST WILSHIRE BLVD. OKLAHOMA CITY, OK 73132 (405)721-7945 FAX (405) 721-8906www.mar-k.com
20. Once both check straps are placed on the pins, lower thetailgate to its full open position. Gently close the tailgatewhile watching the check straps. They should fold togethertowards the bedsides in a downward motion. Continueclosing the tailgate. If any binding occurs, you may need toadjust a hinge up or down. If everything is good then closethe tailgate against the strikers. Make sure the handle hasbeen released to open the latches before doing this.Another Outstanding Part Manufactured in Oklahoma City, USA by©Copyright 2003 MAR-K Quality Parts L.L.C. All rights reserved.6625 WEST WILSHIRE BLVD. OKLAHOMA CITY, OK 73132 (405)721-7945 FAX (405) 721-8906www.mar-k.com