Tailgate Link Assembly Instructions - Mar-K
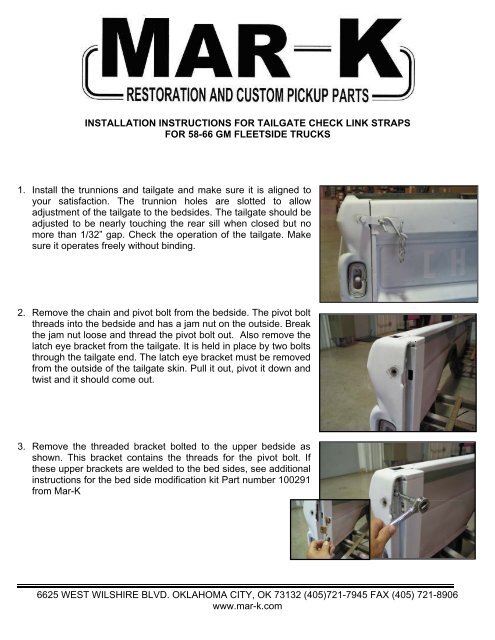
Tailgate Link Assembly Instructions - Mar-K
Tailgate Link Assembly Instructions - Mar-K

Create successful ePaper yourself
Turn your PDF publications into a flip-book with our unique Google optimized e-Paper software.
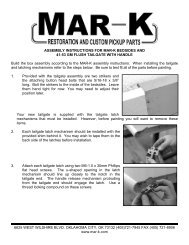
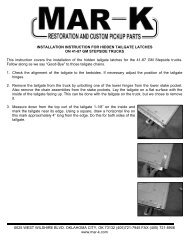
4. Locate the new upper link pivot brackets from the kit. There is aleft and right hand side because of the angled cut and the holepattern. These will only fit on one way.5. Bolt the new upper link pivot bracket to the two holes where thethreaded bracket was just removed. You must re-use the oldhardware. Do this on both sides.6. In order for the link assemblies to fold up inside the tailgate endswhen closed, some material will need to be removed from eachend of the tailgate. A template has been provided to mark thetailgate for these cuts. Align the template to the edge of thetailgate and the bottom of the curl of the tailgate as shown.7. The template will rest above the surface due to the embossmentin the skin. Clamp the template in place so that it remains flat.Scribe the shape onto the tailgate keeping the scribe vertical.The width of the material to be cut out should be 3/8 inch exceptfor the bottom area where the rivet of the link assembly passeswhen folded. That depth is 1/2 inch. Use this template to markboth ends of the tailgate.6625 WEST WILSHIRE BLVD. OKLAHOMA CITY, OK 73132 (405)721-7945 FAX (405) 721-8906www.mar-k.com
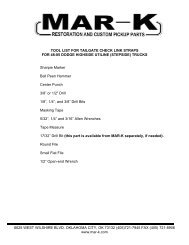
8. Cut out the area indicated by the template (shown by the crosshatchpattern) with a jig saw, high speed cutting wheel, orplasma cutter. We chose the jig saw method.9. We decided to remove the tailgate for this step. Starting at thebottom, cut straight in to the 1/2-inch depth. Do this at bothedges of the deeper part of the notch. Then cut at angles untilthe deep notch is completely cleared out.10. Cut up the straight line towards the upper ear of the tailgate untilyou make contact with the ear. We used a rotary tool with areinforced cutting wheel to finish out the top cut. While cutting onthe tailgate, the jigsaw will rest on the embossed area of thetailgate. Make sure to keep the jig saw flat and not tilted. Makethis cut on both ends of the tailgate.6625 WEST WILSHIRE BLVD. OKLAHOMA CITY, OK 73132 (405)721-7945 FAX (405) 721-8906www.mar-k.com
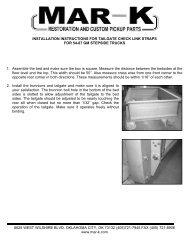
11. When cutting these areas out, you may have cut through a fewspot welds that hold the tailgate skin to the tailgate ends. Ifneeded, place a couple of small tack welds on the tailgate skinand ends and grind them down smooth. We cut through thecenter of some welds, but the tailgate skin was still welded andnot detached.12. Using the same template as in step 6 & 7, we now need to markthe holes where the pivot bracket of the link assembly will attachto the tailgate. Turn the tailgate outside up and place thetemplate in the tailgate end as shown. Make sure that the bottomof the template is against the trunnion bracket in the bottom ofthe tailgate end and that it is touching the inside surface of thetailgate end as shown.13. <strong>Mar</strong>k the tailgate end through the holes in the template. <strong>Mar</strong>kboth ends of the tailgate with this template.14. Center punch these four marks and then drill them to 1/4“diameter.6625 WEST WILSHIRE BLVD. OKLAHOMA CITY, OK 73132 (405)721-7945 FAX (405) 721-8906www.mar-k.com
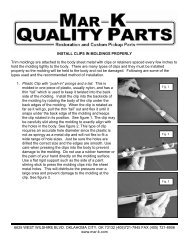
15. Re-install the tailgate back on the bed as before. Support thetailgate in the horizontal position. Attach the pivot bracket on thelink assembly to the tailgate using the 1/4-20 button head screwsand lock nuts supplied in the kit. The head of the bolt should beon the visible side of the tailgate end when closed and the nutshould be on the pivot bracket side.16. While lifting the tailgate, fold the link assembly in the upwarddirection. Align the oblong hole in the link assembly with the pinon the upper bracket bolted to the bedside. Slide the linkassembly on the pin. Lower the tailgate to the open position.17. Raise the tailgate again. This time make sure that the linkassembly folds downward. Check that the tailgate will closecompletely without binding.18. Removal of the chains has left a few holes to be welded closed.The kit provides two 7/8” diameter pieces of metal for the holesin the bedsides. Grind the paint from around these areas. Fit thepatches into the depressions and hold in place with a magnet.Tack weld these pieces in place. Continue welding until the areais completely filled with weld. Do this slowly and move frombedside to bedside to avoid too much heat build up.19. If a full tailgate cover is to be used, weld the bolts holding the link assembly to the tailgate ends inplace. This will allow you to still remove the link assemblies if needed after the full tailgate cover hasbeen installed.©Copyright 2007 MAR-K Quality Parts L.L.C. All rights reserved.Another Outstanding Part Manufactured in Oklahoma City, USA by6625 WEST WILSHIRE BLVD. OKLAHOMA CITY, OK 73132 (405)721-7945 FAX (405) 721-8906www.mar-k.com