Tailgate Link Assembly Instructions - Mar-K
Tailgate Link Assembly Instructions - Mar-K
Tailgate Link Assembly Instructions - Mar-K

Create successful ePaper yourself
Turn your PDF publications into a flip-book with our unique Google optimized e-Paper software.
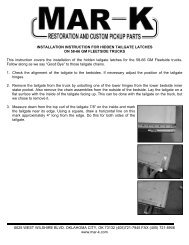
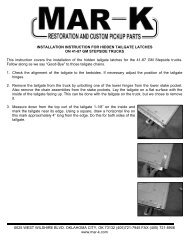
INSTALLATION INSTRUCTIONS FOR TAILGATE CHECK LINK STRAPS<br />
FOR 54-87 GM STEPSIDE TRUCKS<br />
1. Assemble the bed and make sure the box is square. Measure the distance between the bedsides at the<br />
floor level and the top. This width should be 50”. Also measure cross wise from one front corner to the<br />
opposite rear corner in both directions. These measurements should be within 1/16” of each other.<br />
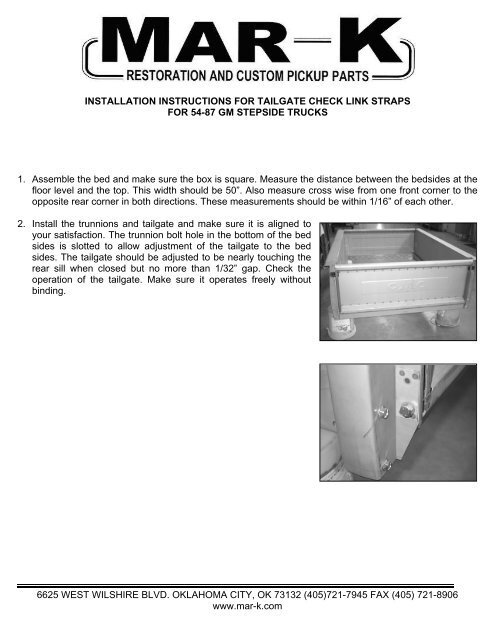
2. Install the trunnions and tailgate and make sure it is aligned to<br />
your satisfaction. The trunnion bolt hole in the bottom of the bed<br />
sides is slotted to allow adjustment of the tailgate to the bed<br />
sides. The tailgate should be adjusted to be nearly touching the<br />
rear sill when closed but no more than 1/32” gap. Check the<br />
operation of the tailgate. Make sure it operates freely without<br />
binding.<br />
6625 WEST WILSHIRE BLVD. OKLAHOMA CITY, OK 73132 (405)721-7945 FAX (405) 721-8906<br />
www.mar-k.com
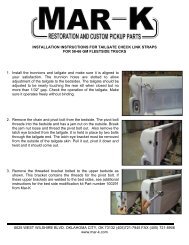
3. Remove the tailgate and the trunnions from both bedsides.<br />
Use the template provided to locate the hole for the upper<br />
fixed pivot pin for the link straps. Bolt the template to the<br />
trunnion hole on the inside of one bedside with the hardware<br />
provided. Place the two washers between the template and<br />
the bedside. The notched side of the template should be<br />
facing the bedside. <strong>Mar</strong>k the bedside through the templates<br />
upper hole.<br />
4. Remove the template and center-punch this location. Drill a<br />
5/16” hole through the bedside at that location. Do this for<br />
both bedsides and deburr the drilled holes.<br />
6625 WEST WILSHIRE BLVD. OKLAHOMA CITY, OK 73132 (405)721-7945 FAX (405) 721-8906<br />
www.mar-k.com
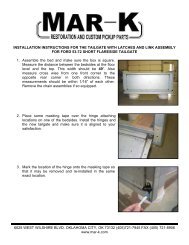
5. Install the fixed pivot pin into each of the 5/16 holes drilled in<br />
step 4. Use the 5/16” diameter button head screw to attach<br />
each pivot pin. The screw head is on the outside of the<br />
bedside and the fixed pivot pin is on the inside of the bedside.<br />
Place the stainless washer over the fixed pivot pin before<br />
bolting it to the bedside. Tighten the fixed pivot pin so that its<br />
flat edges are horizontal as shown in the photo.<br />
6. This step and the next 2 steps prepare the tailgate for the<br />
linkage by cutting away part of the tailgate end so the linkage<br />
can fold into the tailgate end when the tailgate is closed. The<br />
area to be cut away is on the front edge of the tailgate end<br />
toward the cab, on each end. <strong>Mar</strong>k the area to be removed<br />
as shown in the photo using the template as a guide. Align<br />
the template to the outer edge of the tailgate end and skin so<br />
the lower end of the cut out area begins 3-11/16" up from the<br />
bottom of the tailgate and goes up 14-15/16" from the bottom<br />
of the tailgate. <strong>Mar</strong>k the area to be removed with a scribe or<br />
permanent marker.<br />
6625 WEST WILSHIRE BLVD. OKLAHOMA CITY, OK 73132 (405)721-7945 FAX (405) 721-8906<br />
www.mar-k.com
7. Cut away the marked area as measured in Step 6. Use a<br />
cutoff wheel or a jig saw with a short blade. Use care at the<br />
upper part of the cut to prevent damaging the tailgate latch<br />
ear.<br />
8. The cuts done in step 7 above may have removed some of the spot welds holding the skin to the<br />
tailgate end. If so, the skin should be re-welded to the tailgate end in those areas and the welds ground<br />
down smooth. Do not weld a continuous bead, but place good spot welds on the joint about every 2"<br />
apart. Be sure the skin is clamped to the tailgate end in the areas to be welded.<br />
9. Re-install the tailgate, aligning it as in step 2.<br />
10. Open the tailgate so that it is in the horizontal position. Use a board or other straight object extended<br />
out from the bed floor to be sure the tailgate is parallel to the bed floor. This is critical, as the linkage<br />
may not fold correctly into the tailgate end if the tailgate is not held parallel to the bed floor for this step.<br />
11. With the tailgate secured in the horizontal position parallel to<br />
the bed floor, install a link on each fixed pivot pin and place the<br />
pivot bracket into the tailgate end as shown. Apply slight<br />
tension on the linkage so it is straight and clamp the pivot<br />
bracket to the tailgate end as shown.<br />
6625 WEST WILSHIRE BLVD. OKLAHOMA CITY, OK 73132 (405)721-7945 FAX (405) 721-8906<br />
www.mar-k.com
12. Mount the pivot bracket against the sheet metal angled brace<br />
spot-welded inside the tailgate end. The pivot bracket should<br />
be parallel to the tailgate end. Do this on both ends of the<br />
tailgate. Both link assemblies should now be clamped in the<br />
position they will be installed on the tailgate end.<br />
13. Using a 1/4" drill, drill through the holes of the pivot bracket into<br />
the tailgate end. Do not drill through, but drill deep enough to<br />
effectively mark the hole locations on the tailgate end. Use<br />
care to keep the drill square so that the holes in the pivot<br />
bracket are not damaged by the drill.<br />
14. Remove the clamps securing the link to the tailgate and<br />
remove the link assembly from each end of the tailgate. Use a<br />
1/4" drill to drill holes in the tailgate end that were marked in<br />
step 13 above. These holes are exactly 2-1/16 inches apart.<br />
Deburr the holes.<br />
15. Install the link assembly on each end of the tailgate. Use the<br />
1/4" button head screws through the holes drilled in step 14<br />
above to attach the pivot brackets to the tailgate ends. Tighten<br />
the screws. If you are installing <strong>Mar</strong>-K’s stainless link<br />
assemblies, you must place the button head screws on the side<br />
of the tailgate end with the pivot bracket of the link assembly.<br />
6625 WEST WILSHIRE BLVD. OKLAHOMA CITY, OK 73132 (405)721-7945 FAX (405) 721-8906<br />
www.mar-k.com
16. Remove the board used to hold the tailgate parallel to the bed<br />
floor in step 10 above. Carefully raise the tailgate to the closed<br />
position. The links should fold smoothly into the tailgate end as<br />
the tailgate is raised. The tailgate should move to the fully<br />
closed position without causing any binding in the link<br />
assembly.<br />
This completes the installation of the check link straps. The<br />
tailgate may now be removed to detail and paint the areas cut<br />
away. When assembling the system for the final time, use thread<br />
locking compound to help prevent the screws from coming loose.<br />
If a full tailgate cover is to be used, weld the bolts holding the link assembly to the tailgate ends in place.<br />
This will allow you to still remove the link assemblies if needed after the full tailgate cover has been<br />
installed.<br />
©Copyright 2007 MAR-K Quality Parts L.L.C. All rights reserved.<br />
Another Outstanding Part Manufactured in Oklahoma City, USA by<br />
6625 WEST WILSHIRE BLVD. OKLAHOMA CITY, OK 73132 (405)721-7945 FAX (405) 721-8906<br />
www.mar-k.com