
You also want an ePaper? Increase the reach of your titles
YUMPU automatically turns print PDFs into web optimized ePapers that Google loves.
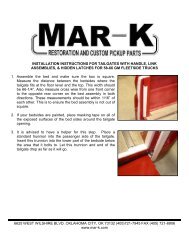
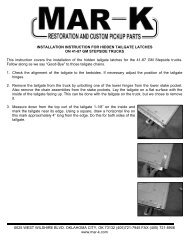
INSTALLATION INSTRUCTION FOR HIDDEN TAILGATE LATCHESON 58-66 GM FLEETSIDE TRUCKSThis instruction covers the installation of the hidden tailgate latches for the 58-66 GM Fleetside trucks.Follow along as we say “Good Bye” to those tailgate chains.1. Check the alignment of the tailgate to the bedsides. If necessary adjust the position of the tailgatehinges.2. Remove the tailgate from the truck by unbolting one of the lower hinges from the lower bedside innerstake pocket. Also remove the chain assemblies from the outside of the bedside. Lay the tailgate on aflat surface with the inside of the tailgate facing up. This can be done with the tailgate on the truck, butwe chose to remove it.3. Measure down from the top curl of the tailgate 7/8” on the inside and markthe tailgate near its edge. Using a square, draw a horizontal line on thismark approximately 4” long from the edge. Do this for both sides of thetailgate.6625 WEST WILSHIRE BLVD. OKLAHOMA CITY, OK 73132 (405)721-7945 FAX (405) 721-8906www.mar-k.com
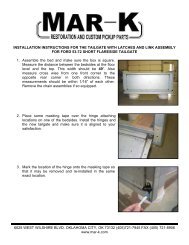
6. Disassemble the hidden latches by removing the aluminum knobs and themounting screws. Slide the plungers and the springs out of the latchsleeves. Remove the #10-32 button-head screws from the latch sleeves.7. You need to mark and drill a 5/8” diameter hole in the tailgate ends for thehidden latch sleeve to slide into. This hole should be in line with the markmade on the tailgate skin and the latch sleeve should fit tight against thetailgate end. <strong>Mar</strong>k the tailgate end 5/16” down from the surface where thelatch sleeve will fit. When drilling, start with a smaller bit and work up to the5/8” drill. You want to have a nice round hole for the latch sleeve. Whenfinishing the hole with the 5/8” drill, it will be rubbing on the tailgate endmaterial that is welded to the tailgate skin. This will keep the latch flatagainst the inside wall of the tailgate. You may find it necessary to use around file after drilling the 5/8” hole to fit the latch sleeve. You will want tokeep this a tight fit to keep the latch from moving around.8. Slide the latch sleeve into the tailgate through the 5/8” hole until the smallthreaded hole lines up with the small hole in the tailgate. Thread the 10-32button-head screw through the tailgate into the latch sleeve and tightenwith the supplied 1/8” hex wrench. Check the alignment of the slot in thetailgate with the slot in the latch sleeve.6625 WEST WILSHIRE BLVD. OKLAHOMA CITY, OK 73132 (405)721-7945 FAX (405) 721-8906www.mar-k.com
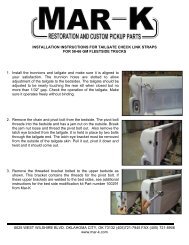
9. Install the spring on the plunger and slide it into the latch sleeve. A liberalamount of your favorite grease on the plunger is recommended beforeassembly.10. Push in on the plunger and position the aluminum knob with the stainlessshoulder screw. Thread the screw into the plunger and tighten the screwwith the 1/8” hex wrench.11. Test the movement of the plunger by sliding it back and fourth. Also pullthe plunger all the way back and twist the knob to lock it in the retractedposition. If the knob rubs on the tailgate or will not retract far enough tolock, you will need to enlarge the slotted hole in the tailgate with a file untilfull movement is obtained.12. Remove the two bolts that hold the pivot bolt brackets to the upper portionof the bedsides. If yours are welded in, see the note below. It is notnecessary to remove the brackets from the bedsides. Place the uppergrommet brackets on top of these original brackets and re-install the bolts.Align the grommet brackets to the bedside outer profile and tighten thesebolts. Due to the shape of these brackets, there is a left and right side andthey will not fit if placed on the opposite bedside.Note: If the brackets are welded to the bed side from the factory, You mustdrill and tap the original bracket to accept the grommet brackets. Place thegrommet brackets into the upper corner of the bed sides. <strong>Mar</strong>k thelocations of the holes through the brackets. Drill and tap these locations to5/16”-18. If you are not planning on using <strong>Mar</strong>-K’s hidden link assemblies,you may also weld these grommet brackets in place.6625 WEST WILSHIRE BLVD. OKLAHOMA CITY, OK 73132 (405)721-7945 FAX (405) 721-8906www.mar-k.com
13. Once the latches are installed on both ends of the tailgate, re-install thetailgate on the truck. Make sure both latches are retracted and shut thetailgate. Hold the tailgate tight against the bedsides and release thelatches by twisting the knobs. The latches have a pointed tip that will markthe bedsides for the rubber grommet to be installed.14. Lower the tailgate and support it in the open position. Each of the upper brackets should now have amark from the latch plunger. Remove the brackets and drill a 5/8” diameter hole. Again, it is better tostart with a small drill and work up to the 5/8” diameter to ensure a more uniform round hole. If you haveaccess to a step drill, these tend to make perfectly round holes in sheet metal.15. Insert the supplied rubber grommets into the brackets and then re-attachthem to the bedsides.16. Close the tailgate and release the latches into the grommets.Another Outstanding Part Manufactured in Oklahoma City, USA by©Copyright 2007 MAR-K Quality Parts L.L.C. All rights reserved.6625 WEST WILSHIRE BLVD. OKLAHOMA CITY, OK 73132 (405)721-7945 FAX (405) 721-8906www.mar-k.com