Somerford Mini Ltd. Ordering Parts Using This Catalogue
Somerford Mini Ltd. Ordering Parts Using This Catalogue
Somerford Mini Ltd. Ordering Parts Using This Catalogue

You also want an ePaper? Increase the reach of your titles
YUMPU automatically turns print PDFs into web optimized ePapers that Google loves.
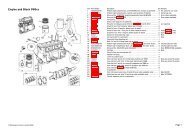
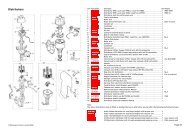
External Engine - 970, 1071 and 1275cc (Cooper S)<br />
No. Part No. Description Qty. Remarks No. Part No. Description Qty. Remarks<br />
External Engine Components (continued)<br />
One of the more widely known characteristics of the Cooper S engine block is the use of studs rather<br />
than screws or bolts to secure the main bearing caps. <strong>This</strong> is only partly true, however - the earliest<br />
variant of the Cooper S engine, the 1071cc unit, used screws (which are not the same as those used in<br />
small bore <strong>Mini</strong> engines).<br />
17 AEG156 SCREW, main bearing cap to block 6 1071cc .<br />
18 AEG205 LOCK TAB, main bearing cap screw 6 1071cc .<br />
19 12G478 STUD, main bearing cap to block, 4 970 and 1275cc.<br />
front and rear<br />
20 AEG323 STUD, main bearing cap to block, centre 2 970 and 1275cc.<br />
21 AEG417 NUT, main bearing cap 6 970 and 1275cc.<br />
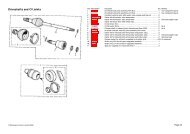
22 BHM1210 LINER SET, camshaft bearings 1<br />
Cam bearings are simply pressed into the cylinder block. There is no positive location, their security<br />
relying on the interference fit between the bearings and the bores in the block. A good tip when<br />
installing cam bearings is to use a little engineering adhesive like Loctite to further hold them in<br />
position, guarding against migration of a bearing along the camshaft (an immediate symptom of which<br />
would be a jammed tappet, resulting in a valve stuck open).<br />
It is absolutely vital to ensure that the bearing oil holes are aligned with (and remain aligned with) the<br />
oil holes in the cylinder block during and after fitting. It therefore follows that a controlled method of<br />
pressing in the bearings is necessary and this may be achieved most effectively by using a proper cam<br />
bearing replacement tool and the correct adaptors - a local engine workshop will do the job for you if<br />
you can’t beg, borrow or steal the tool to do it yourself. Lastly,once installed, check the finished bore<br />
size to ensure that the camshaft will be able to rotate freely.<br />
23 3H576 TAP, cooling system drain 1 Standard fitment 1963-69.<br />
24 2K4954B WASHER, fibre, drain tap A/R Use with drain tap.<br />
<strong>This</strong> washer not only seals the tap to the block, but also is intended (using whatever quantity is<br />
necessary) to shim the tap so that when tightly screwed to the block the spout faces downwards.<br />
25 53K2853 PLUG, cooling system drain 1 Standard fitment 1969 on.<br />
Alternative to drain tap.<br />
26 6K638B WASHER, sealing plug 1 Use with drain plug.<br />
27 2A612 HOUSING, distributor 1 1963-65; does not require O ring.<br />
28 12A1136 HOUSING, distributor 1 1965 on; requires O ring.<br />
29 13H2792 O RING, housing 1 1965 on.<br />
The later 12A1136 distributor housing may be fitted in place of the earlier 2A612 housing, but only if a<br />
13H2792 O ring is fitted with it.<br />
30 SH604061 SCREW, housing to block 2<br />
31 LWZ404 WASHER, shakeproof 2<br />
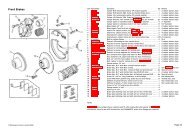
Engine Front Mounting Plate<br />
32 AEG161 PLATE, engine front mounting 1<br />
33 GUG705554GM GASKET, plate to block 1<br />
34 SH605051 SCREW, plate to block 2<br />
35 LWZ305 WASHER, locking 2<br />
36 AEA687 SCREW, plate to main bearing cap 2<br />
37 AHU2379 PLATE, camshaft locating 1<br />
38 SH604061 SCREW, plate to block 3<br />
39 WF600040 WASHER, shakeproof 3<br />
Timing Cover<br />
Several timing covers were fitted in the 1960s , some with timing pointers , some without, most with<br />
integral lo wer stiffeners , one without. All were superseded by 1970 by 12G2506, which includes a timing<br />
pointer and a strong integral lo wer stiffener and does not require the stiffener 12A666 listed below. The<br />
plain washers PWZ104 and PWZ105 also shown below replace the original elongated washers used at<br />
different times on the A Series engine until the 1980s.<br />
40 12G2506 COVER, front, timing 1 Includes oil seal.<br />
41 88G561 OIL SEAL, timing cover 1 Included in timing cover.<br />
42 12A666 STIFFENER, timing cover 1 Use on ear ly 1960s covers suffering<br />
from poor sealing.<br />
43 12A956 GASKET, timing cover 1<br />
44 SH604031 SCREW, timing cover to front mounting 6<br />
plate<br />
45 LWZ204 WASHER, locking 6<br />
46 PWZ104 WASHER, plain 6/3 Qty. reduced when 12A666 stiffener is<br />
present.<br />
47 SH605061 SCREW, timing cover to front mounting 4<br />
plate and block<br />
48 LWZ305 WASHER, locking 4<br />
49 PWZ105 WASHER, plain 4/3 Qty. reduced when 12A666 stiffener is<br />
present.<br />
Tappet Chest Covers<br />
50 - COVER, tappet chest,LH, with 1 Convex cover; for open circuit<br />
breather pipe breathing (1963-64).<br />
51 - COVER, tappet chest,LH, with 1 Concave replacement cover; for open<br />
breather pipe circuit breathing (1963-64).<br />
52 12G577 COVER, tappet chest,LH, with 1 Convex cover; for closed circuit<br />
oil separator breathing (1964-66).<br />
53 12A1212 COVER, tappet chest,LH, with 1 Concave cover; for closed circuit<br />
oil separator<br />
breathing (1966 on).<br />
There are too many varieties of LH tappet chest cover for open circuit engine breathing models to list<br />
here. However they are all detailed, along with all of the other components of each type of breathing<br />
system,in the ‘Emission Controls - Engine Breathing’ sections in the Fuel and Exhaust Systems area of the<br />
<strong>Somerford</strong> <strong>Mini</strong> catalogue.<br />
54 12H941 COVER, tappet chest,RH 1 Convex cover, 1963-66.<br />
55 12A1386 COVER, tappet chest,RH 1 Concave cover, 1966 on.<br />
56 12A1139 GASKET, cover, cork 1 For convex type cover.<br />
57 BH605151 BOLT, cover to block 1 For convex type cover.<br />
58 2K4458 WASHER, bolt 1 For convex type cover.<br />
59 GUG705505GM GASKET, cover, rubber 1 For concave type cover.<br />
60 SH605091 SCREW, cover to block 1 For concave type cover.<br />
61 12A1177 WASHER, cup 1 For concave type cover.<br />
62 12A1176 BUSH, r ubber 1 For concave type cover.<br />
63 MRC1980A BUSH, r ubber 1 Later design; replaces<br />
12A1176 and 12A1177.<br />
Oil System Components<br />
64 2K4994 PLUG, priming 1<br />
65 6K464 WASHER, sealing 1<br />
66 12H865 PLUNGER, oil pressure relief valve 1 Standard fitment.<br />
67 BLS916 BALL, oil pressure relief valve 1 Alternative; see note<br />
below.<br />
The transverse A Series engine is quite susceptible to a sticking oil pressure relief valve because its<br />
lubricating oil is shared with the gearbox. The oil pressure relief valve comes before the oil filter in the<br />
lubricating system; consequently dirty, unfiltered oil is drawn by the oil pump straight from the gearbox<br />
into the relief valve, bringing with it fine metallic particles from the gearbox (incidentally, some metallic<br />
particles are not removed by the filter anyway and make their way into the rest of the engine: never<br />
skimp on <strong>Mini</strong> oil changes!). Almost invariably, if the valve is going to stick it will do so in the wide<br />
open position when the oil is cold and thick. As the oil warms it gets thinner ; because the valve is still<br />
stuck wide open the oil pressure drops alarmingly - the oil pump can’t keep up with thin oil and a wide<br />
open valve - and the engine ceases to be lubricated correctly.<br />
The BLS916 ball listed above may be used in place of the standard fitment plunger to guard against a<br />
sticking relief valve. It must, however, be used in conjunction with the Cooper/Cooper S relief valve spring<br />
AEA536,not with the longer (but weaker) spring used in non-Cooper engines .<br />
While we’re on the subject of oil pressure, if you are preparing a fast road or competition engine you can<br />
of course increase the oil pressure by fitting an adjustable relief valve (which <strong>Somerford</strong> <strong>Mini</strong> are not<br />
particular ly in favour of, as it happens, because in our experience many seem prone to leakage) or<br />
inserting suitable packing behind the relief valve spring.<br />
Don’t get carried away, though. Doubling the running oil pressure - A Series engines are set up when new<br />
to run between 40 and 50 lb/sq. in. approximately when warm - will result in no more effective<br />
lubrication than a more moderate increase to about 60 lb/sq.in. What you’re likely to get by greatly<br />
increasing the oil pressure (if you remember Physics lessons at school) is an unacceptable increase in oil<br />
temperature and let’s face it, <strong>Mini</strong> engines are not the easiest to keep cool in the first place. In extreme<br />
cases the oil will lose its viscosity to the point where it ceases to function effectively - hardly the desired<br />
outcome from raising the oil pressure.<br />
68 AEA536 SPRING, oil pressure relief valve 1<br />
69 12A1851 CAP, threaded, relief valve 1<br />
70 6K431 WASHER, sealing 1<br />
71 2A797 HOUSING, oil pressure relief valve 1 Press-fit in cylinder block.<br />
Dipsticks and dipstick tubes are matched items. If your engine has a nylon dipstick tube (always called -<br />
and used as - a peashooter by wayward storesmen in dealers’ par ts departments!), a 12A116 dipstick<br />
should be fitted. A metal dipstick tube requires a 12A1263 dipstick.<br />
72 12A116 DIPSTICK, oil level 1 1963-66.<br />
12A1263 DIPSTICK, oil level 1 1966 on.<br />
73 AEC671 WASHER, sealing dipstick 1 1963-66.<br />
12A1262 WASHER, sealing dipstick 1 1966 on.<br />
74 12G107 TUBE, dipstick, nylon 1 1963-66.<br />
12A1261 TUBE, dipstick, metal 1 1966 on.<br />
Tel. 01249 721421 Fax. 01249 721316 www.somerford-mini.co.uk<br />
17