INSTALLATION INSTRUCTIONS 1997-1999 DODGE DAKOTA 2 ...
INSTALLATION INSTRUCTIONS 1997-1999 DODGE DAKOTA 2 ...
INSTALLATION INSTRUCTIONS 1997-1999 DODGE DAKOTA 2 ...
Create successful ePaper yourself
Turn your PDF publications into a flip-book with our unique Google optimized e-Paper software.
f. Install kit bracket (“L”-shaped) on radiator. Insert<br />
a kit bolt (1/4” x 1”) through a kit washer (1/4”<br />
SAE). From inside of fan shroud, insert kit bolt<br />
(1/4” x 1”) through 1/4” hole you drilled, a kit<br />
washer (1/4” SAE), and kit bracket (“L”-<br />
shaped). Install a kit nut (1/4” nylock) on kit bolt<br />
(1/4” x 1”).<br />
g. Check fan to fan shroud clearance. Tighten fan<br />
shroud fasteners.<br />
h. Drill a 1/4” hole in bottom center of fan shroud<br />
(to install kit wire loom). Secure wire harness to<br />
bottom of fan shroud with a kit wire loom, a kit<br />
bolt (1/4” x 1”), kit washers (1/4” SAE), and a kit<br />
nut (1/4” nylock).<br />
i. Use kit zip ties to secure wire harness to outside<br />
edges of fan shroud (possibly to core support).<br />
Be sure that wire harness cannot contact fan or<br />
any other moving parts.<br />
4. Manual transmission: Fan shroud<br />
a. Install four kit brackets (“L”-shaped) on radiator<br />
using four bolts that originally held fan shroud to<br />
radiator.<br />
b. Install fan shroud on studs of kit brackets. Install<br />
a kit washer (1/4” SAE) and kit nut (1/4” nylock)<br />
on each stud.<br />
c. Check fan to fan shroud clearance. Tighten fan<br />
shroud fasteners.<br />
K. Front of vehicle<br />
1. 2” kit: Front bumper<br />
a. Using original front bumper mounting hardware,<br />
install kit brackets (front bumper inner) on inside<br />
mounts. The “C” of kit bracket should be open to<br />
rear of vehicle. Center the kit brackets on each<br />
mount. Apply Loctite® to bolt threads. Tighten<br />
bolts.<br />
b. Remove outer support brackets from front<br />
bumper. (On each side of vehicle, two Torx head<br />
screws fasten brackets to bumper.) Separate<br />
two pieces of outer support brackets.<br />
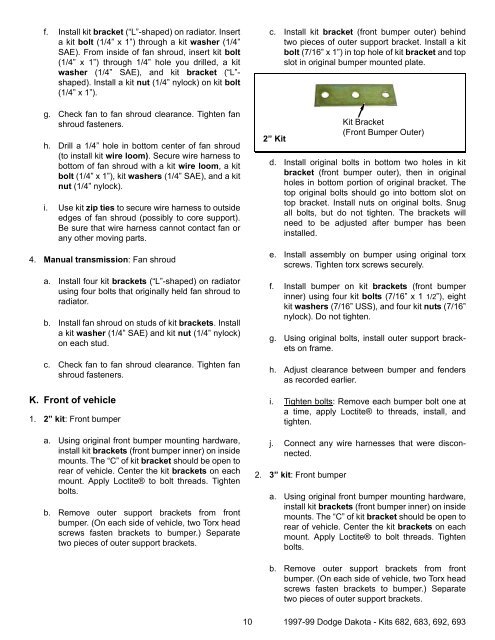
c. Install kit bracket (front bumper outer) behind<br />
two pieces of outer support bracket. Install a kit<br />
bolt (7/16” x 1”) in top hole of kit bracket and top<br />
slot in original bumper mounted plate.<br />
2” Kit<br />
d. Install original bolts in bottom two holes in kit<br />
bracket (front bumper outer), then in original<br />
holes in bottom portion of original bracket. The<br />
top original bolts should go into bottom slot on<br />
top bracket. Install nuts on original bolts. Snug<br />
all bolts, but do not tighten. The brackets will<br />
need to be adjusted after bumper has been<br />
installed.<br />
e. Install assembly on bumper using original torx<br />
screws. Tighten torx screws securely.<br />
f. Install bumper on kit brackets (front bumper<br />
inner) using four kit bolts (7/16” x 1 1/2”), eight<br />
kit washers (7/16” USS), and four kit nuts (7/16”<br />
nylock). Do not tighten.<br />
g. Using original bolts, install outer support brackets<br />
on frame.<br />
h. Adjust clearance between bumper and fenders<br />
as recorded earlier.<br />
i. Tighten bolts: Remove each bumper bolt one at<br />
a time, apply Loctite® to threads, install, and<br />
tighten.<br />
j. Connect any wire harnesses that were disconnected.<br />
2. 3” kit: Front bumper<br />
Kit Bracket<br />
(Front Bumper Outer)<br />
a. Using original front bumper mounting hardware,<br />
install kit brackets (front bumper inner) on inside<br />
mounts. The “C” of kit bracket should be open to<br />
rear of vehicle. Center the kit brackets on each<br />
mount. Apply Loctite® to bolt threads. Tighten<br />
bolts.<br />
b. Remove outer support brackets from front<br />
bumper. (On each side of vehicle, two Torx head<br />
screws fasten brackets to bumper.) Separate<br />
two pieces of outer support brackets.<br />
10 <strong>1997</strong>-99 Dodge Dakota - Kits 682, 683, 692, 693


