INSTALLATION INSTRUCTIONS 1997-1999 DODGE DAKOTA 2 ...
INSTALLATION INSTRUCTIONS 1997-1999 DODGE DAKOTA 2 ...
INSTALLATION INSTRUCTIONS 1997-1999 DODGE DAKOTA 2 ...

Create successful ePaper yourself
Turn your PDF publications into a flip-book with our unique Google optimized e-Paper software.
e. Install a kit washer (7/16” USS) and kit nut<br />
(7/16” nylock) on kit bolt.<br />
f. Apply Loctite® to threads of bolts that originally<br />
held bumper to frame. Install original bolts in forward<br />
two holes from inside of frame. Install original<br />
nuts.<br />
g. Adjust bumper to bed/tailgate clearance, then<br />
tighten all bumper mounting bolts.<br />
h. Connect wire connectors to license plate lights.<br />
D. Fuel filler<br />
1. Fuel filler and vent hoses<br />
a. Connect fuel filler hose and vent hose to fuel<br />
tank. (Ensure “quick connect” couplers lock into<br />
place. It may seem like hoses are being<br />
stretched, but there is enough slack.)<br />
E. Engine compartment<br />
1. Steering shaft<br />
a. Install kit steering extension on input shaft of<br />
steering rack (steering gearbox on 4WD vehicles).<br />
It should only go on one way.<br />
b. Install (DO NOT tighten) kit bolt (3/8” x 1 1/4”,<br />
socket head) in kit steering extension. Be sure<br />
kit bolt crosses recessed area of input shaft.<br />
This will prevent separation of kit steering<br />
extension from input shaft.<br />
c. Try to pull kit steering extension off of input<br />
shaft. If kit steering extension comes off, it has<br />
not been installed correctly. Reinstall it.<br />
F. Inside cab<br />
1. Manual transmission: Shift lever<br />
a. Place bottom portion of shift lever in a vise. Heat<br />
shift lever at the bend, then bend it forward<br />
about 1/2”.<br />
b. Install bottom portion of shift lever into transmission.<br />
Turn cover and lock it into place.<br />
c. Install upper portion of shift lever in lower portion<br />
of shift lever. Be sure boot is in place. Tighten<br />
securely. Install plastic cover.<br />
d. Check operation of shift lever. Be sure transmission<br />
engages fully in all gears.<br />
G. Engine compartment<br />
1. Automatic transmission: Shift cable<br />
a. Be sure shift cable is not interfering with anything<br />
in engine compartment. No further modifications<br />
should be required.<br />
H. Bench work<br />
NOTE<br />
A certified welder should perform all welding.<br />
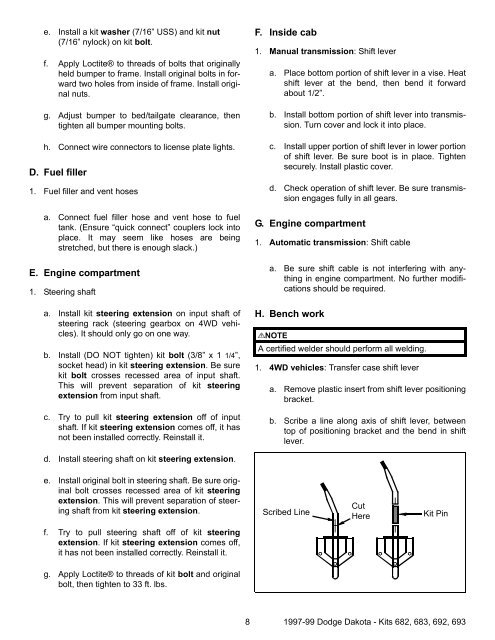
1. 4WD vehicles: Transfer case shift lever<br />
a. Remove plastic insert from shift lever positioning<br />
bracket.<br />
b. Scribe a line along axis of shift lever, between<br />
top of positioning bracket and the bend in shift<br />
lever.<br />
d. Install steering shaft on kit steering extension.<br />
e. Install original bolt in steering shaft. Be sure original<br />
bolt crosses recessed area of kit steering<br />
extension. This will prevent separation of steering<br />
shaft from kit steering extension.<br />
Scribed Line<br />
Cut<br />
Here<br />
Kit Pin<br />
f. Try to pull steering shaft off of kit steering<br />
extension. If kit steering extension comes off,<br />
it has not been installed correctly. Reinstall it.<br />
g. Apply Loctite® to threads of kit bolt and original<br />
bolt, then tighten to 33 ft. lbs.<br />
8 <strong>1997</strong>-99 Dodge Dakota - Kits 682, 683, 692, 693