Examples of Automation X-SEL Serial Communication 2 - IGAS
Examples of Automation X-SEL Serial Communication 2 - IGAS
Examples of Automation X-SEL Serial Communication 2 - IGAS
You also want an ePaper? Increase the reach of your titles
YUMPU automatically turns print PDFs into web optimized ePapers that Google loves.
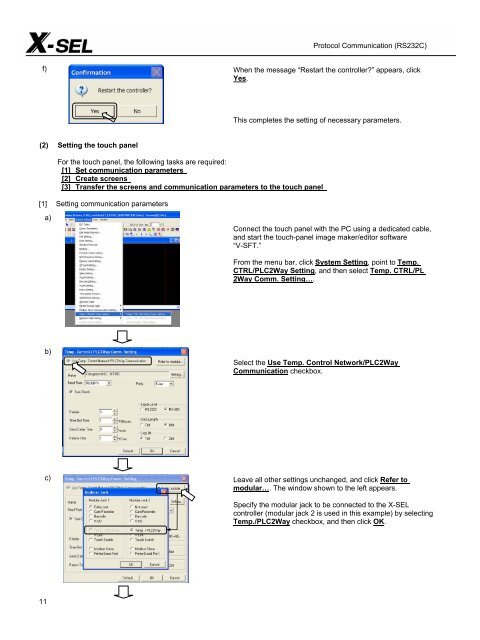
f)<br />
(2) Setting the touch panel<br />
11<br />
When the message “Restart the controller?” appears, click<br />
Yes.<br />
This completes the setting <strong>of</strong> necessary parameters.<br />
For the touch panel, the following tasks are required:<br />
[1] Set communication parameters<br />
[2] Create screens<br />
[3] Transfer the screens and communication parameters to the touch panel<br />
[1] Setting communication parameters<br />
a)<br />
b)<br />
c)<br />
Protocol <strong>Communication</strong> (RS232C)<br />
Connect the touch panel with the PC using a dedicated cable,<br />
and start the touch-panel image maker/editor s<strong>of</strong>tware<br />
“V-SFT.”<br />
From the menu bar, click System Setting, point to Temp.<br />
CTRL/PLC2Way Setting, and then select Temp. CTRL/PL<br />
2Way Comm. Setting….<br />
Select the Use Temp. Control Network/PLC2Way<br />
<strong>Communication</strong> checkbox.<br />
Leave all other settings unchanged, and click Refer to<br />
modular…. The window shown to the left appears.<br />
Specify the modular jack to be connected to the X-<strong>SEL</strong><br />
controller (modular jack 2 is used in this example) by selecting<br />
Temp./PLC2Way checkbox, and then click OK.


